
Enjoy powerful and complete editing of RAW files with a great variety of pro-level tools available in the new AfterShot Lab, now inside PaintShop Pro 2023. There is no need for extra applications or for running several editing processes in parallel, with time-saving and streamlined RAW image editing. In this tutorial, we’ll review the interface and tools of AfterShot Lab.
Download your FREE 30-day trial and make every shot your best shot with PaintShop Pro, your all-in-one photo editing and design software.
Download these FREE resources:
Written tutorial (PDF, 1.2 MB)
PaintShop Pro resources
Keyboard shortcuts (PDF, 173 KB)
PaintShop Pro User Guides
Partner and User websites
PaintShop Pro User Forum
Scrapbook Campus (Tips and tricks, workshops, master classes, and more)
Creation Cassel (Scripts, picture tubes, and other PaintShop Pro tools, plus weekly freebies)
PaintShop Pro Maniacs (Facebook group)
PaintShop Pro (Facebook group)
What’s new in PaintShop Pro
Photo corrections and enhancements
AfterShot Pro tutorials
Featured products
 PaintShop Pro 2023 Ultimate
 AI HDR Studio 3.0
 PaintShop Pro 2023
 Vision FX 2.0
Introduction to Corel AfterShot Lab
Corel AfterShot Lab is a RAW image editing application built into PaintShop Pro 2023, providing advanced features and tools for optimizing images in the RAW file format, without needing to run separate applications. AfterShot Lab is non-destructive, so your original image files remain untouched.
This tutorial will present an overview of what you can do with AfterShot Lab.
Click on any of the images below to view full-size.
Opening RAW files
We’re starting in the Edit tab of the PaintShop Pro Complete workspace, though AfterShot Lab can be launched from all workspaces in the following ways:
- Use File > Open to find one or more images in the RAW file format.
- Drag one or more RAW files from their folder directly into the PaintShop Pro workspace.
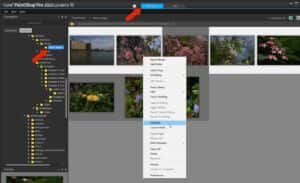
- Use the Organizer (Shift + F9), available in the Complete and Essentials workspaces, to open files.
The Complete and Essentials workspaces also have a Manage tab. Use the Navigation pane to browse to the folder with your RAW images. Select one or more images in the workspace, right-click on a selected image, and choose Edit RAW.
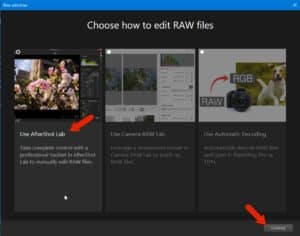
With any of these file-opening methods, you’ll be asked how you want to edit RAW files. Choose Use AfterShot Lab and click Continue.
This opens AfterShot Lab in a separate window.
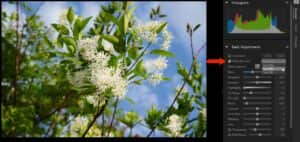
The AfterShot Lab interface
The selected images are displayed in the tray below the Preview area, and the preview area shows the image selected in the tray.
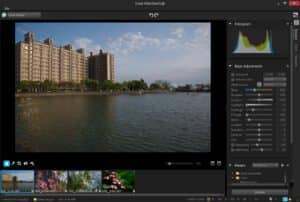
Toolbar icons are below and to the left of the preview area, for common tools such as Pan, ClickWhite, Crop, Straightening, and Red Eye Removal. To the right of the toolbar are Zoom controls, and above the preview are Rotate icons.
To the right of the preview area is the Tools panel, which displays image metadata, as well as tabs for Standard and Detail tools.
The Standard tools panel
The Standard tab features Basic Adjustments and Presets, with the most popular adjustments at the top.
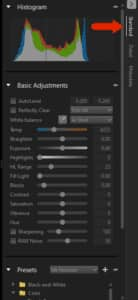
For a quick enhancement, AutoLevel examines the tonal range of the image, and sets the black and white points so that a fixed percentage of the image will be pure black and pure white. The two fields to the right are where you can set the clipping points for black and white, as a percentage of the total image.

Perfectly Clear is a simple way to optimize lighting of each pixel while maintaining true color with no clipping. This can be used for removing abnormal tint, restoring faded photos, and can improve contrast and sharpening. The three settings here are Tint Max, which applies the full range of tint correction, Tint Min which applies partial tint correction, and Tint Off if you want color preserved throughout.
There are also several options for White Balance, which represent warmth characteristics of different light sources, such as Florescent, Cloudy, or Flash. The As Shot setting removes any White Balance adjustments.
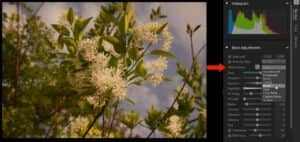
White Balance also has a ClickWhite option, in which you can use the eyedropper to select a pixel from a neutral area, which adjusts the rest of the pixels accordingly.
There are also several adjustment sliders, such as Temperature and Contrast.
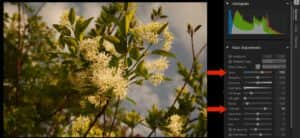
Double-clicking a slider resets it, and you can use the Reset All button at the bottom to reset all adjustments at once.
How to adjust photos with presets
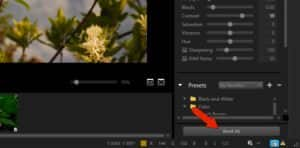
Below the Basic Adjustments are several Presets to try out, such as Bluer Skies or Cross Processing.

You can start with a preset, then change some of the basic adjustments, such as adding Perfectly Clear and increasing Saturation and Vibrance.
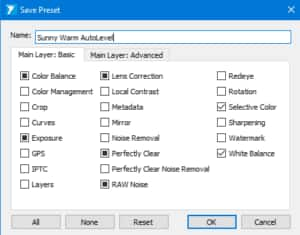
To save your current settings to use for other images, click the Manage button under Presets.

You can use an existing preset folder or create a new folder by clicking the Add Folder icon at the bottom. Adding a preset is done by clicking the Add icon at the top of the Presets pane.

In the Save Preset window, the current settings are checked. Assign a preset name and click OK.
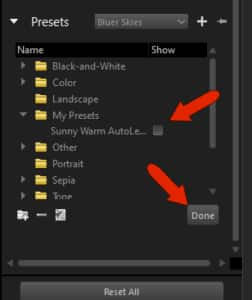
In the Preset pane, move your new preset into a folder, then click Done.
The Detail panel
The Detail panel has controls for specific types of photo improvements.
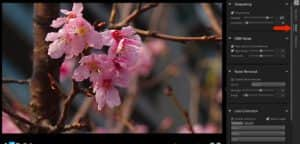
- Sharpening: Control how soft or sharp the details are, by adjusting the amount and sensitivity.
- RAW Noise and Noise Removal: Different methods of noise reduction
- Lens Correction: Options to fix lens distortion.
- At the bottom of this tab are options to Mirror and Invert the image.
The Metadata panel
Finally, the Metadata panel displays data about the image itself.
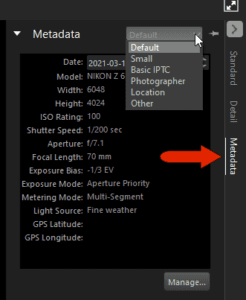
The Default metadata includes date shot, camera model and settings, light source, etc. Switching to Basic IPTC opens social-media related, editable fields for headline and caption, location, creator, and copyright details. Photographer and Location fields can also be edited.
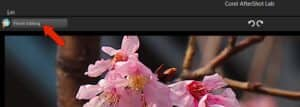
When finished in AfterShot Lab, click Finish Editing.
This brings you back to PaintShop Pro, where the edited images are in the Edit workspace. These are copies of the original images; the original RAW images have not been changed. You can continue editing images in PaintShop Pro and save to any format you like.
Download your FREE 30-day trial and make every shot your best shot with PaintShop Pro, your all-in-one photo editing and design software.
