
Learn how to create, save and share your own custom HDR presets with this quick PaintShop Pro tutorial. If you’re not already familiar with the HDR lab, this will show you how to adjust the various settings (such as vibrancy, contrast, shadows, etc.) to your preference. Once you have created just the right HDR effect for your photo, you can save those settings as a Preset file that will be added to the PaintShop Pro HDR Preset Library.
Download your FREE 30-day trial and make every shot your best shot with PaintShop Pro 2023, your all-in-one photo editing and design software.
Download these free resources:
Written tutorial (PDF, 295 KB)
PaintShop Pro resources
Keyboard shortcuts (PDF, 173 KB)
PaintShop Pro User Guide (PDF, 25.4 MB)
What’s New in PaintShop Pro
HDR Photo Editing
Featured products
 PaintShop Pro 2023 Ultimate
 AI HDR Studio 3.0
 PaintShop Pro 2023
 Vision FX
Creating HDR Presets in PaintShop Pro
Opening the HDR Lab
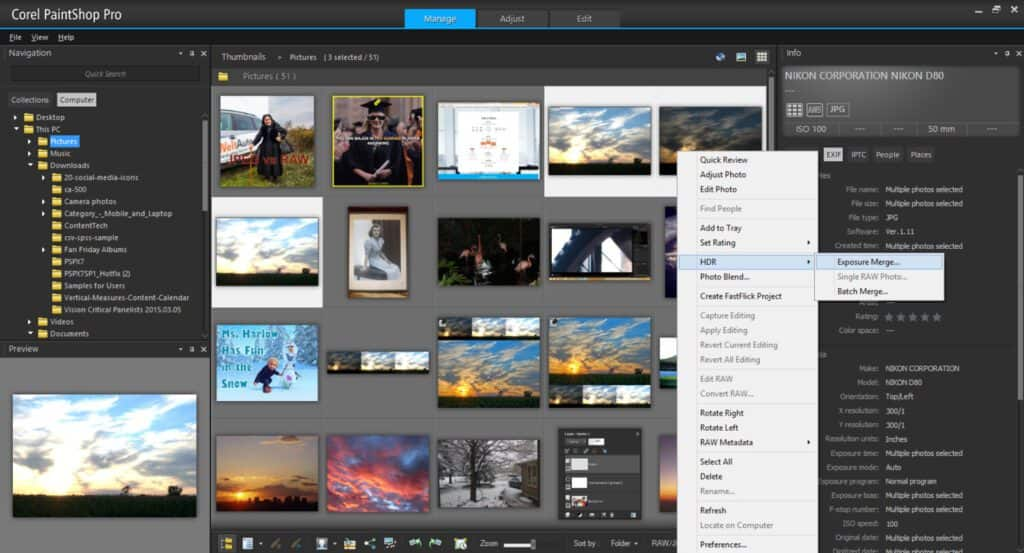
With two or more photos selected (the same photo taken at varying exposures) from within the Manage tab, right-click the selected images and choose HDR > Exposure Merge from the context menu. This will open up the HDR Lab. Remember, the HDR technique can be used on all kinds of photos but usually works best when applied to high-contrast photos, such as landscape photography.
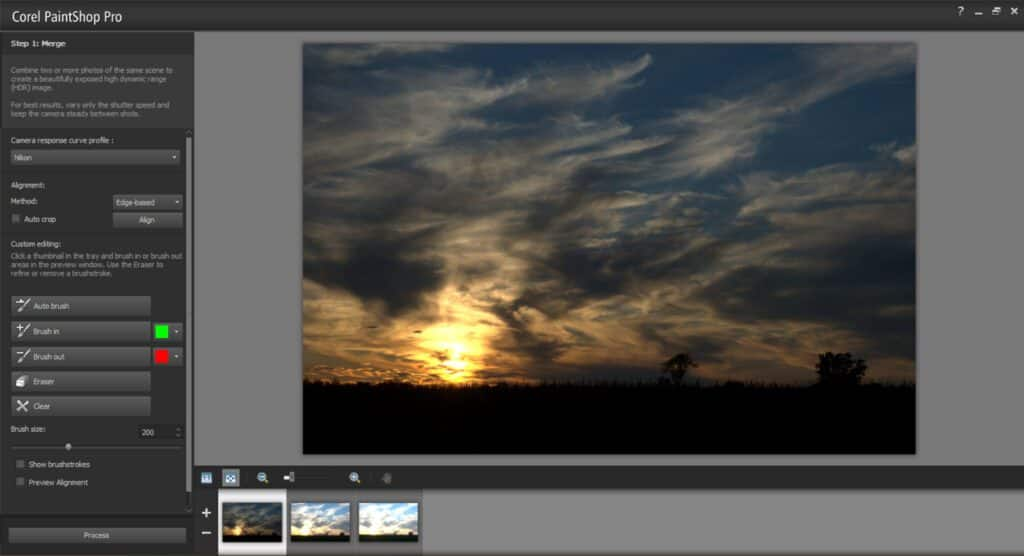
From within this module, creating your HDR preset is a quick and easy process. The first window in front of you merges the various photos you’ve selected, and you can brush in or brush out areas of the final merge. This, however, is not an integral part of creating an HDR preset, so we’ll skip over this section. Go ahead and click Process at the bottom of the screen to merge your photos and move on to the next step.
Creating Your Own HDR Preset
Now in front of you is the HDR Adjustments window. In the first pane in the window on the left are a handful of HDR presets. Below this, options and sliders to adjust White Balance, Temperature, Tint, Contrast, Highlights, Midtones, Shadows, and Vibrancy. You’ll also see a drop-down menu to control the Natural detail (with sliders for Local highlights, Local midtones and Local shadows) and Creative detail (where you can adjust the Strength and Blocks).
To create your own preset, you can start from scratch or use one of the presets as a starting point (like in the example below). Then, to make it your own, simply move the various sliders left or right to adjust the settings and create your own unique HDR effect.
Saving Your HDR Preset
Once you’ve found a look you like, it’s time to save your preset and give it a name. To save the adjustments you’ve made, just click the small disk icon above the library of presets. After clicking, a pop-up box will appear where you can give your HDR preset a name. Click OK and your newly created preset will now appear in the library on the left.
Download your FREE 30-day trial and make every shot your best shot with PaintShop Pro 2023, your all-in-one photo editing and design software.
Turn your JPEG Photos into HDR Images
How to Create an HDR Effect

Reader Interactions