
Making adjustments to your video footage will allow you to perfect your projects. This tutorial will show you how to use different tools in VideoStudio to improve your videos quality.
You will learn how to:
- Access the video options panel.
- Adjust and reset color options.
- Adjust video speed, length, and direction for playback.
- Fade video in and out.
- Split audio from video.
Thanks for watching! We hope you found this tutorial helpful and we would love to hear your feedback in the Comments section at the bottom of the page. You will find a written version of this tutorial below, and a printable PDF copy to download on the Download Resources tab above.
Download a FREE 30-day trial and turn your best moments and life experiences into unique movies with this easy and fun video editor packed with intuitive tools and creative effects.
What’s New in VideoStudio
Color Effects and Corrections
Featured products
 VideoStudio Pro 2023
 Studio Backlot Membership
 VideoStudio Ultimate 2023
 Vision FX 2.0
What you will learn:
- Accessing the video options panel
- Adjusting and resetting the color options
- Adjusting video speed, length, and direction of payback
- Fading video in or out
- Splitting audio from video
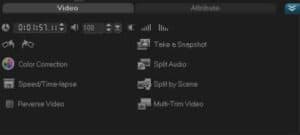
The Options panel
The most common video adjustments can be made in the Options panel, where you can make changes to color levels, hue and saturation, white balance, video speed, and
orientation.
Accessing the Options panel
Do any of the following in the Edit Step panel:
Click the Open Options Panel button
Double-click a video clip.
Right-click a video clip, and choose Open Options Panel.
Adjusting colour options
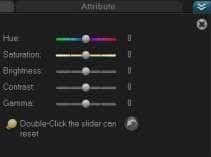
Clicking Color Correction gives you access to a range of settings for easily adjusting the hue, saturation, brightness, contrast and gamma. If you dont like an adjustment, youcan undo all changes or simply reset a single slider with a double-click.
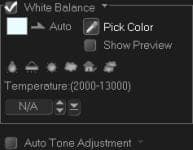
Checking the White Balance option box gives you access to the color-temperature controls. VideoStudio X4 also has a tool for automatically adjusting the video color tone. These features might require a little experimentation before your video clip looks the way you want.
Adjusting video speed, length and direction
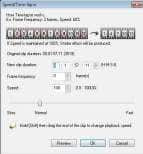
Clicking the Speed/Time-lapse button gives you access to features that allow you to speed up or slow down a video. In the Speed/Time-lapse dialog box, you can specify a clips running time, determine how many frames per second to remove, or adjust clip speed simply by moving the Speed slider. Any changes you make with the Speed slider are automatically updated in other Speed/Time-lapse controls, and any changes you make to any of the controls is reflected in the Speed slider.
Reversing your video
Checking the Reverse Video option box plays a clip backwards. If a video contains audio, its a good idea to split the audio track from the clip before reversing it.
Fading audio in and out
You can create smooth transitions by clicking the Fade In or Fade Out buttons to have background music start and end gradually.
Splitting audio
You can separate an audio track from a video clip by clicking the Split Audio button. This allows you to manipulate the audio totally independent of the video.
There are more controls on the Options panel, such as Multi Trim and Split by Scene, that are covered in separate tutorials.
Download a FREE 30-day trial and turn your best moments and life experiences into unique movies with this easy and fun video editor packed with intuitive tools and creative effects.
