
Make everyone in your video look their very best with new Face Effects introduced in VideoStudio 2022! Easily brighten or smooth skin with simple controls, and adjust face width and even eye size to fine-tune facial features. Play with these super popular editing tools and adjust the levels manually depending on how much impact you’re looking to create. Aside from beautifying and polishing lifestyle videos, this can be a handy tool for creating glam Instagram and TikTok videos or even goofy clips for friends and family with intentionally oversized or downsized features.
Thanks for watching! We hope you found this tutorial helpful. You will find a written version of this tutorial below, and a printable PDF copy to download on the Download Resources tab above.
Download a FREE 30-day trial and turn your best moments and life experiences into unique movies with this easy and fun video editor packed with intuitive tools and creative effects.
Download these free resources:
Written Tutorial (PDF, 482 KB)
VideoStudio User Guides and Help files
For VideoStudio X9 to 2023, languages include English, Deutsch, Français, Italiano, Nederlands, 简体中文, 繁體中文, 日本語
What’s new in VideoStudio
Effects, filters, and transitions in VideoStudio
Color effects and corrections in VideoStudio
Featured products
 VideoStudio Pro 2023
 Studio Backlot Membership
 VideoStudio Ultimate 2023
 Vision FX 2.0
How to add Face Effects to video clips
In this tutorial, you’ll learn how to use the new Face Effects feature introduced in VideoStudio 2022. You can make subtle adjustments to finetune your videos by adding the skin smoothing effect or adjusting the brightness or skin tone.
You can also adjust the eye size and face width of your subjects to create a dramatic or comical effect and have some fun with your videos!
In the Library, click the Media button. Upload the media that you want to add effects to by right-clicking and selecting Insert Media Files. Then drag your video clip onto the Video track on the timeline.
How to make subtle adjustments to enhance appearance
To access the Face Effects tab, double-click on the clip on your timeline. This will open the Options panel. Click on the Face Effects tab.
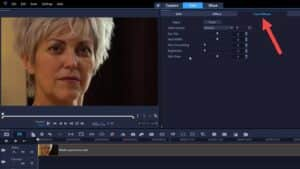
There are several different features you can adjust, including Eye Size, Face Width, Skin Smoothing, Brightness, and Skin Tone.
To make subtle adjustments to improve the appearance of your subject, gradually adjust the Skin Smoothing, Brightness and/or Skin Tone sliders.

- Skin Smoothing: Drag the slider to the right to smooth variations in the skin and apply a subtle blur for a softer portrait effect.
- Brightness: Drag the slider to the right to brighten underexposed faces.
- Skin Tone: Drag the slider to warm or cool the skin tone.
To compare these adjustments with the original video, toggle the Apply button on and off to see the difference before and after the added Face Effects.

Press Play to see what the effects will look like as the video plays.
Note: Make sure to apply Face Effects before you apply other filters as some filters prevent the application of Face Effects.
How to save a custom Face Effects preset
You can save your settings as a Preset to use in other projects by clicking on the Save icon beside Select Preset.
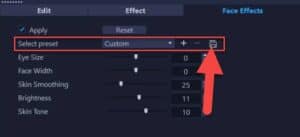
Give this preset a title and it will be saved as a .beauty file. The new preset will be automatically added to the dropdown list beside Select preset to use in future.
Delete a preset by clicking the minus button or add it to the list again by clicking on the plus button.
If you want to start over, you can click the Reset button to bring all of the slider values back to 0.
How to create dramatic/comical effects
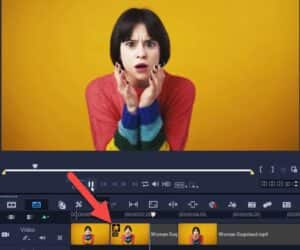
You can also use Face Effects to make some silly or crazy videos for your social media. For example, you can increase Eye Size for an exaggerated “surprised” expression.

Using Face Effects on a portion of a video
If you want to apply Face Effects to only a portion of your video clip, drag the playhead to where you want to begin the face effect and press S to split the video clip. Then drag the playhead to where you want the face effect to end and split the clip at this point also.
Now select the split clip you want to add the face effect to, and add your desired effect on this clip.
You can also experiment with the Face Width slider to adjust the width of the lower part of the face. This can help make your subject have a slightly trimmer or broader face if you want to make a subtle adjustment, or you can make a more dramatic effect by making the face really wide or really narrow.

Download a FREE 30-day trial and turn your best moments and life experiences into unique movies with this easy and fun video editor packed with intuitive tools and creative effects.
