
It’s easier than ever to match your videos to the beat of a track! In this tutorial, you’ll learn how to use audio cues, which are markers on the timeline that correspond to the beats of an audio track. Once the audio cues are in place, you can easily snap video or photo clips to the markers. This is an easy way to build excitement and emphasize key moments in your video projects.
Audio cues are exclusive to VideoStudio 2023 Ultimate.
Thanks for watching! We hope you found this tutorial helpful. You will find a written version of this tutorial below, and a printable PDF copy to download on the Download Resources tab above.
Download a FREE 30-day trial and turn your best moments and life experiences into unique movies with this easy and fun video editor packed with intuitive tools and creative effects.
Download these free resources:
Written Tutorial (PDF, 482 KB)
VideoStudio User Guides and Help files
For VideoStudio X9 to 2023, languages include English, Deutsch, Français, Italiano, Nederlands, 简体中文, 繁體中文, 日本語
What’s New in VideoStudio
Audio and Music in VideoStudio
Intermediate and Advanced Editing in VideoStudio
Featured products
 VideoStudio Pro 2023
 Studio Backlot Membership
 VideoStudio Ultimate 2023
 Vision FX 2.0
How to use audio cues
In this tutorial, you’ll learn how to use audio cues, which are markers on the timeline that correspond to the beats of an audio track. Once the audio cues are in place, you can easily snap video or photo clips to the markers.
There are two main ways to add audio cues: automatically and manually. We’ll look at the automatic method first.
Adding auto audio cues
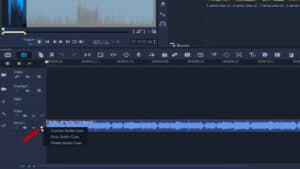
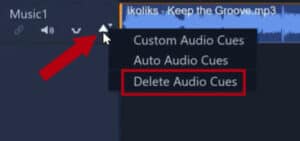
To start, we have a short piece of music on the timeline. Audio Cues are located on the music track. The Audio Cues button is grayed out when there are no audio clips in the voice or music tracks. After you add one or more audio cues, the Audio Cues button changes color to indicate that there are audio cues on the track.
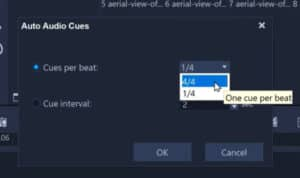
With Auto Audio Cues, VideoStudio will analyze the piece of music and add cues or markers at one in every four beats. Assuming your music has four beats in a bar, that would be one marker per bar.
Or alternatively, we can choose four cues for every four beats. Therefore, a cue on every beat of the bar. If you want a fast edit like we saw in the intro of the tutorial video, pick the 4/4 option.
TIP: you don’t have to use every cue once they’ve been created, so it’s better to have more cues than not enough.
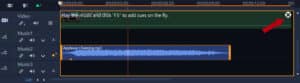
Alternatively, you could pick a cue at a set interval. For example, if you wanted the visuals to change every 10 seconds and not be related to the music track at all. But in this case, we want VideoStudio to calculate every beat of the music, so we’ll select 4/4. Yellow markers are created on the audio track corresponding to the beats.
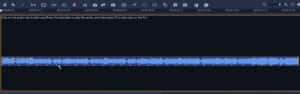
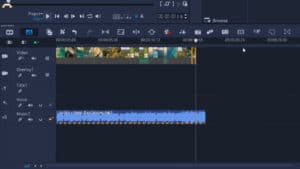
Once the audio cues have been created, you can play it back to see if they match. In this example, it’s lined up pretty well, so now we can start bringing our video or photo clips into this montage. As you position a clip or adjust the length of a clip on the timeline, the cues help you line up when a clip should start and end to align with the beat of the music.
As you’re repositioning a clip, you will notice that the clip wants to snap to the nearest marker, so it’s really easy to line clips up quickly and efficiently. In this example, we’ll make clips in the first half of the edit last two beats in length. And in the second half we’ll speed it up so that they last one beat each, to add more excitement as the montage progresses.
Adding custom audio cues
You can also create audio cue points manually if you know the exact points you want your clips to start and end.
We’ll remove the auto audio cues and clips from the timeline and then go to Custom Audio Cues. We can now enter cues directly on the audio clip, and there are a few ways to do this:
- Click on the clip where you want to add the cues.
- Place the cursor where you want to add a cue and press F5.
- Press the Space bar to start playing the audio and press F5 to add cues on the fly.
Once you’ve added your Custom Audio Cues, you can add your media to the timeline and adjust the length of the clip to align with the beat, just as we did with the Auto Audio Cues.
Editing custom audio cues
When you choose Custom Audio Cues, you enter an editing mode that lets you add, delete, and reposition cues. In this editing mode, you can move the cursor or click in the timeline, and you can also access the controls on the player panel.
To show or hide audio cues, toggle the Audio Cues button. Hiding cues does not delete them from a track. If you enter the Custom Audio Cues editing mode after hiding cues, cues are automatically displayed again.
To move an audio cue:
- select it and drag it to a new position, or
- press the left or right arrow key to reposition it.
To delete an audio cue:
- hover over an audio cue, and when a prompt appears that you can delete the cue, drag the cue outside the audio clip, or
- select a cue and press Delete, or
- select a cue and press F5.
To delete all audio cues, click Audio Cues and then click Delete All Cues.
To exit the Custom Audio Cues editing mode, click the Close (X) icon in the top right corner.
Download a FREE 30-day trial and turn your best moments and life experiences into unique movies with this easy and fun video editor packed with intuitive tools and creative effects.
