
This advanced tutorial brings together all of the concepts taught in the Camera Focus and Settings course to teach you how to properly expose your photos. You will learn how to achieve proper exposure by using ISO, Aperture, and Shutter Speed values.
Thanks for watching! We hope you found this tutorial helpful and we would love to hear your feedback in the Comments section below. And don’t forget to visit our social media pages and show us what you’ve learned by sharing your photos, videos and creative projects with us.
Download your FREE 30-day trial and make every shot your best shot with PaintShop Pro, your all-in-one photo editing and design software.
Camera Focus and Settings
Understanding My DSLR Camera
 PaintShop Pro 2023 Ultimate
 Vision FX 2.0
 PaintShop Pro 2023
 AfterShot Pro 3
Achieving Proper Exposure
This advanced tutorial brings together all the concepts taught in the Camera Settings course to teach you how to properly expose your photos. You will learn how to achieve proper exposure by using ISO, Aperture, and Shutter Speed values.
Exposure is the amount of light allowed through the lens onto the sensor of a camera. The primary controls for exposure are aperture (amount of light) and shutter speed (length of exposure). The ISO setting also effects exposure.
A picture can be underexposed, overexposed, or properly exposed.
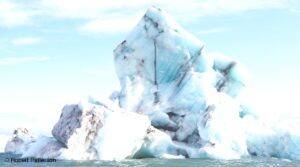
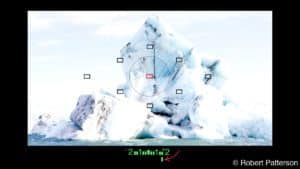
An overexposed image will suffer a loss of detail in the brighter areas and appear bright white and somewhat washed out.
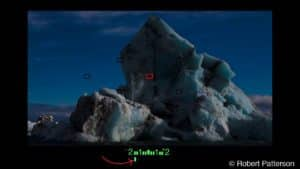
An underexposed image will appear too dark and will have a loss of detail in the darker areas of the image.

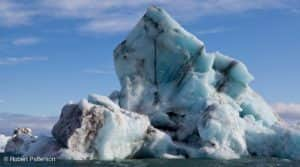
A proper exposure will have good balance of brightness across all areas of the photo. Details will appear clear in both dark and bright areas.
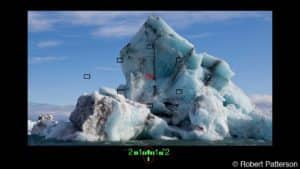
The camera’s internal light meter will judge the amount of light entering the camera and give a recommended exposure. In most cameras the meter display is located at the bottom of the viewfinder. At its most basic, achieving the proper exposure is a matter of aligning the marker on the meter to the center of the display by adjusting shutter speed and aperture.
Underexposed
Green marker is on the left of center:
Overexposed
Marker is on the right of center:
Proper Exposure
Marker is in the center of the meter:
With partial, center weighted, or spot meter settings, a good way to properly expose your subject is to aim the selected auto-focus point at the subject and depress the shutter button halfway. The meter will use the auto-focus point as the area to measure brightness. Continue to hold the button down then recompose the shot. This will ensure that you are metering for your subject and not the brighter or darker background. The amount of light available will largely dictate your shutter and aperture (fStop) settings. Low light will require slower shutter speeds and lower (wider) aperture values.
When selecting a shutter speed, it’s important to generally keep the speed faster that 1/60th of a second. Speeds slower than that can lead to blurry images due to camera shake or movement within the photo. With slow speeds, mount the camera on a tripod or brace it against something solid. For a more accurate rule on shutter speeds and sharp images, see the Reciprocal Rule in the tutorial Achieving Sharp Focus.
fStops will influence focus. Depth of field is directly related to aperture. Low fStop values will give a shallow depth of field (only a small range of the photo in focus).
High fStop values will give a large depth of field (a large range of the photo in focus). For a better understanding of this, watch the tutorial What is Depth of Field.
Sharpness is also effected by aperture. All lenses have an fStop value that will produce the sharpest image possible for that lens. For more on this, see the tutorial Achieving Sharp Focus.
Which do you select first, shutter or aperture? Anything you can do to stabilize a camera will help prevent camera shake. Use a tripod or brace the camera against something solid. Even touching the camera when shooting at slow shutter speeds can cause blur. Use of a remote shutter release or the cameras self timer will allow hands free use of the camera.
Bracketing
As a safety measure, bracketing can be used to ensure that your have captured the best exposure. For each proper exposure you take, take two more shots, one at 1 fStop over and one at 1 fStop under the proper exposure. Some cameras will offer an automatic means of doing this.
Download your FREE 30-day trial and make every shot your best shot with PaintShop Pro, your all-in-one photo editing and design software.
