
White balance isn’t about the color of the sun – it’s about the color of the light. The white balance setting adjusts the camera to different lighting conditions. Achieving the correct white balance will ensure the colors in your photos look their best. In this tutorial you will learn how to properly adjust the white balance setting depending on the lighting situation.
For example:
- Sunlight gives a blue cast.
- Artificial light gives an orange cast.
If your white balance is not set correctly, your image will look too orange or too blue. See examples below.
Thanks for watching! We hope you found this tutorial helpful and we would love to hear your feedback in the Comments section below. And don’t forget to visit our social media pages and show us what you’ve learned by sharing your photos, videos and creative projects with us.
Download your FREE 30-day trial and make every shot your best shot with PaintShop Pro, your all-in-one photo editing and design software.
Camera Focus and Settings
Understanding My DSLR Camera
 PaintShop Pro 2023 Ultimate
 Vision FX 2.0
 PaintShop Pro 2023
 AfterShot Pro 3
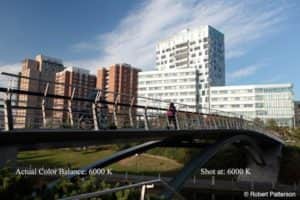
White Balancing refers to the process of calibrating a camera to achieve the most accurate rendering of color under differing lighting conditions.

Different types of light vary greatly in their color, this range of colors is referred to as color temperature. Sunlight, for example is blue and interior artificial light is generally more orange in color. For a more detailed look at this, see the Color Temperature section in the Composition, Light, and Color part of this course.
Because these light sources vary so greatly in color it is imperative to set your camera to the proper settings to avoid photos that look unnaturally orange or blue. If you take a picture outside with your camera set to an artificial light source setting, you will end up with a very blue image, conversely if you shoot under artificial light with daylight white balance setting you will generally get a rather orange looking picture. These problems can be corrected in photo editing software but is best to properly capture the image to save a lot of time in post production.

Interior light shot of interior light setting

Interior light shot at daylight setting

Sunny day shot at interior light white balance
Sunny day shot on cloudy or shade white balance
While the physical means of selecting a white balance vary between different makes of camera, they are generally the same in their nature. In the menu screen of your camera under the white balance settings you can simply select the icon that matches the conditions under which you are shooting. The icons will be different from make to make of camera, but usually resemble these below.
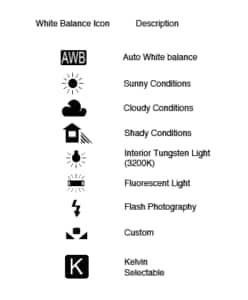
For a bright sunny day, you simply select the icon that looks like the sun. For interior light you would select the light bulb icon or the fluorescent bulb icon depending on the light source. Other options are also usually available for cloudy, shady or flash Photography conditions.
The auto white balance setting will generally work very well, and eliminates the need to think about white balance too much, however sometimes the image just doesnt look quite right and that’s when you should try different settings.
With many cameras you will also have a couple of other options to attain the correct white balance. The first requires a bit better understanding of color temperature but allows you to dial in any value you wish. Color temperature is measured in degrees Kelvin (K) and with many cameras you can set your white balance to any value from approximately 2500K (orange artificial light) to 10000K (Very blue natural light, cloudy day). This allows the photographer to make fine adjustments to the color of an image, sometimes warming the picture up or cooling it down.
The second is to capture a white balance by photographing a piece of white paper and then using that image to tell the camera what white looks like. The camera then can infer how all other colors should appear relative to that white. It is very important that the paper be as white as possible though. If there is a tint to it, the camera will white balance more to the contrasting color, so if the paper is blueish, your image will appear more orange or vice versa.
The means of doing this will vary between different makes of camera but the end result is the same. Consult your manual for the specific means of adjusting these and the other settings we’ve discussed.
Download your FREE 30-day trial and make every shot your best shot with PaintShop Pro, your all-in-one photo editing and design software.
