
Capturing photos with the sharpest focus is ideal to make sure the subject stands out. This is a lesson on understanding how your camera and lens affect the sharpness of the subject in your picture. This advanced tutorial brings together the concepts introduced in the Getting Started course to provide some great advice for achieving the sharpest focus in your photos.
You will learn how to:
- Make sure your viewfinder is calibrated to your eye.
- Avoid blurring by following the reciprocal rule to determine you shutter speed.
- Figure out the ideal aperture value (f-stop) for your lens.
Thanks for watching! We hope you found this tutorial helpful and we would love to hear your feedback in the Comments section below. And don’t forget to visit our social media pages and show us what you’ve learned by sharing your photos, videos and creative projects with us.
Download your FREE 30-day trial and make every shot your best shot with PaintShop Pro, your all-in-one photo editing and design software.
Camera Focus and Settings
Understanding My DSLR Camera
 PaintShop Pro 2023 Ultimate
 Vision FX 2.0
 PaintShop Pro 2023
 AfterShot Pro 3
Achieving Sharp Focus
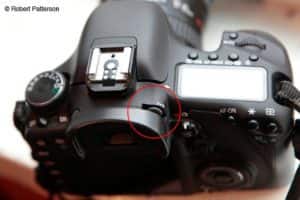
Getting sharp images is a key element to most kinds of photography. Achieving sharp focus is largely a function of aperture and shutter speed but not the same as getting a maximum depth of field. The focal length and quality of your lens are also factors. The first step in getting sharp focus is to make sure your viewfinder is calibrated to your eye. This is done with a viewfinder diopter usually located on the exterior of the viewfinder. Simply look through the viewfinder and auto-focus on something. Then adjust the diopter dial until the image looks its sharpest to your eye.
Reciprocal Rule
Slow shutter speeds lead to soft images. The reciprocal rule is a guideline for determining the slowest, safe shutter speed for handheld shooting. The steadier your camera the sharper the image will be. Use a tripod when available or brace your camera against something solid.
The Rule: The slowest shutter speed should be no slower than the reciprocal value of the focal length you are using. So think of your focal length as a fraction and use the reciprocal fraction as your slowest shutter speed.
50mm lens (50/1) = 1/50th of a second
200mm lens (200/1) = 1/200th of a second
Lens Quality
The higher quality the lens, the sharper the images. High quality optics and better build quality will always give better results. Some lenses will also have image stabilization features. Image stabilization will allow sharp images to be taken up to 4 steps slower than the reciprocal rule states. Unfortunately, high quality lenses are considerably more expensive than the average consumer level lens.
Lens “Sweet Spot”
All lenses will have an fStop value at which the lens will produce its sharpest image. All lenses are different but generally the sharpest performance for a lens is about 2 stops down from the lens’ widest fStop (the smallest number).
To test your lens, follow these steps:
What you need:
- The camera and lens you wish to test
- A tripod
- A magazine or some kind of page with a lot of sharp text
- A light source if you are not in a brightly lit area
1. Set your camera to aperture priority. This will simplify the process as you will not have to adjust shutter speed for each shot.
2. Set the ISO setting to 100 or 200. This will provide clean, noise-free images.
3. Set the camera to the shortest self timer setting. This will prevent camera shake.
4. Tape a page of the magazine with a lot of text to a wall. And point your light source at the page if you need more light.
5. Put your camera on the tripod and set it up at a distance that will allow a full frame shot of the magazine. Make sure the distance is great enough that your lens can achieve focus.
6. Set the aperture at its widest setting (smallest fStop number)
7. Focus on the text of the magazine. Auto focus should work fine.
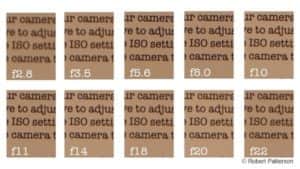
8. Take a series of shots, each time adjusting the aperture down by one stop. (f2.8, f4.0, f5.6, f8.0, f11, f16, f22). Do not move the camera at all, if the camera gets moved, start over.
9. Download the photos into your computer and do a comparison of each photo. View the photos at 100% magnification or higher. The image with the sharpest appearance will be the lens sweet spot. Use the photo’s metadata to see which fStop value is the sharpest.
In this case this lens appears to be sharpest at around f10.
Download your FREE 30-day trial and make every shot your best shot with PaintShop Pro, your all-in-one photo editing and design software.
