
Make a Social Media Template
Create your own templates for social media, customized to suit your brand and style, using some of CorelDRAW’s basic tools and design techniques.
Watch this 2-minute video for an overview of the process; the steps are written out below.
Start your FREE 15-day trial and embark on a design journey with powerful tools for vector illustration, layout, photo editing, typography, and collaboration.
How to Create a Social Media Template
Create your own templates for social media, customized to suit your brand and style. Follow the steps below to get familiar with some of CorelDRAW’s basic tools and design techniques.
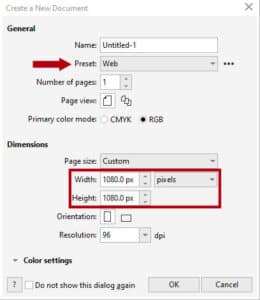
Step 1: Create a new document
- Start a new document (Ctrl/Cmd + N).
- Select the Social category and then choose a preset (we’re using the Instagram Post 1,080 x 1,080px preset).
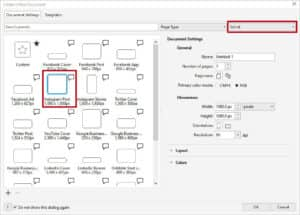
NOTE: If you are using an earlier version of CorelDRAW, select Web from the Preset dropdown list and set your page size to 1080 x 1080px. If you want to save this preset, click the 3 dots beside the Preset dropdown list, click Save Preset and enter a name. The next time you go to create a new document your saved preset will be listed.
Step 2: Create the background
Our template design has a simple background made up of 2 rectangles. One rectangle will have a color and pattern fill, and the other rectangle will be a photo placeholder. To create the first rectangle:
- Double-click the Rectangle tool icon – this will create a rectangle that is the size of the page.
- On the property bar, set the Object Origin to left and change the width to 370px.
- Double-click the Rectangle tool icon again to create a second rectangle.
- On the property bar, set the Object Origin to right and change the width to 710px.

To learn more, watch the full tutorial How to Use the Rectangle Tool.
Step 3: Enhance the background with fills
- Select the left rectangle and activate the Interactive Fill tool.
- On the property bar, first select a fill type and then use the Fill Picker dropdown to select a color or pattern. We chose a Uniform fill in blue but you could also choose a gradient, pattern or texture fill.
- Right-click on the no color swatch to remove the outline.
To add visual interest to our solid blue fill, we’re going to add a PostScript fill on top.
- Select the left rectangle and press Ctrl/Cmd + D to duplicate it.
- Activate the Interactive Fill tool. On the property bar, select PostScript Fill and use the Fill Picker dropdown to select a texture (we chose Archimedes).
- Activate the Transparency tool and on the property bar, choose Uniform transparency and set the amount to 50.
TIP: Click the Edit Fill icon on the property bar to adjust various properties of the PostScript fill, such as size, line width, and the amount of gray that appears in the texture’s foreground and background.

To learn more, watch the full tutorials:
How to Use the Fill Tools
How to Use the Eyedropper Tools
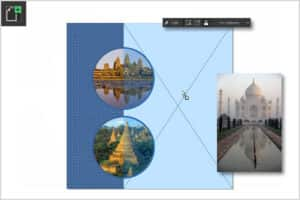
Step 3: Create the photo placeholders
Our template design has three photo placeholders – the large rectangle that we’ve already created, and two ellipses. We’ll add PowerClip frames to these objects to clip our photos into. First, to create the ellipses:
- Activate the Ellipse tool, hold down the Shift key and drag to create an ellipse.
- To resize, use the corner handles or enter a value in the Object size field on the property bar (our ellipses are 400px).
- Place the ellipse so it is centered on the edge between the left and right rectangle.
- On the property bar, set the Outline width to 10px to create a thick border.
- To match the outline color with the blue background, activate the Color Eyedropper tool. Click on a blue area in the background to sample the color, then click on the outline of the ellipse.
- Press Ctrl/Cmd + D to duplicate the ellipse and move it below the first ellipse.
- Select both ellipses and press Ctrl/Cmd + G to group them together.

Now to add the PowerClip frames:
- Right-click on the larger rectangle on the right and select Frame Type > Create Empty PowerClip Frame.
- Do the same with the group of ellipses.
- These objects will now have an X across them, indicating that they are PowerClip frames that you can place other objects into.

To learn more, watch the full tutorials How to Use the Ellipse Tool and How to Use PowerClip.
Step 4: Add some photos
Adding photos into the PowerClip frames is just a simple drag and drop.
- Browse to the location on your computer where you’ve stored the photos to use in this project.
- Drag the photo onto the CorelDRAW interface and into a PowerClip container.
- On the PowerClip menu, choose a Fit Content option (we’re using Fill Proportionately).
- To resize or reposition the photo, click the Edit button on the PowerClip menu, adjust the photo and then click Finish.
Step 5: Add a callout
We want to add a callout graphic to highlight a special offer.
- Activate the Polygon tool then click and drag to draw a polygon. Pressing the Ctrl/Cmd key while you draw the polygon will keep the sides equal.

- On the property bar, adjust the number in the Points or sides field (our polygon will have 40).
- Activate the Shape tool, hold down the Ctrl/Cmd key and pull one of the nodes inward to create a starburst shape.
- If you want to resize or reposition the polygon, switch to the Pick tool and either use the handles to move or resize, or enter new values in the Object size and Object position fields on the property bar.
- Fill the polygon with a color, either by clicking on a color swatch in the Color palette or using the Eyedropper tool to sample a color from the design.
TIP: The Document palette at the bottom of the interface will display colors already used in the document. So if we want to use the same blue as our background and ellipse borders, we can just click on the blue color swatch in the Document palette to fill the polygon.
- Right-click on the no color swatch if you want to remove the outline.

To learn more, watch the full tutorial How to Use the Polygon Tool.
Step 6: Add some text
We’re going to add 3 pieces of text to our design: a title at the top, a special offer inside the callout graphic, and a web address at the bottom.
- Activate the Text tool and type in each piece of text.
- On the property bar you can adjust various text properties such as font, size, alignment, etc.
- To change the text color, click a swatch on the Color palette.
- Use the Pick tool to position the text where you want it.
- To center text inside the callout graphic, select the text, hold down the Shift key and select the polygon. Press C then E which are the shortcut keys to align centers horizontally and align centers vertically.
To learn more, see the tutorial series Working with Text in CorelDRAW.
Now your social media template is complete. You can save it as a CDR file to preserve the objects and layers for future editing, and export it in a variety of formats including JPG, PNG, PDF etc.

Additional Resources
If you’re not familiar with the tools used in this project, watch the full tutorials below to learn more.
How to Use Rectangle Tool

How to Use the Ellipse Tool

How to Use the Fill Tool

How to Use the Color Eyedropper

Make a Holiday Instagram Template

How to Use PowerClip

How to Use the Polygon Tool

How to Use the Text Tool

See More Tutorials
Browse the full collection of tutorials for CorelDRAW and PHOTO-PAINT, from beginner to advanced, creative projects, and more!
What’s New in CorelDRAW

CorelDRAW Tools

Working with Text

Start your FREE 15-day trial and embark on a design journey with powerful tools for vector illustration, layout, photo editing, typography, and collaboration.

Comments (1)
Reader Interactions
Comments
simple guide line to follow .