
Learn how to use the Text tool in PHOTO-PAINT to add text to your photo editing projects. This tutorial will review the basics of adding, formatting, and editing text, plus more advanced techniques such as adding effects, fitting text to a path, and using text as a mask. You will also learn how to work with variable font support introduced in PHOTO-PAINT 2020, to fine-tune text properties such as weight, width, spacing and more.
Thanks for watching! We hope you found this tutorial helpful and we would love to hear your feedback in the Comments section at the bottom of the page. You will find a written version of this tutorial below, and a printable PDF copy to download on the Download Resources tab above.
Start your FREE 15-day trial and embark on a design journey with powerful tools for vector illustration, layout, photo editing, typography, and collaboration.
Download these free resources:
Written tutorial for Windows (PDF, 1.1 MB)
Written tutorial for Mac (PDF, 1.3 MB)
CorelDRAW Graphics Suite resources
Quick Start Guide (PDF, 2 MB)
Keyboard Shortcuts (PDF, 3.5 MB)
CorelDRAW and Corel PHOTO-PAINT user guides
For CorelDRAW Graphics Suite subscription and perpetual licenses (2018 to 2024), languages include English, Português do brasil, 简体中文, 繁體中文, Čeština, Deutsch, Español, Français, Italiano, 日本語, Polski, Русский
CorelDRAW Community
CorelDRAW learning center
Facebook
X (formerly Twitter)
YouTube
Introduction to PHOTO-PAINT
What’s New in CorelDRAW Graphics Suite
 CorelDRAW Graphics Suite
 Ultimate Vector Bundle Vol. 1
 CorelDRAW Standard 2021
 Ultimate Vector Bundle Vol. 2
 Corel Vector
Using the Text Tool in PHOTO-PAINT
Learn how to use the Text tool in PHOTO-PAINT to add text to your photo editing projects. This tutorial will review how to add, format and edit text.
Click on any of the images below to view full size.
Adding and Editing Text
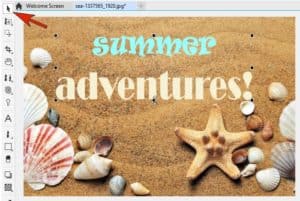
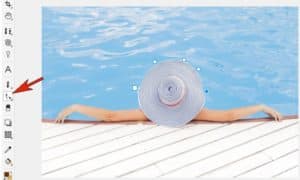
In our first example, we’ll add text to a beach photo. Click the Text tool icon on the toolbar or press the T key as a shortcut to activate the tool.
Once you activate the Text tool, the property bar will provide a number of settings that you can use to format and edit your text. To select a font, click on the Font List dropdown. You can scroll down to see all of the fonts installed on your computer, and if there’s a specific font you want to use, such as Ravie, just start typing the font name.
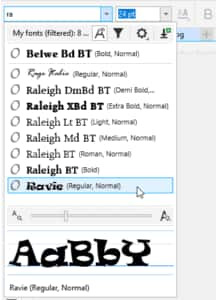
You can also set the Font size, Alignment, and Character and Line spacing. To set the font color, click a swatch in the Color palette on the right.
Click where you want to place the text, type what you want to appear, including line breaks, and click outside when finished.

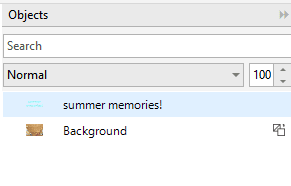
In the Objects docker (Window > Dockers > Objects), the text is listed above the background.
While the Text tool is still active, you can click back inside to make changes. You can edit the text itself or highlight specific characters to change font or size. You can change the color by clicking a different swatch. Or you can click the Eyedropper tool in the Image palette to sample a color in the photo, then click that color.

With the Pick tool active, you can reposition the text. Clicking on the text again with the Pick tool will bring up the rotation handles, which you can use to rotate or skew the text.
NOTE: you can also use the Pick tool to resize your text, however this can distort the characteristics of your chosen font, so it is best practice to resize text using the Font size setting on the property bar.
You can even use the Drop Shadow tool to make the text really stand out.

To learn more about shadows, watch our full tutorial Adding Depth with Shadows.
TIP: If the Pick tool is active, you can always double-click a text object to return to the Text tool and edit the text.
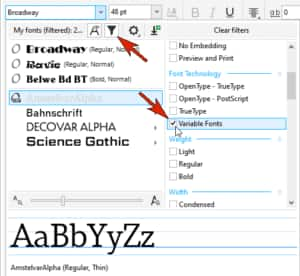
Working with Variable Fonts and OpenType Fonts
In PHOTO-PAINT 2020, we added support for variable fonts. Variable fonts enable you to fine-tune some properties of the text beyond what is available on the property bar. To find variable fonts, open the Font list dropdown and click the Filter icon. Under Font Technology, check the Variable Fonts option.
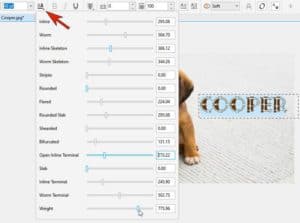
Choose one of the fonts in the filtered list, set the size and pick a color, and add the text.

Then highlight the text and click the Variable Fonts icon on the property bar. The menu of sliders that appears can be used to adjust all sorts of properties of these characters.
To learn more, watch our full tutorial Working with Variable Fonts.
Some OpenType characters can also be changed when the Interactive OpenType option is enabled on the property bar.

With the text still highlighted, open the Font list dropdown and filter it to show OpenType Fonts.
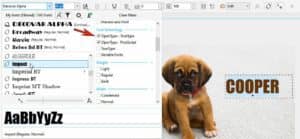
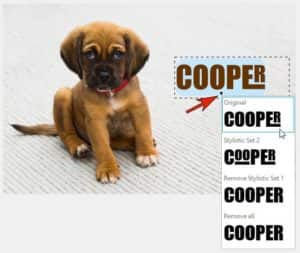
Some Open Type characters will have a small arrow you can click for alternate sets of characters.
Fitting Text to a Path
Text can also fit to a path. The Path tool can be found in the Shape tool group on the main toolbar. By default, this tool group is represented by the Rectangle tool icon, so you need to click the small arrow to expand the tool group and activate the Path tool.
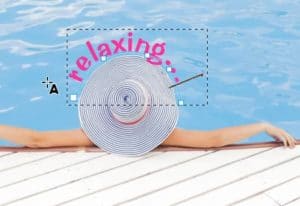
In this example, we want to add some text around the hat. With the Path tool, we click at multiple points along the path we want to create, and double-click to finish the path.
Now when we activate the Text tool and move the cursor over the path we created, the cursor symbol changes from an A to a curve symbol while on the path.

When your cursor shows the curve symbol, click and start typing, and the text follows the curve.
On the property bar, you can adjust the distance from the path and the offset, as well as Text Orientation, Vertical Placement, and Horizontal Placement.

NOTE: The path itself is used just for placing the text and won’t appear in the final image when exported or printed.
You can also make existing text fit a path. In this example, we have our path created and we also have some text created.

Use the Pick tool to select the text, then go to Object > Text > Fit Text to Path. Then click the path and the text will move to fit the path.

To separate the text from the path, go to Object > Text > Render as Object. Now you can move the text independently and it will maintain the shape of the path.

Adding Fills to Text
In addition to using different colors for different characters, you can also apply fills. With the text selected with the Pick tool, activate the Fill tool.
On the property bar, you can choose solid fill, fountain fill, bitmap fill, or texture fill. Just be sure to click each time inside the character itself.
NOTE: If you edit the text after the characters have been filled, the fills will be lost. So be sure that your text is final before adding fills.
Text Masks
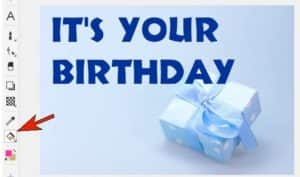
You can use text as a mask. In this example, we have a background image and some text. With the Pick tool active, double-click the text to edit it. Then click the Create Mask icon on the property bar.
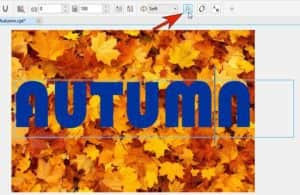
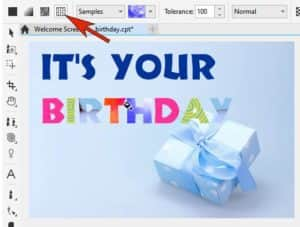
Click outside to finish and you will see the mask marquee around the letters.
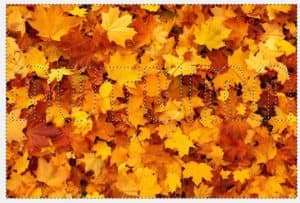
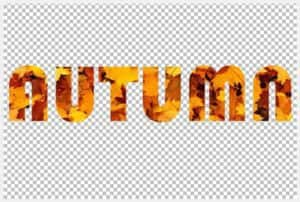
By default, the area inside the mask, or inside the letters, is what will not be kept. So if you want to delete the background image outside the letters, first go to Mask > Invert Mask. Now press Ctrl + X to cut, which results in just the filled letters.
To learn more, watch our full tutorial Using Masks in PHOTO-PAINT.
You can copy and paste these letters onto a different background, and use the Pick tool to move, rotate and resize.

If you would like to learn more about the Text tool, watch our tutorial series on Working with Text. Although these tutorials were created in CorelDRAW, you will find that many of the text options are available in PHOTO-PAINT as well.

Working with variable fonts
Using masks in Corel PHOTO-PAINT
Start your FREE 15-day trial and embark on a design journey with powerful tools for vector illustration, layout, photo editing, typography, and collaboration.
