Motion tracking text allows you to add a title that will move with a person or object in your video. In this tutorial, we’ll track two different boys playing football and add titles that follow their movement. You will learn how to set up motion tracking on the subjects first and then use the Match Motion feature to make the titles follow the same motion paths as the subjects.
Thanks for watching! We hope you found this tutorial helpful and we would love to hear your feedback in the Comments section at the bottom of the page. You will find a written version of this tutorial below, and a printable PDF copy to download on the Download Resources tab above.
Download a FREE 30-day trial and turn your best moments and life experiences into unique movies with this easy and fun video editor packed with intuitive tools and creative effects.
Download these free resources:
Written tutorial (PDF, 609 KB)
Sample video (MP4, 23 MB)
To download the sample video, click on the link to open, then right-click on the video and select “Save video as” and save to a location on your computer.
VideoStudio User Guides and Help files
For VideoStudio X9 to 2023, languages include English, Deutsch, Français, Italiano, Nederlands, 简体中文, 繁體中文, 日本語
What’s New in VideoStudio
Speed and Motion Editing Techniques
Featured products
 VideoStudio Pro 2023
 Studio Backlot Membership
 VideoStudio Ultimate 2023
 Vision FX 2.0
Motion Tracking Text: How to Add Text that Follows a Person or Object
Motion tracking text allows you to add a title that will move with a person or object in your video. In this tutorial, we’ll track two different boys playing football and motion track moving titles that follow their movement.
How to Track Motion
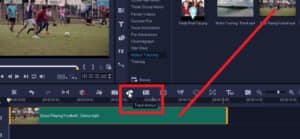
Open VideoStudio in the Edit tab and drag the video of the boys playing football onto the Video track on the timeline. With the video clip selected, click on the Track Motion icon from the toolbar.
Drag the red tracker over the first boy that we’ll track.
NOTE: You may want to change the tracker type to Set tracker as area if you want to track a larger area and not just pinpoint one spot.
- Deselect Add Matched Object, since in this case we do not want to add a matched image or video.
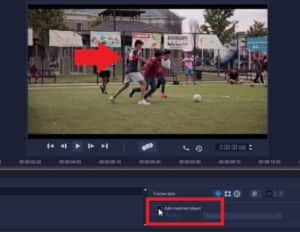
Click Track Motion to track the boy’s movement.

How to Track in/Track Out
The motion tracker has continued tracking even after the boy has left the shot, so we need to fix this.
- Drag the scrubber to the point where the boy disappears on the screen.
- Then click Track Out.
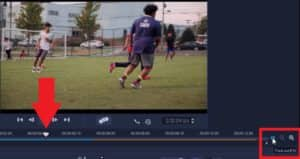
How to Add a New Tracker
- Click the Plus icon to add a new tracker and repeat the steps above to track a new subject, in this case the second boy.

How to Continue Tracking a Subject if Tracker is Interrupted
If we drag our scrubber to about four seconds into the clip, we can see that the tracker stops once another boy goes in front of the boy we’re tracking.
- Click the Track Out button again to stop tracking where the tracker gets interrupted.
- Drag the scrubber to a point on the clip where the subject re-enters the shot.
- Click the plus icon to add a new tracker.
- Drag the tracker on top of the subject and click the Track Motion icon again to continue tracking the boy after he reappears.
How to Rename Trackers
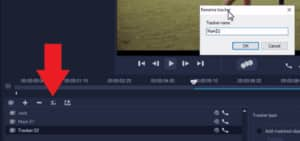
- Click on the Rename Tracker icon to rename these trackers to be able to differentiate them and click OK.
Motion has been tracked on our clip and is indicated by this white icon and these light blue lines showing where we have tracked motion within the clip.

Motion Tracking Text to Add Moving Titles
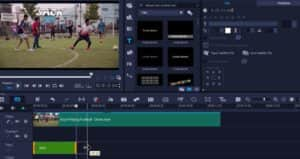
- Double-click on the Title track on the timeline.
- Then double-click on the preview pane and type in your title.
- Adjust the font type, size and color if you wish.
- Extend the length of the title to match the motion by clicking on the title in the timeline then hovering your mouse over the edge and clicking and dragging it to the right.
How to Match the Title to the Tracked Motion
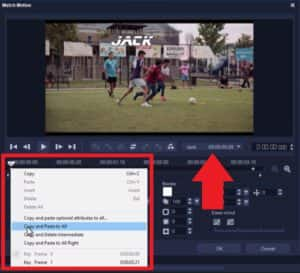
- Right-click on the title in the timeline and select Motion Options, then Match Motion.
- In the Match Motion dialog box, make sure that the right tracker is selected in the tracker dropdown list.
- Adjust the position of your title by clicking and dragging it on the preview pane.
- You can also change other settings like size, rotation, or opacity level.
- Click OK when you are finished adjusting the position and settings of your title.
Important: If any changes are made to the settings on the first keyframe, you’ll have to right-click on the first keyframe and select Copy and Paste to All. That will ensure that the title customizations are the same throughout the entire clip.
How to Add a Second or Third Title
- Right-click on the Title track and select Insert Track Below to add a second title track.
- Repeat the steps above.
And now when we preview our video, we’ll see how we’ve created two titles that follow the boys’ motion as they play football!

Download a FREE 30-day trial and turn your best moments and life experiences into unique movies with this easy and fun video editor packed with intuitive tools and creative effects.

