
In this tutorial, you will learn how to save custom motion paths and apply them to other elements in your project, or reuse them in future projects. Learning how to save and apply custom motion paths allows you to build a library of motion effects and will save you a lot of time and effort! Before watching this tutorial, you need to know how to create motion effects. If you are not familiar with this technique, please watch the tutorial Creating Custom Motion Effects first.
Thanks for watching! We hope you found this tutorial helpful and we would love to hear your feedback in the Comments section at the bottom of the page. You will find a written version of this tutorial below, and a printable PDF copy to download on the Download Resources tab above.
Download a FREE 30-day trial and turn your best moments and life experiences into unique movies with this easy and fun video editor packed with intuitive tools and creative effects.
Download these free resources:
Written Tutorial (PDF, 493 KB)
VideoStudio User Guides and Help files
For VideoStudio X9 to 2023, languages include English, Deutsch, Français, Italiano, Nederlands, 简体中文, 繁體中文, 日本語
What’s New in VideoStudio
Speed and Motion Editing Techniques
Featured products
 VideoStudio Pro 2023
 Studio Backlot Membership
 VideoStudio Ultimate 2023
 Vision FX 2.0
Creating Custom Motion Paths
Once you have learned how to create custom motion effects, you can save them as paths to use on other media elements and in future video editing projects. Creating motion using keyframes can be time-consuming, so learning how to save your custom motion paths will save you a lot of time and effort. If you are not familiar with creating custom motion effects, please watch our tutorial on Custom Motion Effects first.
Saving Custom Motion Paths
In the previous tutorial, we created the motion of a windsurf clip over a beach background. We will now save the motion as a custom path by right-clicking on it and selecting Motion > Customize Motion to open the Customize Motion window.

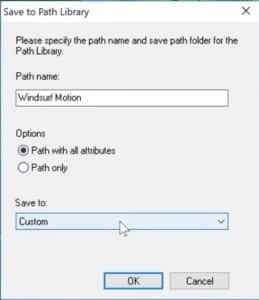
In the Customize Motion window, select Save to, then enter a Path name and choose the Path with all attributes option. Save it to the Custom folder.
Back on the timeline, open the Path menu in the library and click on the Custom folder. The new path will show up here.
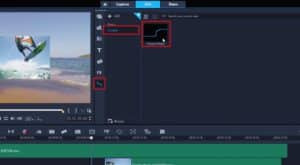
If we drag and drop this path onto the next two clips in the timeline, they now have the exact same movement as the first clip.
Applying Custom Motion Paths to Graphics and Text
For the next part of this tutorial, we are going to create a new custom motion path for a graphic object and a title in a new project.
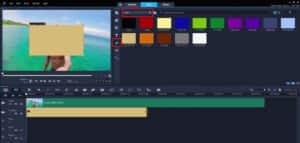
Open the Graphic menu in the library, choose Color in the Gallery dropdown, and pick a color. This will be a background text box for a title.
Drag and drop the color graphic onto the Overlay track in the timeline, then drag out the right edge to extend the length, 5 seconds in this example.
Right-click on the color graphic in the timeline and select Motion > Customize Motion. In the Customize Motion window you can resize and reposition the color graphic to something suitable for a text box.
TIP: click on the Lock Aspect Ratio icon in the Size area to unlock this before you resize the color graphic.
Now we will add keyframes for motion. In this example we used the following keyframes for our 5-second text box clip:
- A starting keyframe with the position completely off screen to the right at 0:00.
- A second keyframe on screen at our text box position in the lower right corner at 0:30 (giving us a 30-second entry animation).
- A third keyframe at the same position at 4:30 (which will keep our textbox in the same position from 0:30-4:30).
A final keyframe completely offscreen to the left at 5:00 (giving us a 30-second exit animation).
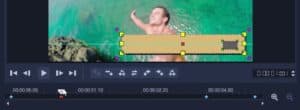
This will result in an animation that enters from the right, stays on the screen for a few seconds, then exits to the left. In the Customize Motion window you can also add a shadow or border, adjust opacity or rotate. In this example we added a shadow to our text box graphic.
We want our title to be positioned on top of the text box graphic and follow the same motion, so we first need to save our new motion path we just created.
Click the Save to button at the bottom of the Customize Motion window and enter a Path name. This time select the Path only option. This will save the motion of the text box without any of the other transformations we made to it – we don’t want to stretch or compress our text or add a shadow like the one we added to the text box. Save it to the Custom folder and then click OK to exit the Customize Motion window.
Back on the timeline, click on the Text icon and type your text in the Preview window. Resize and position it to fit into the text box graphic. On the Title track in the timeline, drag out the right edge to increase the duration of the text so it matches the duration of the text box graphic (5 seconds in this case).
Click on the Path icon in the library and find the new path in the Custom folder. Drag and drop it on the title in the timeline. The title will now follow the same path, staying over top of the text box the entire time.
You can reuse these custom motion paths for other elements that you want to have the same motion, either within the same project or in new projects you create in the future.
Download a FREE 30-day trial and turn your best moments and life experiences into unique movies with this easy and fun video editor packed with intuitive tools and creative effects.
