
GRFX Studio Pro and GRFX Studio – Corel edition are no longer available for purchase or as free plugin included with PaintShop Pro Ultimate, CorelDRAW Graphics Suite, and Corel Painter. Unfortunately the software company that created these products is no longer in business and therefore we are not able to provide support for any issues with the software.
Download your FREE 30-day trial and make every shot your best shot with PaintShop Pro, your all-in-one photo editing and design software.
Download these free resources:
Written Tutorial (PDF, 3 MB)
PaintShop Pro resources
Keyboard shortcuts (PDF, 173 KB)
PaintShop Pro User Guides
Partner and User websites
PaintShop Pro User Forum
Scrapbook Campus (Tips and tricks, workshops, master classes, and more)
Creation Cassel (Scripts, picture tubes, and other PaintShop Pro tools, plus weekly freebies)
PaintShop Pro Maniacs (Facebook group)
PaintShop Pro (Facebook group)
What’s New in PaintShop Pro
Plugins for PaintShop Pro
Featured products
 PaintShop Pro 2023 Ultimate
 AI HDR Studio 3.0
 PaintShop Pro 2023
 Vision FX 2.0
How to Use the GRFX Studio Plugin
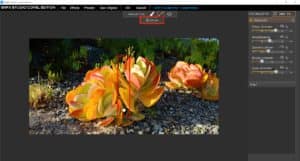
GRFX Studio is a photo-editing program that includes hundreds of effects that you can apply to your photos. As soon as you try GRFX Studio you’ll see just how easy it is to quickly generate sophisticated photo effects.
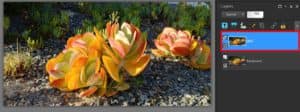
Start with an image open in PaintShop Pro Ultimate and make sure your Layers palette is displayed (View > Palettes > Layers or press F8). In the Layers palette, right-click on the Background layer to duplicate it. We named this new layer GRFX to help keep our layers organized. Keep this layer active (i.e the layer highlighted in blue), because the active layer is what will be used in the GRFX Studio plugin.
Go to Effects > Plugins > Auto FX Software > GRFX Studio – Corel Edition and GRFX Studio will launch in a new application window.
Adding an Effect
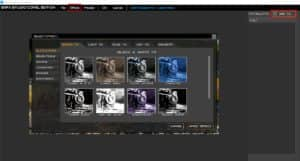
To add the first effect, click on Effects in the top menu and choose Add Effect or click on the Add FX button at the top of the FX Palette on the right. There are four effects categories: PHOTO, LIGHT, EDGE, and ART, each of which with its own subcategories.
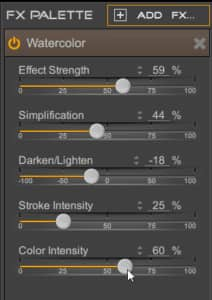
For a simple example, click on the Art FX tab, select Watercolor and click Apply Effect. This adds a watercolor painting appearance to the photo.

In the FX Palette, you can adjust the strength, darken or lighten, or adjust the intensity of the stroke or color.
Adjusting an Effect
By default, the effect is applied to the entire image. But the Watercolor Tools toolbar along the top has options that enable you to control where the effect takes place. For example, click on the Brush tool and set it to OFF. Then use the brush to paint over a part of the photo where you want to lessen the effect.
The painted area has less of the watercolor effect, meaning that more of the original photo is showing through. You can brush over the area again to reduce the effect further if you wish.
You can use the Clear Strokes button in the brush tool options to remove all brush strokes.
There are two other options in the Watercolor Tools toolbar that can be used to restrict the effect to just one area of your image: the Gradient Line tool and the Ellipse tool. Under the Gradient Line tool, click Add Line and a vertical line will be placed on your image.
The black handle at the top represents the full watercolor effect, and the white handle at the bottom represents zero watercolor effect. Along the line, the watercolor effect fades from full strength to none. You can drag the endpoints to change the placement and angle of the gradient line, for example a horizontal line that applies a gradient effect from right to left.

NOTE: When you hover over the line, an “X” will appear in the center, which you can click to remove the line and return the full-strength effect to the entire image.
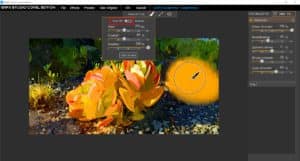
The Ellipse tool works much the same way. Click on Add Ellipse and a target image will be placed on your image, with four handles (top, bottom, left and right). In the center of the target, the effect is zero and gradually increases to full strength outside the target, creating a depth of field type of effect. Use the handles to adjust the shape and size of the target area. Click and drag if you want to move the ellipse to another area of your image.
NOTE: you can add more than one ellipse or gradient line (or both) on your image.
Combining Multiple Effects
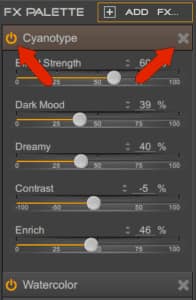
To combine the watercolor effect with another effect, click Add FX at the top of the FX palette. In this example we chose the Photo FX tab, and selected Cyanotype from the Black and White subcategory. After adjusting a few settings, you can produce what looks like a watercolor painting of a desert evening.

In the FX Palette, you can turn each effect on and off, or use the X icon to remove an effect.
TIP: To compare the image before and after effects, click the See Original button in the top menu.
If you want to use this set of effects on other photos, choose Presets > Save Effects as Preset. Then for the next photo, you would use the Presets > Load Preset option. Any presets you save will also be listed on the Presets tab in the Add Effects window.
When finished, click OK and you will return to PaintShop Pro, where the image now has the new effects, on the layer you created. You can now work with any of PaintShop Pro’s effects and tools to further edit the photo.
You can use the Visibility (eye) icon to hide the GRFX layer to get the original photo back or delete the layer if you decide you don’t like the effects. You can also create more duplicate layers for going back to the GRFX Studio plugin and trying out and comparing different effects.
Get More Effects with GRFX Studio Pro
In this next example we will demonstrate some of the additional effects from the GRFX Studio Pro version that can be purchased from your product’s Welcome Screen.

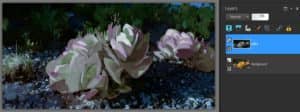
To change this from a bright daytime scene to a darker time of day, choose the Shading subcategory on the Photo FX tab and apply the Shade effect. Click the Brush tool and set the brush to ON. Use the Brush tool to paint over any areas of your image that you want to apply the effect to. In this example, we made a first pass with the brush over the entire image, then brushed over just the sky a couple more times.

After increasing the Strength value, the whole scene becomes darker.

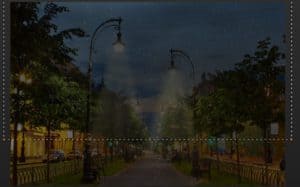
Adding Light Beams
The next effect is in the Light FX tab, in the Light Beams subcategory. Choose the type of beam you want and click Apply Effect. A T-shaped line will be placed on your image, with handles that can be used to rotate, move and adjust the length of the lines. In this example we positioned the T-path so that the light pours down from the closest streetlamp and reduced the Opacity and Spread settings in the FX Palette. You can also change the light color by clicking Cast Color to open a color picker window. Here you can choose a color or click Pick Screen Color to sample color from your photo.

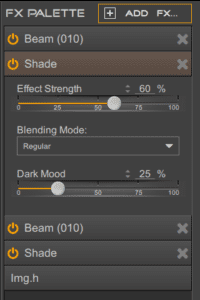
Duplicating Effects
To add a fainter light beam to the next streetlamp, you could apply a new beam from scratch and adjust the settings to your liking. Or you can save the current effects as a preset, which includes both the light and shading. When you load the preset, both effects are repeated, and you will see them stacked in the FX Palette.
Click on the X beside Shade to delete the extra shading, then move and adjust the second light beam.

Additional GRFX Studio Pro Effects
As mentioned at the beginning, the Pro version of GRFX Studio has a wider selection of effects than the free Corel version. Here are some examples.
Use the Weather FX to apply rain (or snow, or lighting, or sunshine).

For another weather effect, choose one of the Dramatic Sky effects, such as this stormy one.
Another fitting effect here would be a rain puddle, also in the Weather FX tab, which by default is applied to a lower portion of the image.

TIP: You can use the Brush tool to remove the puddles everywhere except the sidewalk.
The Pro version also has some nice focal effects such as Focal Brush, in which the entire imagine is blurred and you can brush over areas you want in sharper focus.

Or you can try Vintage Color from the Photo FX > Camera subcategory.

Or HDR Color Pop from the Photo FX > Color subcategory.

These are just a few of the over 1200 different effects available in GRFX Studio Pro that can be used on their own or combined and stacked with other effects for truly unique results every time. And don’t forget – once you bring your image back into PaintShop Pro you can make further edits with PaintShop Pro’s effects and tools.
Download your FREE 30-day trial and make every shot your best shot with PaintShop Pro, your all-in-one photo editing and design software.

Comments (32)
Reader Interactions
Comments
My GRFX Auto Pro AI was working fine the other day then yesterday until now it says “NetWork Error. Cannot Start Application.” Please advise.
My Grfx has stopped working.
I get to the user menu screen and get an error message – A network error has occurred – the app can go no further. Can you fix this for me please?
Thank you,
Phil W.
I have the same problem for the Mac edition I purchased the software over a year ago, and several times it stop working, The way this software works it sends info to the there website autofx.com this site is unavailable, so you’re of of luck, there has to be some sort of workaround you can use to bypass this. This software was great as a plugin and standalone app.
il doit y avoir une sorte de solution de contournement que vous pouvez utiliser (sic) . D’accord champion, mais quelle est – elle cette “solution de contournement” ?
Autofx.com n’existe plus. Et, … C’est tout !
Ciao sono interessato alla soluzione
me too.. not sure what happened…
I get to the user menu screen and get an error message – A network error has occurred – the app can go no further. Can you fix this for me please?
Thank yo Ivan Rega. This company is not responsing ??????
My GRFX PRO has the same problem and hasn’t worked for about 2 weeks. When I try to launch the program the following error message appears: Network error. Application cannot continue. Can anyone tell me how to solve the problem?
Thank you
Sergio Cuomo
I have a same problem. Network error. Application cannot continue. How to fix it ????????????????
requested tech support from Corel 2 weeks ago, no response!!! maybe Corel is more interested in promoting new products, does not make you feel like upgrading, whether its PSP, Viseo Studio or Corel Draw, when you cannot get support.
Has GRFX STudio Pro ai gone out of business and no longer supported? I get network error and app can go no further.. does not seem to be any support. Stopped working a few weeks ago. Does anyone know what is going on.
I have the same issue “network error” and I am unable to fix it. Very frustrating since I love the program. I am now apprehensive to update to the newer version for fear of having the same issue.
If anyone figures it out please let me know and of course, I’ll do the same.
Kind regards =)
Same happening for me. I tried going on the AutoFX website for help, but it appears to be inactive – not sure whether something has happened to the company. I’ve tried Googling for news, but nothing and no assistance on the Corel support pages. I’m very frustrated, as it was great for adding masking to images and it was my go to for that.
Ich habe auch das gleiche Problem kann es nicht mehr aufmachen kommt der Fehler Network error Application cannot continue
GRFX Pro AI network error Application cannot continue
Same for me.
Corel: What about help??
This happened about a year ago. It was down for a few weeks. Got so frustrated. Started trials with other software but didn’t find any I liked as much as this one. Then suddenly it just started working again. Guess we gotta wait it out again.
I have not been able to to GRFX studio Pro AI for many weeks now. Please provide details as to how to fix this or how to contact company.
I have the same problem. I’m very angry and I think I’m going to delete GRFX
Here the same issue “network error”. Please fix it!
Supposedly GRFX studio free version is available for PSP Ultimate 2023 but I can’t find it, does anybody know how I get this install?
Thanks
I’m also encountering the same network error. In addition to the Corel Plug-in I also purchased the full edition. The software is a great tool and they should ensure the product works as a standalone application without relying on any connectivity to their website. I hope there is a workaround for this issue.
Same here. It will be nice if Corel can give an answer to this questions.
By the way, the same happends a year or 2 ago. And suddenly it works again. But for now the period of not working is longer…….
I have the same error.
Ich habe auch das gleiche Problem “Netzwerkfehler hab ich mir als eigenständige Version gekauft
Grüße kauer
I have the same issue “network error”.
Uwe
My GRFX PRO isn’t working. message appears: Network error. Application cannot continue.If anyone figures it out please let me know
My GRFX PRO isn’t working. message appears: Network error since March 2024.. Application cannot continue.If anyone figures it out please let me know
I use GRFX Studio Corel version, GRFX Studio PRO and GRFX Studio PRO AI, the same problem with the three versions. “NETWORK ERROR, APPLICATION CANNOT CONTINUE”. It’s very frustrating considering the price paid for these applications. If anyone knows the solution I’m interested.
I have GRFX Studio Pro and was a day one supporter starting with the AutoFX plugins; however, when I got a new PC back in December, I found out the hard way that I cannot activate the software I spent $$$ on. It seems GRFX fell into a huge black hole with no care about supporting those who purchased their software. Considering the Corel version doesn’t work either, maybe someone can look into this??
GRFX Studio Pro and GRFX Studio – Corel edition are no longer available for purchase or as free plugin included with PaintShop Pro Ultimate, CorelDRAW Graphics Suite, and Corel Painter. Unfortunately the software company that created these products is no longer in business and therefore we are not able to provide support for any issues with the software.
If a programer could disassemble the software and delete the section that sends info to the GRFX’s server, which is no longer , you may be able to run the software. Having purchased this for my Mac, I do know if you disconnect your internet, the program will start for a little bit until it searches for GRFX Server and then it stops working. If the owner did go out of business, he should at least sent everyone who purchased the software an updated app that you don’t need the internet to activate.