In this tutorial, you’ll learn how to use the Perfectly Clear plugin for PaintShop Pro. Perfectly Clear is a photo editor that has dozens of amazing options to instantly fix your images. It works as a standalone editor and also as a plugin for PaintShop Pro. You can find Perfectly Clear in the Get More section of the welcome book inside PaintShop Pro.
Thanks for watching! We hope you found this tutorial helpful and we would love to hear your feedback in the Comments section at the bottom of the page. You will find a written version of this tutorial below, and a printable PDF copy to download on the Download Resources tab above.
Download your FREE 30-day trial and make every shot your best shot with PaintShop Pro, your all-in-one photo editing and design software.
Download these free resources:
Written Tutorial (PDF, 2 MB)
PaintShop Pro resources
Keyboard shortcuts (PDF, 173 KB)
PaintShop Pro User Guides
Partner and User websites
PaintShop Pro User Forum
Scrapbook Campus (Tips and tricks, workshops, master classes, and more)
Creation Cassel (Scripts, picture tubes, and other PaintShop Pro tools, plus weekly freebies)
PaintShop Pro Maniacs (Facebook group)
PaintShop Pro (Facebook group)
What’s New in PaintShop Pro
Plugins for PaintShop Pro
Featured products
 PaintShop Pro 2023 Ultimate
 AI HDR Studio 3.0
 PaintShop Pro 2023
 Vision FX 2.0
Using the Perfectly Clear Plugin
In this tutorial, we’ll review how to use the Perfectly Clear plugin for PaintShop Pro to create professionally finished photos in minutes. You can find Perfectly Clear in the Get More section of the welcome book inside PaintShop Pro.
Click on any of the images below to view full-size.
Introduction to Perfectly Clear
To launch Perfectly Clear, open your image under the Edit tab in PaintShop Pro. Go to Effects > Plugins > Athentech Imaging > Perfectly Clear v3.
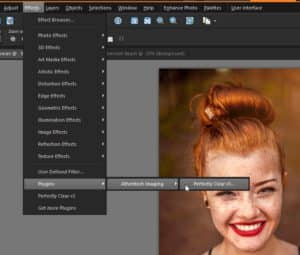
This will bring up the Perfectly Clear interface. In the top left-hand corner, you can adjust the zoom level.
We also have three different view options:
- Use Single Image View to see what the after image will look like.
- Use Dual Image View to see a side-by-side comparison of the before and after image.
- Use the Single Image Split View and drag the slider to the left or right to see the before and after split view of the image.
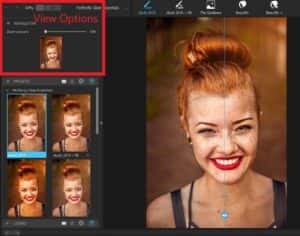
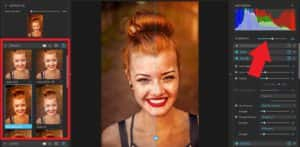
Presets and Looks
Perfectly Clear includes several categories of Presets that instantly transform your photos including Perfectly Clear Essentials, Perfect Lifestyle, and more.
- Simple click on a preset to preview and apply it to your image.
- Use any of the adjustment sliders on the right to fine-tune your selection.
- Adjust the intensity of the preset by playing with the Strength slider.
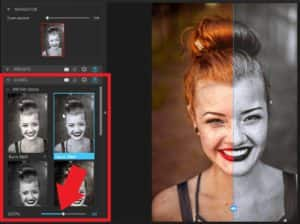
Perfectly Clear also includes four different Looks categories which include creative effects designed for emulating film stocks, black and white photography, and creative color grading.
To refine the intensity of the Look applied, you can adjust the Strength slider directly below the Looks menu.
Face Selection
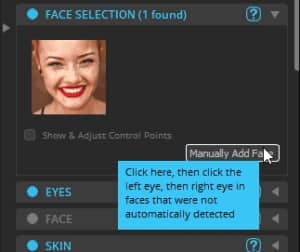
If you’re working with an image with people and you’d like to make adjustments to the Eyes, Face, Skin and Makeup Groups, you’ll need to make sure that the faces have been identified in your photos.
If a face isn’t automatically identified (for example in a group shot) and the face isn’t showing up in the Face Selection area, then the adjustments won’t be applied.
However, you can add a face manually by clicking Manually add face.
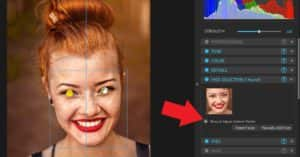
You can also adjust the control points of any face by clicking Show & Adjust Control points and then making sure the yellow dots are positioned correctly on top of the left and right eyes.
Example 1: Using Perfectly Clear for Portraits
Here are some examples of how we used Perfectly Clear to enhance this portrait photo.
- Start with a preset, such as the default iAuto2019 preset.
- In the Eyes section, we increased the Dark Circles slider to reduce the appearance of the dark circles under this woman’s eyes even more.
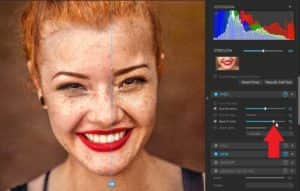
In the Skin section, we used the Perfectly Smooth slider to soften the appearance of her freckles and skin tone just a bit.
In the Makeup section, we used the Blush option to add a bit of blush to her cheeks.
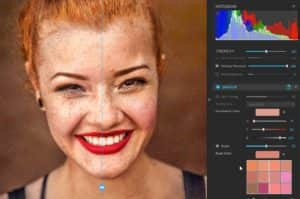
At any time, switch to the Dual Image view to see how the edits have changed your portrait photo.
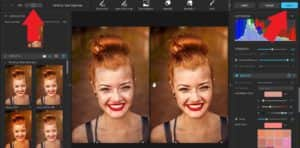
Once you are happy with your adjustments, simply click Apply to bring the edited image back into PaintShop Pro where you can make any further edits.
Example 2: Using Perfectly Clear for Landscape Photos
In this second example, we’ll transform a beach shot taken on an overcast day into a more vibrant and colorful photo we could use as a postcard. We’ll use the Single Image Split View to see the before and after versions side-by-side.

- Open up the Perfect Lifestyle preset category and select Vacation Photos.
- Adjust the Strength slider to around 85.
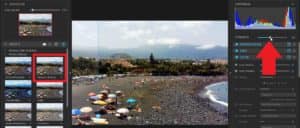
- Go to the Color category and enable Sky Enhance.
- Select Blue Sky Royal and adjust the Strength slider to around 30.
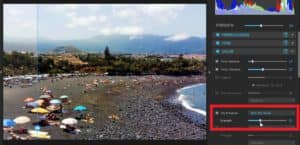
- Enable Graduated Filter and add a Light Portrait Vignette.
- Adjust the Blend slider to around 80.
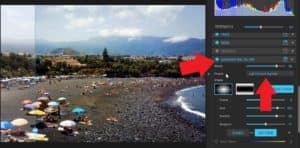
Drag the before and after slider from left to right to preview the changes.
You can see how much more vibrant the image is by applying these presets and we’ve turned a dull beach photo into a colorful vibrant photo that could be used as a postcard.

The Perfectly Clear plugin is a great way to automatically correct and fix your images with just a few clicks to create stunning images every time!
Download your FREE 30-day trial and make every shot your best shot with PaintShop Pro, your all-in-one photo editing and design software.

