
Learn how to make motion titles that will add a professional quality to your videos. In this tutorial we’ll show you how to combine titles and motion graphics to make motion titles, how to save them as title presets, and how you can make customizations to the motion graphics such as changing the color scheme to match your brand or adding effects.
If you are using Pinnacle Studio 23 Ultimate or higher, download a FREE motion graphic sample file and try it out yourself.
To purchase motion graphics, visit the Get More section of the Welcome screen in your Pinnacle Studio product.
Thanks for watching! You will find a written version of this tutorial below, and a printable PDF copy to download on the Download resources tab above.
Download these free resources:
Written Tutorial (PDF, 703 KB)
Motion Graphic Sample File (Zip, 2 MB)
Pinnacle Studio User Guide and Help Files
Studio Backlot
Pinnacle learning center
YouTube
Download a FREE 15-day trial and discover all the essential and advanced video editing features that Pinnacle Studio delivers to make your videos look their best.
What’s new in Pinnacle Studio
Text and titles
Templates, overlays, and graphics
Featured products
 Pinnacle Studio 26 Ultimate
 Studio Backlot Membership
 Pinnacle Studio 26
 Vision FX 2.0
How to make Motion titles
In this tutorial, you’ll learn how to make motion titles by adding text to motion graphics. We will also show you how you can save these motion titles as title presets to use in future projects, and how to customize motion graphics by adding effects and changing the color scheme to perfectly suit your video.
Click on any of the images below to view full-size.
How to add text to motion graphics
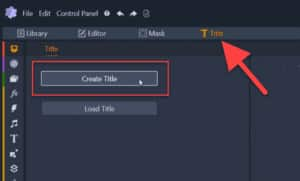
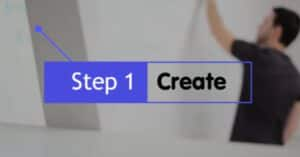
Step 1: Create title
In this example we’ll create a motion title for a YouTube fashion vlog. First, we need to create a title.
- Click on Title to open the Title panel and then select Create Title.
- Type your title under Text Settings and make any adjustments you want to the font type, size, and color under Text Settings and Look Settings.
- In the Player panel, you can click and drag on the text layer if you want to reposition it.
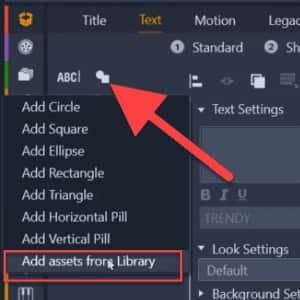
Step 2: Add motion graphic
Now we will add a motion graphic.
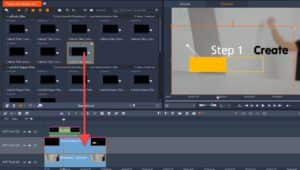
- Click on the Shape Tool icon and select Add Assets from Library.
- Click on Project Bins and select the Project Bin where you’ve imported your motion graphics.
- Select the motion graphic you want (in this example we’re using Lower Thirds Titles 3) and click Apply.
This will add a shape layer to the title, and both objects can be modified within the same layer on the A/V Track.
- To adjust the Shape layer, you can reposition it by clicking and dragging on the Player panel.
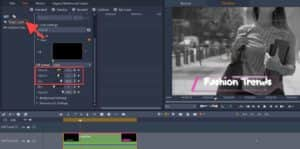
And you can change the size or position by using the Size and Offset sliders on the left.
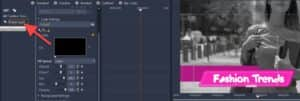
You can also rearrange the order of the shape and text layers in the list of objects on the left, as in this example we want the Shape layer underneath the Text layer so that the text appears on top of the graphic.
How to save a custom title preset with motion graphics
You can save the motion title as a title preset to use in future videos, which will save you a lot of time.
- Click on the Title tab.
- Select Save Title.
- Give your new title a name and click Save.
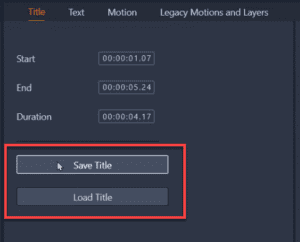
To use this title in a new project, simply click Load Title, then select your newly created title and click Open. The title will be automatically added to the timeline.
How to make customizations
There are so many ways that you can customize these motion graphics to suit your video project. Maybe you want to add some effects for more creative flair, or change the colors to match your brand colors. Here are a few ideas to get you started.
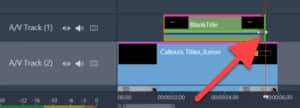
First, create your title and add it onto A/V Track 1.
In order to make customizations to the motion graphic, it needs to be on a separate A/V Track on the timeline. So drag your selected motion graphic (for example, Callouts Titles 8) from the Project Bin onto A/V Track 2.
In the Player panel, adjust the size and position of the motion graphic and make any adjustments to the title so it fits with the motion graphic.
On the timeline you can change the start position and/or length of the title, for example to have it pop up after the motion graphic.
Hover your mouse over the edge of the title and click and drag to adjust the length.
Now we’ll make some customizations. Double-click on the motion graphic on the timeline to open the Editor panel.
To add transparency: Under Properties, scroll down to adjust the Opacity level with the slider.
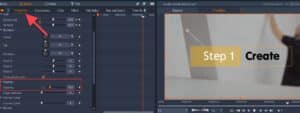
To change the color scheme: Click on the Color tab and then select the Color Wheel option.
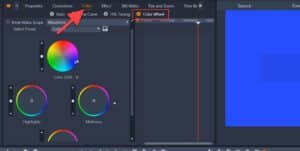
You can adjust any of the color wheels to completely change the color of the motion graphic to match your brand colors or video color scheme.
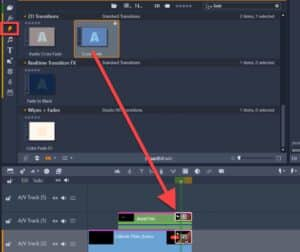
To add a transition: Click on the Transitions icon on the left to open the Transitions library. Drag any of the transitions onto the motion graphic and/or the title in the timeline, for example to add a fade or dissolve to the end so they softly disappear.
Now that you have learned how to create titles with motion graphics and some options for customization, you can get started making your own motion titles and enhance your video projects with some eye-catching, professional looking titles.

Download a FREE 15-day trial and discover all the essential and advanced video editing features that Pinnacle Studio delivers to make your videos look their best.
