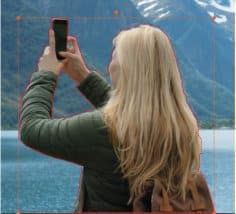
Edit more efficiently and save a lot of time with Smart Object Tracking, intelligent, shape-aware motion tracking for masks applied on common objects. Now you can easily apply masks to objects in your video–from pets and cars, to drones, and more. There is no need to re-create masks for each frame because smart technology automates the process by recognizing the original masked object and tracks it throughout the selected episode. Only available in Pinnacle Studio 25 Ultimate.
In the tutorial series below, start with the basics of how to use Smart Object Tracking to mask and track objects, then learn how to apply this technique to specific projects like adding text behind objects, duplicating objects, or placing objects in a new scene.
Thanks for watching! We hope you found this tutorial helpful and we would love to hear your feedback in the Comments section at the bottom of the page.
Learn the basics of how you can use Smart Object Tracking to identify and track objects across your videos to achieve a variety of cinema-grade special effects.
Thanks for watching! We hope you found this tutorial helpful and we would love to hear your feedback in the Comments section at the bottom of the page. You will find a written version of this tutorial below, and a printable PDF copy to download on the Download Resources tab above.
Learn how to use the sensitivity controls in Smart Object Tracking, and how to fine tune a mask to fix missing frames or make it even more accurate
Thanks for watching! We hope you found this tutorial helpful and we would love to hear your feedback in the Comments section at the bottom of the page. You will find a written version of this tutorial below, and a printable PDF copy to download on the Download Resources tab above.
Learn how to place text behind a tracked object, and how to add effects to the text to help it look more realistic.
Thanks for watching! We hope you found this tutorial helpful and we would love to hear your feedback in the Comments section at the bottom of the page. You will find a written version of this tutorial below, and a printable PDF copy to download on the Download Resources tab above.
Learn how to duplicate an object in a scene, use nested projects to manipulate the mask, plus other adjustments to perfect the final results.
Thanks for watching! We hope you found this tutorial helpful and we would love to hear your feedback in the Comments section at the bottom of the page. You will find a written version of this tutorial below, and a printable PDF copy to download on the Download Resources tab above.
Learn how to remove an object from a scene, and how to place a new scene behind that object.
Thanks for watching! We hope you found this tutorial helpful and we would love to hear your feedback in the Comments section at the bottom of the page. You will find a written version of this tutorial below, and a printable PDF copy to download on the Download Resources tab above.
Download a FREE 15-day trial and discover all the essential and advanced video editing features that Pinnacle Studio delivers to make your videos look their best.
What’s New in Pinnacle Studio
Masking Techniques
Advanced Video Editing Projects
Featured products
 Pinnacle Studio 26 Ultimate
 Studio Backlot Membership
 Pinnacle Studio 26
 Vision FX
Using Object Detection for Mask Tracking
You can use object detection to help you apply a mask to a moving object in your video clips. Object detection uses artificial intelligence (AI) to recognize common objects and automatically track them throughout the video clip. If the object is detected, the mask is automatically adjusted from frame to frame. Fine-tuning is required if the object is obscured and tracking is lost at any point. If the object isn’t recognized, then you can edit the shape mask from frame to frame.
How to Use Object Detection for Mask Tracking
- In the Timeline, select a clip that you want to mask, and click Mask to display the Mask panel. Click Create Clip Mask to add a mask directly to the clip.
- In the Mask panel, click the Create Shape button.
- In the Mask preview area of the Player panel, click the Brush tool. By default, the Smart Edge check box is enabled, so object edges will be auto-detected.
Note: You can use any of the tools in the Brush flyout to select your object, and you can choose to unmark the Smart Edge check box if edge detection isn’t needed. - After your object is selected, click the Apply button.
- In the Shape area, if the object is recognized, you can click the Track button (the button is not available if no object is recognized).
Depending on the size and complexity of the clip and your computer system, it might take a few moments to process. - Review the tracked mask to see if any adjustments need to be made. Before making manual adjustments, you can try changing the Sensitivity setting (below the Track button). You can then click the Track button again to regenerate the tracking result. Lower Sensitivity values include more areas in the mask; higher values include less areas in the mask.
- In the Mask panel, click the Function tab, and choose the Mask Properties that you want.
How to Edit a Shape Mask from Frame-to-Frame
- Create a shape mask.
Note: If masking an irregular shape that is moving, it is recommended that you try using the Brush tool with Smart Edge enabled to create your mask. - In the mask properties area, ensure keyframing is turned on for the shape you have created.
- Use the playback controls in the Mask preview area to move through the frames, stopping when you need to edit the mask so that it covers your target area.
- In the Shape properties area, do one of the following:
- Click the Replace button, and in the Mask preview area, use the Brush tool (with Smart Edge, or another tool of choice), to redraw the mask (the outline for the previous mask remains as a guide), and click Done.

- Click the Modify button, and in the Mask preview, use the tools you want (for example, Brush tool with or without Smart Edge to add to the mask, or Eraser tool to remove from the mask) to edit the shape, and click Done.
Keyframes are added for the edited mask shape.
- Click the Modify button, and in the Mask preview, use the tools you want (for example, Brush tool with or without Smart Edge to add to the mask, or Eraser tool to remove from the mask) to edit the shape, and click Done.
- Repeat steps 2-4 for any additional frames.

Download a FREE 15-day trial and discover all the essential and advanced video editing features that Pinnacle Studio delivers to make your videos look their best.


Comments (4)
Reader Interactions
Comments
Zijn de you tube video’s niet beschikbaar in het Nederlands? Met de Engelse versie kan ik niets aanvangen.
Hallo Van der Meulen Willy,
Je kunt de video’s bekijken met Nederlandse ondertiteling. Klik op het CC-pictogram onder aan de videospeler om ondertiteling in te schakelen. Klik vervolgens op het pictogram Instellingen en selecteer Ondertitels/CC > Automatisch vertalen en selecteer uw taal.
Ik hoop dat dit helpt!
Discovery Center team
les tutos en francais n’existe pas ?
Bonjour,
Malheureusement, les tutoriels sont uniquement en anglais. Pour voir les sous-titres dans votre langue :
– Cliquez sur l’icône “Settings/Paramètres” dans le coin inférieur droit du lecteur video
– Cliquez sur “Subtitles/Sous-titres” et sélectionnez votre langue
– Si votre langue n’est pas répertoriée, cliquez sur “English (auto-generated)”, puis sur “Auto-translate” et sélectionnez votre langue.
Cordialement,
Discovery Center team