
Pinnacle Studio has a number of tools and features to add, edit and enhance the audio portions of your video projects. Some of these features, such as the Audio Mixer, Scorefitter music, Voice Over tool, and Audio Ducking can be found on the timeline. There is also an Audio Editor, with new features introduced in Pinnacle Studio 25 to make your audio sound crisp, clear, and unique.
Thanks for watching! You will find a written version of this tutorial below, and a printable PDF copy to download on the Download resources tab above.
Download these free resources:
Written tutorial (PDF, 1 MB)
Pinnacle Studio User Guide and Help Files
Studio Backlot
Pinnacle learning center
YouTube
Download a FREE 15-day trial and discover all the essential and advanced video editing features that Pinnacle Studio delivers to make your videos look their best.
What’s new in Pinnacle Studio
Intermediate and advanced video editing techniques
Audio and music
Featured products
 Pinnacle Studio 26 Ultimate
 Studio Backlot Membership
 Pinnacle Studio 26
 Vision FX 2.0
An overview of the Audio Editor
In this tutorial, we’ll review the Audio Editor in Pinnacle Studio and all the audio editing tools available to you, in addition to the new audio features introduced in Pinnacle Studio 25.
Audio tools on the timeline
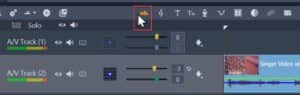
First, let’s review the audio tools that are available on the timeline toolbar. Start with your audio clip/video clip with audio on one of the A/V Tracks on the timeline and select the track that contains the audio or video clip that you want to make audio adjustments to.
Click on any of the images below to view full-size.
Audio Mixer
Click on the Audio Mixer button. This button opens the enhanced audio control area with volume adjustment tools.
Below the timeline track headers is a master playback level indicator that will tell you your volume levels.
- Adjust your master volume by dragging on the yellow slider here or set your own dB level.
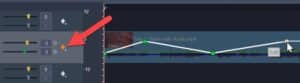
- You can also Turn on Keyframing and edit levels on the tracks using audio keyframing. This will allow you to right-click on the track and manually add or delete keyframes so you can have audio higher and lower in different positions on the clip.
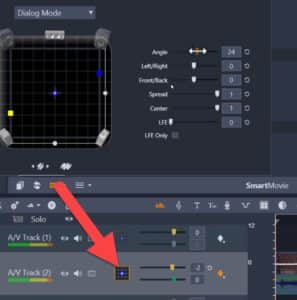
Click on the Panner tool button to adjust the surround sound settings by selecting any of the presets or customizing your own settings by adjusting the sliders manually.
- Introduced in Pinnacle Studio 25, the 5.1 surround sound controls now have support for Angle, Spread and Center with keyframe options to manipulate multi-speaker panning over time.
Voice Over Tool
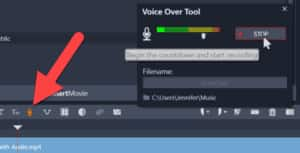
Click on the Voice Over Tool button. You can record a voice over using your microphone by pressing the Record button, and then once you finish recording, your voice over will be automatically added to the Voice Over track on the timeline.
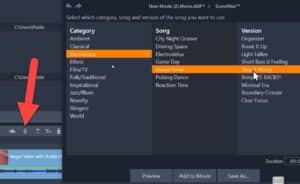
ScoreFitter Music
Click on the SoundStage button to access a collection of ScoreFitter music. This is an easy way to add a great soundtrack to your videos, as the ScoreFitter tool will automatically compose the song so it perfectly matches the length of your media on the timeline.
To learn more, watch the full tutorial How to Add Music.
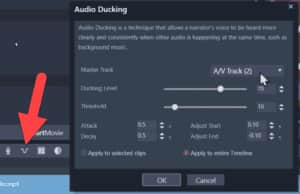
Audio Ducking
Audio Ducking is a technique that allows a narrators’ voice to be heard more clearly above other audio, like background music, in the project.
To learn more, watch the full tutorial How to Use Audio Ducking.
Audio Editor panel
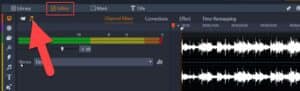
To access the Audio part of the Editor panel, make sure you select the audio or video clip you want to make edits to.
Then click on Editor, and click on the Music Notes icon to enter the audio editing mode if you are editing audio in a video clip.
Channel Mixer
The channel mixer allows you to make level adjustments and redirect audio signals from their original channel assignments to new ones.
Level adjustment: Click on the slider under the level meters to set the playback level of the clip. The level you set will be used whenever this clip is played or used in a timeline. The red area on the meters represents overmodulation of the sound and should be avoided if possible. To determine the maximum level you can safely use, click the Normalize button.
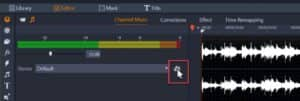
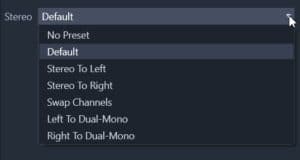
Stereo: This dropdown list contains all options for redirecting audio signals, such as a channel exchange (left interchanges with right, for example), or combining a two-channel stereo signal onto one mono channel.
Introduced in Pinnacle Studio 25 to 5.1 surround sound controls are support for Angle, Spread and Center with keyframe options to manipulate multi-speaker panning over time.
To access the surround sound controls, click on the 5.1 Surround/Stereo Panner icon in the track header area beside your clip on the timeline, as demonstrated at the beginning of this tutorial.
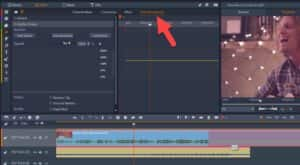
Corrections
This section lets us make many different corrections to improve our audio quality.

- Equalize: An equalizer is basically a tool that lets you adjust the volume of the individual frequencies within an audio source.
- You can choose from a number of select presets from the dropdown list, or choose to manually adjust the dials to set Gain, Frequency, and HiCut and LoCut
- Adjustments: The only parameter available under the Adjustment tool the is LFE (Subwoofer), which lets you either activate or deactivate the Subwoofer channel for a particular clip.
- Compressor: Adding a compressor can help smooth out your sound by scaling back the loud sections.
- Expander: Expanders increase the difference in loudness between quieter and louder sections of audio making quiet sounds quieter and loud sounds louder.
- De-Esser: De-essing helps you reduce sibilance or harsh high-frequency sounds.
- Noise Reduction: Using the noise reduction filter can help reduce or eliminate background noise to give you cleaner and clearer audio.
Introduced in Pinnacle Studio 25, the Noise Reduction section now allows you to create a noise profile. This allows you to make a selection of audio as a sample of the background noise you want to eliminate throughout the entire clip.
Noise reduction using a custom noise profile
Using the noise reduction filter you can reduce or eliminate undesirable background noise. The filter reacts dynamically to changing amounts and kinds of noise within the material.
Noise reduction can be applied for a range of problems. The results obtained may differ, however, depending on the source material and the origin of the problem. In many cases the results can be optimized through targeted use of the Level and Fine Tuning parameters.
To apply noise reduction:
1. Double-click a clip with audio.
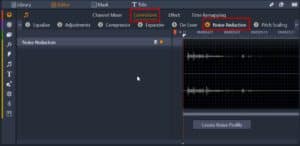
2. In the Editor panel, click the audio button in the upper-left corner.
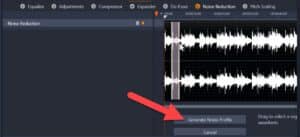
3. Click the Corrections tab and click Noise Reduction.
4. Click the Create Noise Profile button.
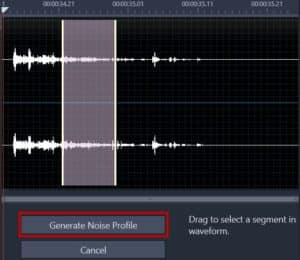
5. In the waveform view, drag across a section of the audio that contains only the audio sound that you want to remove.
6. Click the Generate Noise Profile button.
7. Adjust any of the following settings to fine-tune the noise reduction:
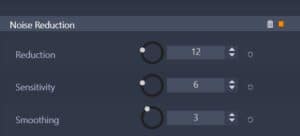
- Reduction: Specifies the amount of noise reduction. Higher values remove more noise, but can reduce the volume of the audio that you want to preserve.
- Sensitivity: Specifies the frequency range of the noise reduction. Higher values remove more noise, but might remove some frequencies that you want to preserve.
- Smoothing: Removes artifacts such as choppiness and popping. Higher values remove more artifacts, but can reduce clarity.
If you aren’t able to get the results you want, you can click Recreate to select and generate a new noise sample.
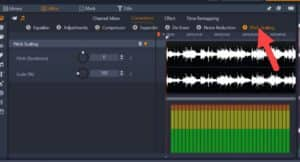
Also introduced in Pinnacle Studio 25, is a new section for Pitch Scaling. Pitch Scaling lets you change the pitch of audio without affecting the speed and therefore not impacting the duration of the clip.
To apply Pitch Scaling:
1. Double-click a clip with audio.
2. In the Editor panel, click the audio button in the upper-left corner.
3. Click the Corrections tab and click Pitch Scaling.
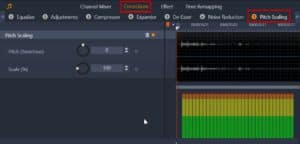
4. Adjust either of the following settings to change the pitch of the audio:
- Pitch (Semitone): Increases or decreases pitch (measured in semitones)
- Scale (%): Increases or decreases pitch (measured as a percentage)
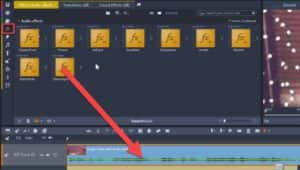
Audio effects
Apply audio effects by clicking on the Effects section. There are a number of audio effects we can apply to our audio or video file: ChannelTool, Chorus, deEsser, Equalizer, Grungelizer, Leveler, Reverb, StereoEcho, and Stereo Spread.
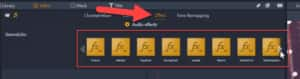
To apply the effect, simply click an effect on the thumbnail bar and it will automatically apply to your selected clip.
Another way to add an audio effect to your project is to go to the Library panel and go to Effects > Audio effects. Then drag the effect from the Library onto your audio or video clip.
After editing an Audio Effect, you can make custom edits to any of the default settings by right clicking on your clip on the timeline and going to Effect > Edit and selecting the applied effect. From here, make any adjustments you wish or select a different preset.
Time Remapping
Time Remapping allows you to adjust the speed for your video clips. You can apply a slow motion or fast motion effect to the entire clip, or you can use keyframes to speed up some scenes in a clip, while slowing down other scenes.
To learn more, watch the full tutorial Adjusting Speed with Time Remapping.
These are all of the different ways you can improve or experiment with your audio and video clips in Pinnacle Studio!
Download a FREE 15-day trial and discover all the essential and advanced video editing features that Pinnacle Studio delivers to make your videos look their best.

Comments (2)
Reader Interactions
Comments
tutto bene per le persone inglese.
a me non mie di nessuno aiuto. essendo che ho acquistato il programma dal’italia mi sarebbe utile consultarlo in questa ligua.
grazie
Ciao Antonio,
Per vedere i sottotitoli nella tua lingua:
– Fai clic sull’icona “Settings/Impostazioni” nell’angolo in basso a destra del video player
– Fare clic su “Subtitles/Sottotitoli” e selezionare la lingua
– Se la tua lingua non è elencata, fai clic su “English (auto-generated)/Inglese (generato automaticamente)”, quindi fai clic su “Traduzione automatica” e seleziona la lingua.
Distinti saluti
Discovery Center team