
Create a professional-looking movie in minutes with the help of project templates! In this tutorial, we’ll show you step-by-step how to use Pinnacle Studio™ templates for your own personal or business projects. These templates have effects, transitions, and text boxes built in, so even if you’re new to Pinnacle Studio, you’ll be able to get started quickly and easily.
Pinnacle Studio comes with dozens of templates included but you can also find more templates for purchase in the Store tab of the Welcome screen inside Pinnacle Studio.
Thanks for watching! You will find a written version of this tutorial below, and a printable PDF copy to download on the Download resources tab above.
Download a FREE 15-day trial and discover all the essential and advanced video editing features that Pinnacle Studio delivers to make your videos look their best.
Download these free resources:
Written tutorial (PDF, 1.3 MB)
Pinnacle Studio user guide and help files
What’s New in Pinnacle Studio
Beginner Video Editing Techniques
Templates and Overlays
Featured products
 Pinnacle Studio 26 Ultimate
 Studio Backlot Membership
 Pinnacle Studio 26
 Vision FX 2.0
How to use project templates in Pinnacle Studio
In this tutorial, we’ll show you step-by-step how to use Pinnacle Studio™ templates for your own personal or business projects. These templates have effects, transitions, and text boxes built in, so even if you’re new to Pinnacle Studio, you’ll be able to create a professional-looking movie quickly and easily.
Step 1: Getting started
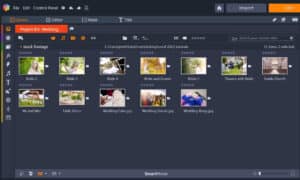
In our first project example, we’re going to use the Colorize (P-07) template to make a short wedding photo compilation video. In the Library panel on the Edit tab, we have a project bin set up with the media we want to use.
To access the template, click on the Project Bins icon, which is the top icon on the Navigator bar and your templates will be listed.
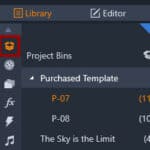
NOTE: if you have purchased templates from the Welcome screen inside Pinnacle Studio, your templates will be automatically installed and listed under the Purchased Template project bin. If you have purchased templates from the Discovery Center store, you will need to manually install the templates to a location of your choosing on your computer. For more information on manual installation, read the full installation instructions.
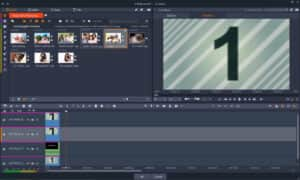
Select the template you want to use, and the template files will be displayed in the Browser window of the Library. Locate the movie.axp file and double-click on it to load the template files on the timeline.
You will see that the A/V tracks are filled with placeholders for your images or video clips, as well as different titles that you can customize with your own text. If you click and drag the playhead along the Player window timeline, you can view the transitions throughout the entire template.
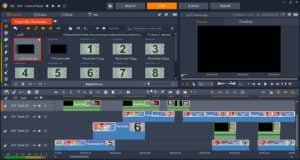
If you want to zoom in or zoom out on the timeline, scroll down to the bottom of the timeline and your cursor will change to an icon with two arrows. Click and drag to the right to zoom in to be able to edit individual components. Or click and drag to the left so you can zoom out to see the entire template in the timeline. You can use the bottom scrollbar to adjust your position on the timeline as well.
TIP: It’s a good idea to save your project periodically as you’re working on it. Go to File > Save Movie and save it as a Studio Movie Project that you can edit later.
Step 2: Adding media to the template
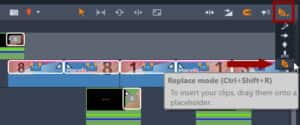
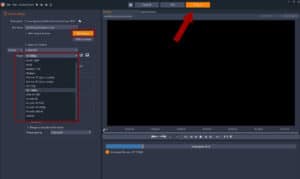
Before you start adding your photos or videos to the template it’s very important to make sure you are using the Replace editing mode. Go to the right of the timeline toolbar, click the dropdown menu and select Replace mode. Alternatively, you can activate Replace mode with the keyboard shortcut CTRL + Shift + R.
Now you’re ready to add your own media into the template. In the Library, open the project bin containing your media. To add media to the template, all you have to do is click and drag the media from the Library into the desired placeholder on the timeline. In our example, we’ll drag a picture of the bride over the top of Placeholder 1 until the placeholder is highlighted in red. Once you release your mouse, your photo will take the place of the placeholder and will have the transitions automatically added.
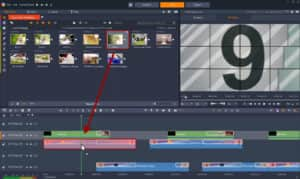
Now repeat this step with the rest of the placeholders on the timeline. If you want to replace any of the media that you’ve added to the placeholders, simply drag and drop a new photo or video clip into the placeholder.
Step 3: Adjusting media
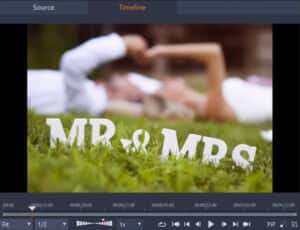
In some cases, the photos or video clips might not be the same aspect ratio as the template. For example, with one of our photos we see these black bars on either side.
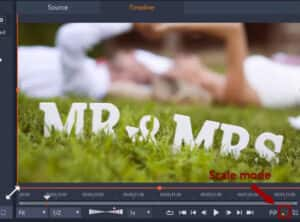
You can change the size and position of a photo by clicking on the photo on the timeline and then clicking the Scale Mode icon under the Player panel. In Scale mode, you will see an orange frame and control handles around the photo. You can click and drag the photo to reposition it or drag on the nodes to rescale or rotate the photo until it fills the entire frame.
To learn more about cropping and resizing, watch the full tutorial.
Step 4: Adding titles
Each template contains title placeholders that you can replace with your own text. On the timeline, click on the title you want to edit, and this will open the Text tab of the Title Editor.
TIP: Before editing a title, you can preview it in the Player panel to see what the title looks like before, during, and after the transition.
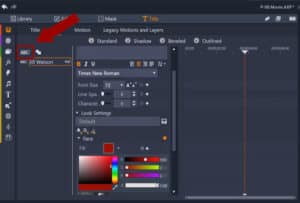
The Title Editor has many options to make your text look exactly the way you want. On the left, each component of the title is on a separate layer. In our example, we have 3 layers:
- A text layer “Your Text Here.”
- A shape layer, which is the white line.
A text layer “Lorem Ipsum.”
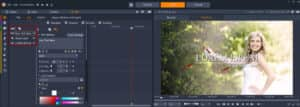
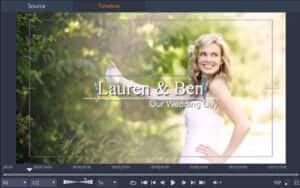
Each layer can be modified independently, using the Text Settings and Look Settings. In our example, we’ll click on the first text layer and change this to “Our Wedding Day”. Then we’ll click on the second text layer and change this to “Lauren & Ben”. For this title, we’ll keep the settings the same as the template.
With titles that contain multiple layers, you can delete any of the layers if you wish. Just select a text or shape layer then right-click on it and select Delete Layer or press the Delete key on your keyboard. Alternatively, you can click the Hide (eye) icon beside the layer to make the layer invisible in case you change your mind and want to enable it later.
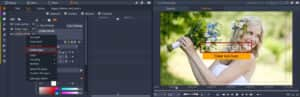
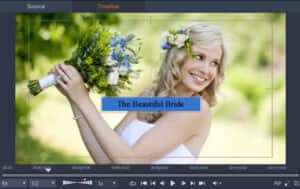
For our next title, we’re going to remove the top text layer so that it only has the shape layer with the text inside it. We’ll change the text to “The Beautiful Bride” and we’ll also change the color of the shape layer so that it complements the colors in our photo. To do this, select the shape layer and then select a new Fill color under Look Settings. You can even use the Eyedropper tool to sample a color from your photo so it matches perfectly.
To learn more about title editing, see the tutorial series Working with text and titles.
Step 5: Exporting your video
Once you have finished editing your video, you can export it by clicking on the Export tab at the top. Then choose the folder destination and give the file a name. Choose an export preset (we’re using HD 1080p) and click Start Export.
To learn more about exporting videos, watch the full tutorial.
Step 6: Editing split screen templates
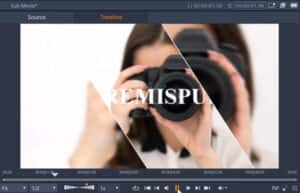
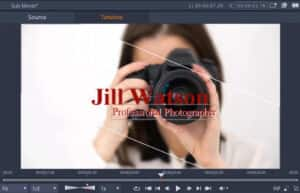
Some of the templates include split screen placeholders, which require an extra step. In this example, we are using the Blur Effect (P-08) template to create a video for a photographer’s business.
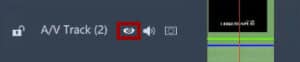
You can see that on A/V Track 2, we have several split screen placeholders which are different from the media placeholders that we worked with in the first template.

To add media to the split screen placeholders, right-click on the placeholder on the timeline and choose Open in Sub Editor. This will open the Sub Editor in a separate window, and each segment of the split screen placeholder will be on its own timeline track.
From here, open the project bin that contains your media and then drag and drop your media onto the placeholders as we did in the first project. You can preview how the images look by playing the movie in the Player window.
To learn more about split screen videos, watch the full tutorial.
While you’re in the Sub Editor, you’ll also want to make any edits to the titles within each one. Just double-click on the title to open the Title Editor, and then make any changes you want to the Text Settings and Look Settings.
In our previous example we showed you how you can remove a text or shape layer from a title. In this example, we’re going to add a new text layer. To add a new text layer, click the Add Text Layer (ABC) icon.
Here we’ve added a second text layer for a subheading that says “Professional Photographer” and we’ve changed the font and size.
Once you’re finished adding your media to the placeholders and editing the titles, press OK to exit the Sub Editor and go back to the timeline. Now repeat this process with the other split screen placeholders by opening each placeholder in the Sub Editor, dragging and dropping your media into the placeholders, and editing the titles.
If you want to delete a title entirely, you can either delete each text and/or shape layer in the Title Editor or toggle off the monitoring button (eye icon) in the track header of whichever track your title is on. This second option is preferable, in casee you change your mind later and want to include the title.
REMINDER: If the template you are using contains both regular placeholders and split screen placeholders, make sure that you are in Replace mode when adding your media to the regular placeholders.
Pinnacle Studio includes dozens of free templates that can be found in the Montages and Templates section of the Library, and you can find even more templates to purchase on the Store tab of the Welcome screen. Now that you know how to work with templates, we hope you’ll give them a try to see for yourself how easy it is to make a professional-looking movie with your own photos and videos.
Download a FREE 15-day trial and discover all the essential and advanced video editing features that Pinnacle Studio delivers to make your videos look their best.
