
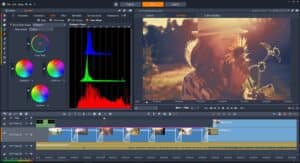
Stylize your image to set the tone and mood with new powerful color grading controls, including color correction, color wheels, LUT, waveform scope, and more. With precise controls, you’re in the driver’s seat when it comes to setting the ambience, creating a sun-kissed scenario or an ice blue landscape. Even match the color of two clips captured in different lighting! The creative possibilities and customizations are endless with Pinnacle Studio.
Thanks for watching! We hope you found this tutorial helpful.
Download a FREE 15-day trial and discover all the essential and advanced video editing features that Pinnacle Studio delivers to make your videos look their best.
What’s new in Pinnacle Studio
Color effects and corrections
Featured products
 Pinnacle Studio 26 Ultimate
 Studio Backlot Membership
 Pinnacle Studio 26
 Vision FX 2.0
How to use color grading
Pinnacle Studio includes a collection of color adjustment tools that let you correct the color in video clips or get creative with color grading to achieve a specific mood or look. The color controls available in Pinnacle Studio depend on the version of the application you have. When you’re making color adjustments, you have access to the Color Grading view in the Player panel. In addition to creating your own creative look, you can import LUT profiles (lookup table).
Tone Curve
The Tone Curve lets you perform color and tonal corrections by adjusting either individual color channels or the composite (RGB) channel.
The x-axis of the graph represents the original tonal values (from highlights on the right, to shadows on the left); the y-axis of the graph represents the adjusted tonal values (from dark/less color at the bottom, to light/more color at the top).
The diagonal line on the graph is what you adjust to create your “curve”. Moving the curve up and to the left lightens the clip and increases the color in any channel; moving the curve down and to the right darkens the clip or decreases the color of a given channel. If you have a clip with a blue cast, for example, you can decrease the blue in the image by selecting the Blue channel and moving the curve down and to the right.
You can add one or more nodes to the curve, to give you more precise control over the areas that you want to adjust.
HSL Tuning
HSL (Hue, Saturation, Lightness) is a powerful color adjustment tool that lets you interactively adjust colors in a clip. This lets you target specific colors.
The interactive control (white cursor) on the Color Grading view in the Player panel lets you drag in the image to adjust specific colors. The original source clip colors appear on the left.
To access color correction and color grading controls:
1. Open the Editor panel, click Color, and choose one of the following options:
- Basic
- Tone Curve
- HSL Tuning
- Color Wheel
To apply a LUT profile:
1. Open the Editor panel, click Color > Basic.
2. At the bottom of the Basic Settings area, click the drop-down menu beside LUT Profile, and choose a LUT profile or click Browse and navigate to the file you want to apply.
To adjust color and tone with Tone Curve
1. Open the Editor panel, click Color > Tone Curve.
2. Below the curve graph, select one of the following color channel options:
- RGB — lets you edit the red, green, and blue channels in a combined histogram
- Red — lets you edit the red channel only
- Green — lets you edit the green channel only
- Blue — lets you edit the blue channel only
Drag points on the graph to adjust the relationship between the Input levels (the brightness of the original pixels) and the Output levels (the brightness of the corrected pixels).
If you want to add a point to the curve, click along the line where you want to add the point. Note: At any point you can reset the curve by clicking Reset All.
To adjust color with HSL Tuning
1. Open the Editor panel, click Color > HSL Tuning.
2. Click one of the following tabs:
- Hue
- Saturation
- Lightness
3. Do one of the following:
- Click the interactive color tool, then in the Player panel ensure that the Color Grading view is displayed, and drag across a color in the clip that you want to adjust. Dragging to the left moves the corresponding sliders to the left; dragging to the right moves the corresponding sliders to the right.
- Adjust the individual sliders to set the values you want.
- Note: You can return to the original clip settings by clicking Reset All. You can also reset an individual slider by double-clicking the label for the slider.
Download a FREE 15-day trial and discover all the essential and advanced video editing features that Pinnacle Studio delivers to make your videos look their best.
