
Learn how to use the Selective Color feature to highlight a single color in a photo or video. This technique will bring your focus to the spotlight, pushing everything else to the background in black and white. It’s a truly unique effect to add to your next video!
Thanks for watching! We hope you found this tutorial helpful and we would love to hear your feedback in the Comments section at the bottom of the page.
Download a FREE 15-day trial and discover all the essential and advanced video editing features that Pinnacle Studio delivers to make your videos look their best.
What’s New in Pinnacle Studio
Effects, Filters and Transitions
Color Effects and Corrections
Featured products
 Pinnacle Studio 26 Ultimate
 Studio Backlot Membership
 Pinnacle Studio 26
 Vision FX 2.0
How to Create a Selective Color Effect
Selective Color is an effect that lets you fully or partially desaturate a video or photo while preserving one or more focal colors. For example, you can preserve the bright yellow of a taxicab while making everything else in the scene black-and-white.

Selective Color lets you preserve one or more focal colors.
To apply the Selective Color effect:
1. In the Timeline, select a clip.
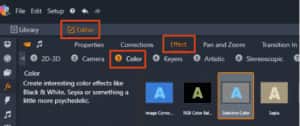
2. Open the Editor panel, click Effect > Color, and click the Selective Color thumbnail.
Note: An arrow appears when you position your pointer over the bar of effect thumbnails. This lets you scroll through the available effects.
3. Click the Eyedropper tool , and in the Preview panel, do one of the following:
- Click a color that you want to preserve—all other colors will be desaturated (based on the Desaturation slider setting).
- Drag across an area to set a rectangular sample area—all other colors will be desaturated.
To add to your color selection, hold the CTRL key while you click or drag the Eyedropper tool.
To clear all color selections, choose Default from the Select preset dropdown menu.
Note: Enable the Reverse checkbox if the area you want to desaturate has less color variation (such as a lawn, sky, or water) than the area you want to preserve.
4. To adjust the results, do any of the following:
- To adjust the selected color, click the Edit button beside the Eyedropper tool and in the Hue Color Picker, drag a top arrow to move to a new color. Drag the bottom arrows to adjust the range for a selected color. Use the Add Color and Remove Color buttons to change colors using the Hue Color Picker.
- Drag the Desaturation slider from 100 to a lower value if you don’t want a full black-and-white effect in unselected areas.
- Drag the Edge Softness slider to a higher value if you want a softer edge transition between the areas of color and the desaturated areas.
5. Preview your entire clip to ensure your settings achieve the results you want. Adjust any settings as required.
Download a FREE 15-day trial and discover all the essential and advanced video editing features that Pinnacle Studio delivers to make your videos look their best.
