
Don’t throw away all the time and effort you put into your VideoStudio project! Use a Ripple Edit to keep your titles, overlays, and audio perfectly in sync without any tedious, manual adjustments. Once you learn how to use a ripple edit you’ll wonder how you ever got by without it.
The best way to describe what a ripple edit is would be to explain a situation you would need it. Let’s say you have finished your slideshow complete with pictures, music, and titles but then you decide that you want to add or remove some of the pictures. If these pictures are in the middle of your movie, adding or removing them can completely throw off the timing of everything else! That’s where a ripple edit comes in. A ripple edit lets a single edit ripple down through the rest of the movie to ensure everything stays in sync and just the way you designed it. Save yourself the headache and time when you learn how to ripple edit in VideoStudio.
In this tutorial you will learn:
- How to lock individual tracks or all tracks on the timeline
- How to enable ripple editing
Thanks for watching! We hope you found this tutorial helpful and we would love to hear your feedback in the Comments section at the bottom of the page. You will find a written version of this tutorial below, and a printable PDF copy to download on the Download Resources tab above.
Download a FREE 30-day trial and turn your best moments and life experiences into unique movies with this easy and fun video editor packed with intuitive tools and creative effects.
Download these free resources:
Written Tutorial (PDF, 453 KB)
VideoStudio User Guides and Help files
For VideoStudio X9 to 2023, languages include English, Deutsch, Français, Italiano, Nederlands, 简体中文, 繁體中文, 日本語
Intermediate and Advanced Techniques
What’s New in VideoStudio
Overlays and Templates
Featured products
 VideoStudio Pro 2023
 Studio Backlot Membership
 VideoStudio Ultimate 2023
 Vision FX 2.0
How to Ripple Edit
With VideoStudio, you can enable Ripple Editing to help you save time and effort when editing your video or slideshow. Imagine you have just created a slideshow and want to remove a few pictures. Doing this without Ripple Editing would throw off the timing of the rest of your video, and you would have to make manual adjustments to fix it. But if you enable Ripple Editing, your titles, overlays, and audio will stay in sync, even if you edit out a portion of the video.
To Enable Ripple Editing:
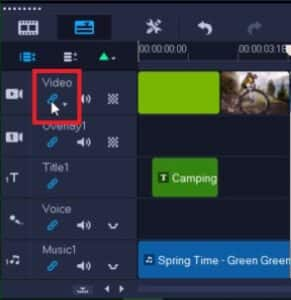
Go to the left side of the video track on your Timeline.
Click on the chain lock icon. This will enable Ripple Editing on all the tracks on your Timeline.
Alternatively, click on the small arrow beside the chain lock icon and a drop-down menu will appear.
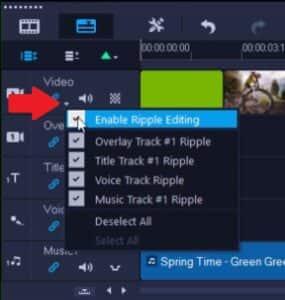
Here, you can choose to Enable Ripple Editing, and select which tracks you would like to enable or disable Ripple Editing on.
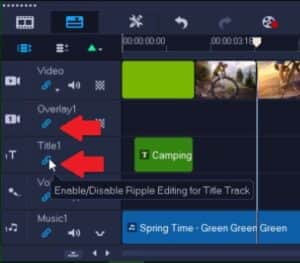
Click on the chain lock icon on each track to manually enable or disable Ripple Editing.
Now, you can make edits to your video or slideshow, and the titles, overlays, or audio will automatically move and stay in sync with the video.
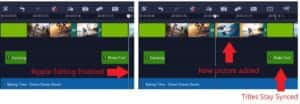
As you can see, you won’t have to make any manual adjustments!
Ripple Editing can save you a lot of time and effort and makes it easy to make edits to your video.
Download a FREE 30-day trial and turn your best moments and life experiences into unique movies with this easy and fun video editor packed with intuitive tools and creative effects.
