
Design a custom, personalized photo postcard – complete with background, photo opening, text, and decorations – in CorelDRAW. In this tutorial, we’ll cover all the steps starting with document setup through to printing and saving your postcard. Our example is a holiday-themed postcard, but you can use the same techniques for any occasion. Download the free holiday images on the Download Resources tab at the top of the tutorial page and follow along.
Thanks for watching! We hope you found this tutorial helpful. You will find a written version of this tutorial below, and a printable PDF copy to download on the Download Resources tab above.
Start your FREE 15-day trial and embark on a design journey with powerful tools for vector illustration, layout, photo editing, typography, and collaboration.
Download these free resources:
Written tutorial (PDF, 1.4 MB)
VectorStock design elements (Zip file, 7 MB) This file was provided by VectorStock / Voysla
CorelDRAW Graphics Suite resources
Quick Start Guide (PDF, 2 MB)
Keyboard Shortcuts (PDF, 3.5 MB)
CorelDRAW and Corel PHOTO-PAINT user guides
For CorelDRAW Graphics Suite subscription and perpetual licenses (2018 to 2024), languages include English, Português do brasil, 简体中文, 繁體中文, Čeština, Deutsch, Español, Français, Italiano, 日本語, Polski, Русский
CorelDRAW Community
CorelDRAW learning center
Facebook
X (formerly Twitter)
YouTube
 CorelDRAW Graphics Suite
 Ultimate Vector Bundle Vol. 1
 CorelDRAW Standard 2021
 Ultimate Vector Bundle Vol. 2
 Corel Vector
Design a photo postcard in CorelDRAW
In this tutorial we’ll see how to design a simple photo postcard in CorelDRAW, with a background, decorations, and text, and of course a family photo. We’ll be creating a holiday greeting card, but you can use the same techniques for any occasion.
In this tutorial, we’ll cover the following:
- Document Setup
- Adding a Background
- Adding a Photo and Photo Frame
- Adding Text
- Adding Decorative Elements
- Saving and Printing
Click on any of the images below to view full-size.
Document setup
Before you begin, you should consider whether you plan to print your photo postcard or share it online, or both. If you want to print and mail to family and friends, you can use a printing service or print at home using photo paper or purchased template sheets. The document size will be based on your printing method, but if you are only planning to share the photo postcard online, you can use any dimensions and aspect ratio you choose.
NOTE: if you plan to use a printing service, check their website for instructions about photo sizes, resolutions, file formats, and how to upload your file.
For our example, we will be printing at home using a pre-formatted Avery template that has space for two 4×6” images.
Go to File > New or choose New Document on the Get Started tab of the Welcome Screen. In the Create a New Document window, set the Resolution to 300 dpi. The page dimensions can be anything, as we will be setting our page size in the next step. Click OK.
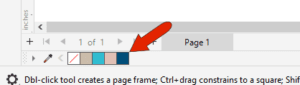
To find the label template we’ll be using, go to Layout > Page Size and click on the Label presets option. This gives you a list of many different label brands and types to choose from. The one we’re using is under Avery Laser/Ink: #5389 with space for two 4” x 6” postcards. Select the template you want to use and click OK.
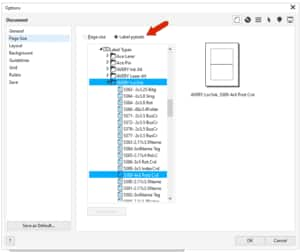
This changes the page dimensions to the 4 x 6” size for the template.
Adding the background
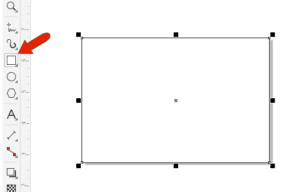
Now we want to define the page border to use as a clipping object for the background image. The easiest shortcut for this is to double-click the Rectangle tool icon on the Toolbox.
The background image we’ll use is a CorelDRAW file containing vector snowflakes, provided by our friends at VectorStock (Vector image by VectorStock / Voysla). This file is available to download on the Download Resources tab at the top of the tutorial page.
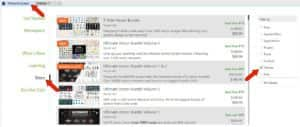
If you are looking for something different, Corel has a wealth of content such as clip art, borders, fill patterns, and more. You can find this by going to the Welcome Screen and clicking Store or Get More depending on the version you’re using. Choose a filter if you want and browse the options. Filtering by Vectors will produce a list of vector content, which is scalable and easy to use in CorelDRAW.
The background image we’ll use is a CorelDRAW file containing vector snowflakes. To bring in this file, click the Import icon, and place the imported image off to the side.
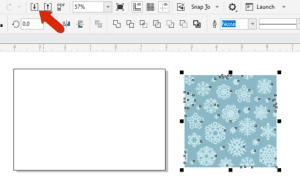
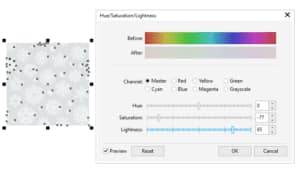
We want to lighten the background a bit, so while it is still selected, choose Effects > Adjust > Hue / Saturation / Lightness. Preview is checked, so you can see changes in real time. We’ll lower the Saturation, increase the Lightness, and keep the Hue as is. This is an optional step, so you can adjust the Hue/Saturation/Lightness to your own liking or leave the background as is.
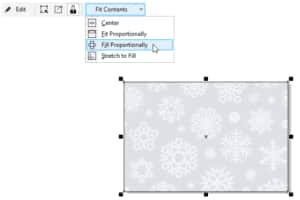
To make the background image fit the page, right-click on it and choose PowerClip Inside. When the cursor changes to an arrow, use it to click on the page rectangle. The background image will be placed inside the rectangle, and the PowerClip menu bar is along the top of the drawing window. From the Fit Contents dropdown list, choose the Fill Proportionally option.
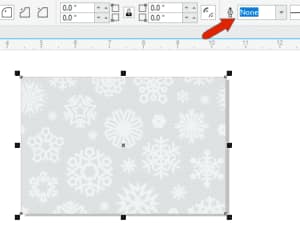
To remove the page border outline, you can either change its Outline width to None on the Property Bar, or you can right-click on the no-color swatch at the top of the Color palette. If you prefer to keep the border, you can also increase the outline width and change the Line style or color if you want.
Adding a photo and photo frame
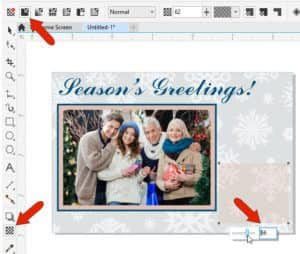
Now we want to bring in the family photo, so we’ll click the Import icon, browse to select our photo, and place the photo on the left side of the card.

To place a 2-color frame around this photo, we’ll use several shortcuts. With the photo still selected, hold down the Shift key and double-click the Rectangle tool. This creates a rectangle around the photo. In the Objects docker, you can see that this new rectangle is at the top of the layer.
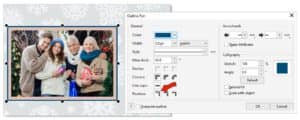
With that rectangle selected, double-click the Outline swatch on the right side of the status bar (along the bottom of the drawing window). This opens the Outline Pen dialog box, where we can modify the rectangle. We’ll set the Width to 8pt and choose Inside Outline for the Position.

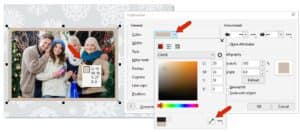
For the outline color, click the Color dropdown to open the color picker window and use the Color Eyedropper to sample a color from the photo. Click OK.
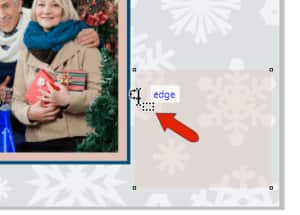
For the outer border repeat the previous steps: select the photo, hold down the Shift key and double-click the Rectangle tool to create a new rectangle. Double-click the Outline swatch to open the Outline Pen dialog box. This time the Width will be 3pt, the Position will be Outside outline, and again we will use the Color eyedropper to sample a different color from the photo.
Note that the swatches from colors you chose for the outlines are listed in the Document palette, along the bottom of the window.
Adding text
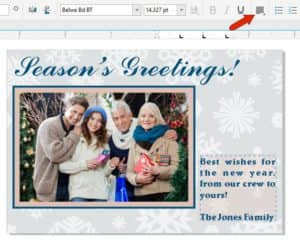
Next comes the greeting text, which we’ll place above the photo. Activate the Text tool, click where you want to start, and type the text you want for your greeting, clicking in blank space when finished.
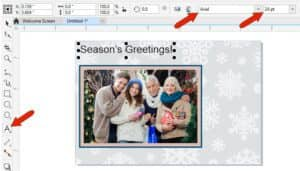
To format the text, use the Pick tool to select it and then you can change the font style, size, and other text settings on the property bar. You can also use the Pick tool to reposition the text if necessary. For the text color, we’ll click a swatch in the Document palette to match the outer frame color.

We also want to add a message in the lower right corner of the postcard, but before we add that text we want to create a semi-transparent text box so the text is easily visible. We’ll use the Rectangle tool to create the rectangle that will contain this text. Set the rectangle fill color by clicking a swatch in the Color palette or Document palette, and on the property bar change the Outline width to None.
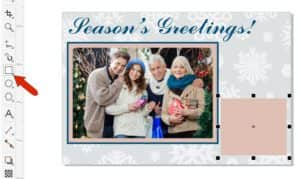
We want the snowflake background to show through the rectangle a bit. To do this, select the Transparency tool in the Toolbox. On the property bar choose the Uniform transparency option and adjust the Transparency slider to your liking.
You could leave this area empty if you want to write in a message by hand on each printed card. Or you can add the text with the Text tool – and keep in mind that you could edit this text if you wanted to have different, personalized greetings on some cards. Activate the Text tool and move your cursor over the rectangle until the tool icon changes to a dotted square on the Text icon. This indicates that the text will be fitted into the rectangle.
This creates paragraph text that stays within the rectangle, which you can highlight to select and change font, and color, and center or justify the text. With the text still selected, choose Text > Paragraph Text Frame > Fit Text to Frame, so that the text takes up the whole rectangle.
Adding decorative elements
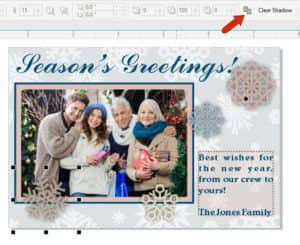
Our last step in the postcard design is to add a few decorations. In this example, we’re going to use a few snowflake graphics from the background image we used earlier. We’ll import the image again (CDR file) and place it off to the side. Click in a blank space of the drawing window to deselect the image. Activate the Pick tool and select a snowflake, then move it onto the card and resize and/or rotate if needed.

If you want to change the color of the snowflake, click any swatch in the Color palette along the right, or in the Document palette. And for a nice shadow effect, activate the Shadow tool in the Toolbox, drag from the snowflake center just a bit, and use the slider to adjust the shadow transition if necessary.

You can bring in more snowflakes and copy the shadow properties from the first snowflake. With the Shadow tool active, select a new snowflake, click the Copy icon on the property bar and then click on the first snowflake to copy the shadow properties.
Saving and printing your postcard
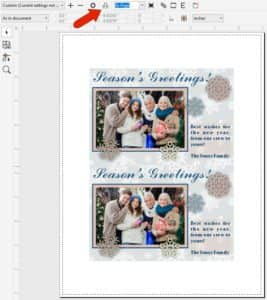
Once you are happy with, make sure to save it not only as a CDR file, but also as a JPG if you want to share online. If you are using a print service, make sure to check what kind of file formats they accept. For printing at home on a template, go to File > Print Preview. Because the template is already defined, both 4×6 slots are filled with the postcard design, and the Print button is right in the toolbar.
Start your FREE 15-day trial and embark on a design journey with powerful tools for vector illustration, layout, photo editing, typography, and collaboration.
