
Learn how to use CorelDRAW’s new Variable Outline tool to interactively adjust lines, curves, and outlines, using nodes at one or more points along the path to specify different line widths. The new Variable Outline tool allows you to create dynamic line styles, seamless curves, hand-drawn and calligraphic effects.
Thanks for watching! We hope you found this tutorial helpful. You will find a written version of this tutorial below, and a printable PDF copy to download on the Download resources tab above.
Start your FREE 15-day trial and embark on a design journey with powerful tools for vector illustration, layout, photo editing, typography, and collaboration.
Download these free resources:
Written tutorial for Windows (PDF, 1.1 MB)
Written tutorial for Mac (PDF, 1.1 MB)
CorelDRAW Graphics Suite resources
Quick Start Guide (PDF, 2 MB)
Keyboard Shortcuts (PDF, 3.5 MB)
CorelDRAW and Corel PHOTO-PAINT user guides
For CorelDRAW Graphics Suite subscription and perpetual licenses (2018 to 2024), languages include English, Português do brasil, 简体中文, 繁體中文, Čeština, Deutsch, Español, Français, Italiano, 日本語, Polski, Русский
CorelDRAW Community
CorelDRAW learning center
Facebook
X (formerly Twitter)
YouTube
What’s new in CorelDRAW Graphics Suite
CorelDRAW tools
Lines, shapes, and outlines
 CorelDRAW Graphics Suite
 Ultimate Vector Bundle Vol. 1
 CorelDRAW Standard 2021
 Ultimate Vector Bundle Vol. 2
 Corel Vector
How to create variable-width outlines
In this tutorial, we’ll explore the new Variable Outline tool, available in CorelDRAW and Corel DESIGNER. This tool enables you to interactively adjust lines, curves, and outlines, using nodes at one or more points along the path to specify different line widths. The variable widths are preserved when curves or lines are edited.
Variable outlines are great for adding depth to your drawings, by creating hand-drawn or calligraphic effects.
We’re starting with a simplified version of this cartoon-style illustration created by CorelDRAW artist Ivan Fedorowich, and we’ll use the Variable Outline tool to add a dynamic line style to various elements.

We’ll start by modifying the lightning bolt, so we’ll use the Objects docker to hide the objects that are in front of this curve.
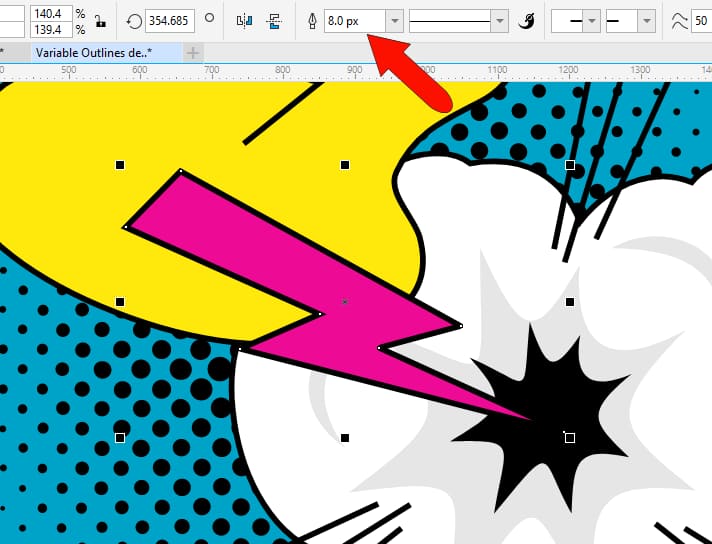
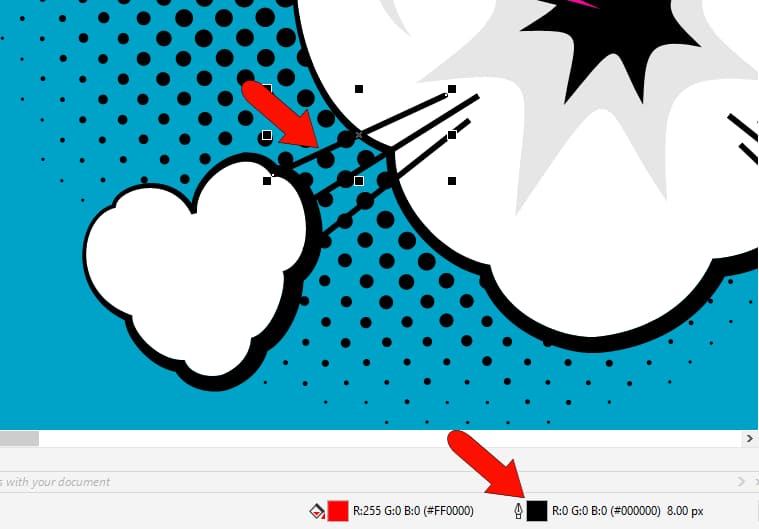
When you select an object with the Pick tool, the property bar lists a uniform width of 8 pixels.
There are several ways to access the Variable Outline tool. By default, the Variable Outline tool is the last tool in the Toolbox, or you can press the V shortcut key.
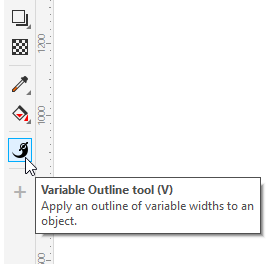
Your cursor will now have the Variable Outline symbol. And because the lightning bolt was already selected, it is automatically selected for variable outlines, and its outline is now a red, dashed line.
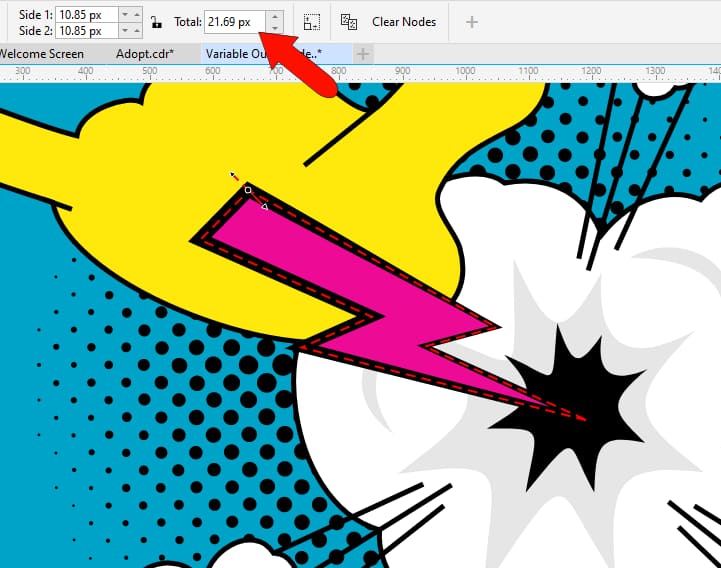
To give this object the illusion of depth, it should be thicker at its top and get narrower as it enters the cloud. To achieve this effect, we’ll add nodes along the outline to specify different outline widths.
TIP: turning on Object Snaps will enable you to snap to edges, nodes, midpoints, etc.
How to add and adjust nodes
There are a few different ways to add nodes. To add the first node, click once on the outline to add a node at the top corner, then go to the property bar, and click the Add Node icon.
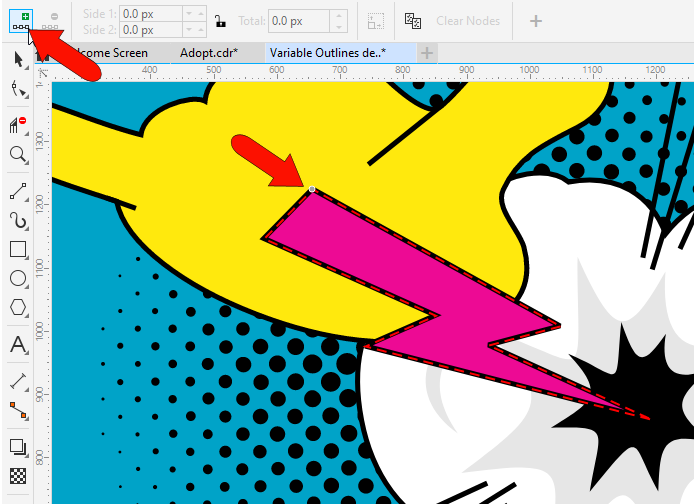
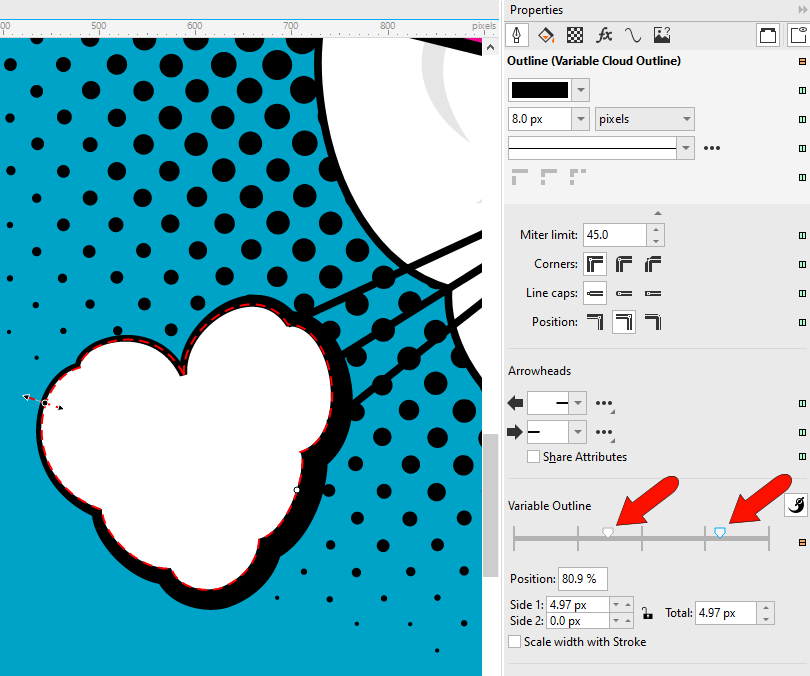
Each node has two arrows, for Side 1 and Side 2 thicknesses. These are both currently 4 pixels, which add up to the 8-pixel width.
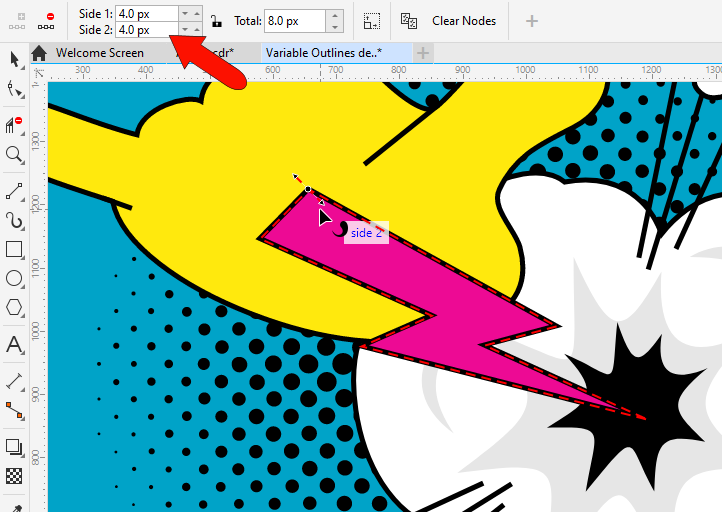
Dragging either arrow changes the width uniformly on both sides, with the red preview lines indicating the line width at this node. Releasing the mouse applies the new width, and both values update in the property bar.
The outline in this example transitions evenly from about 21 pixels in the corner, down to 8 pixels on the opposite side.
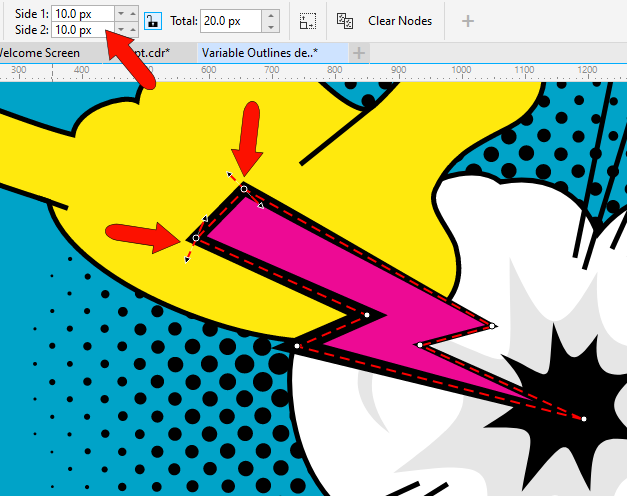
The second way to add a node is to double-click on the outline, then adjust to get the desired width.

For more precise widths, double-click to add nodes in the remaining corners. We can select both top nodes by clicking while holding the Shift key for consecutive selection, and make the entire thickness 20 by assigning 10 pixels to each side.
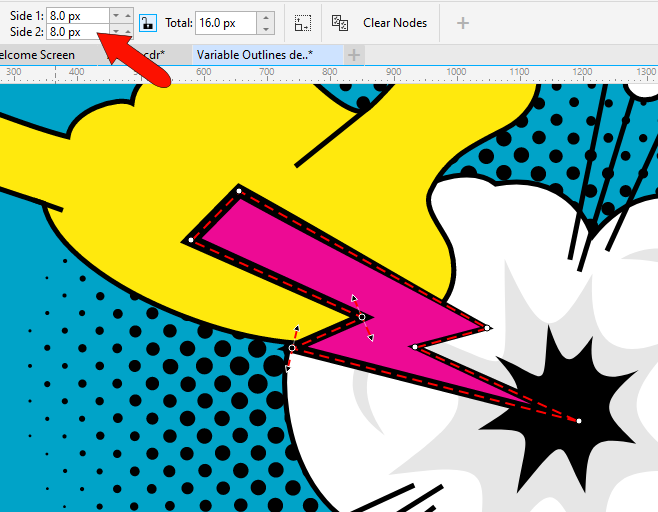
For the next two nodes, we can hold down the Ctrl key while clicking for individual multi selection, and make both sides 8 pixels.
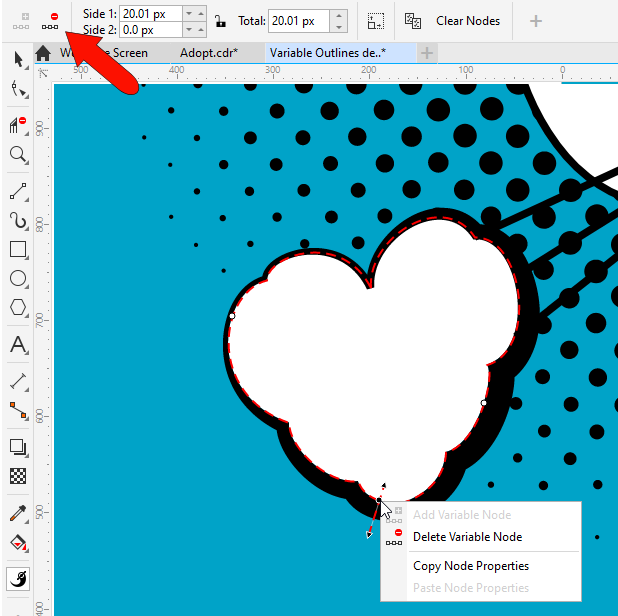
How to copy node properties
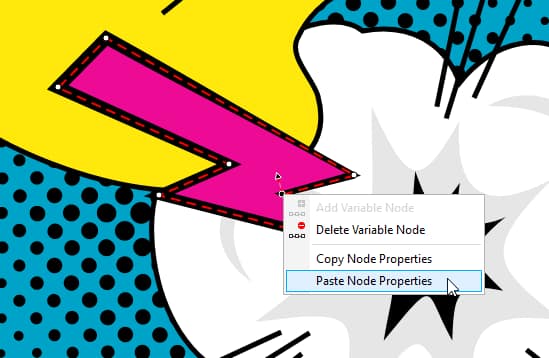
Node properties can also be copied. For the node shown below, make both widths 6 pixels. Then right-click the node to bring up the context menu, and choose Copy Node Properties.
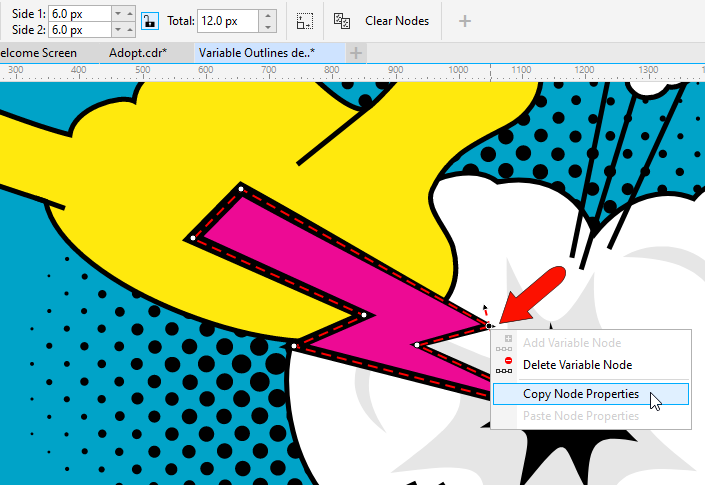
Right-click the other node that is to have the same width and choose Paste Node Properties.
For the node at the bottom, we’ll assign a total outline thickness of 4 pixels. Now we can unhide the cartoon fingers that were covering the lightning bolt, and here is the new, dynamic curve.

Additional ways to add and edit nodes
Now let’s look at one of the cloud-shaped curves. Press V to activate the Variable Outline tool. Because the cloud’s curve wasn’t selected in advance, you need to select it.
A third way to add a node is to click and drag, which both creates the node and sets its width.
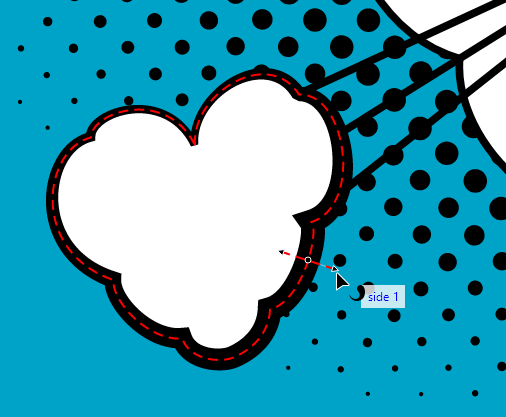
Let’s say you want the thickness to change only along the outside of the object. Hover over the inside arrow to see whether it’s Side 1 or Side 2 and change that width to zero.
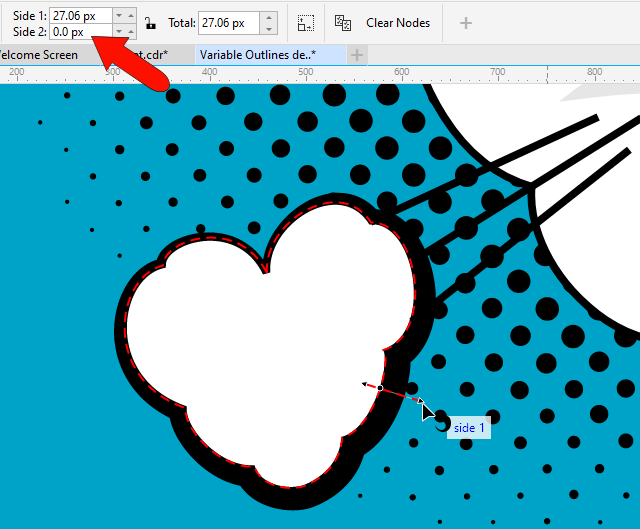
If you drag either arrow, the same amount of new width will be added to both sides. But if you hold the Shift key, you’ll change only the side whose arrow you’re dragging.
A fourth way to create a node is to right-click along the curve and choose Add Variable Node.
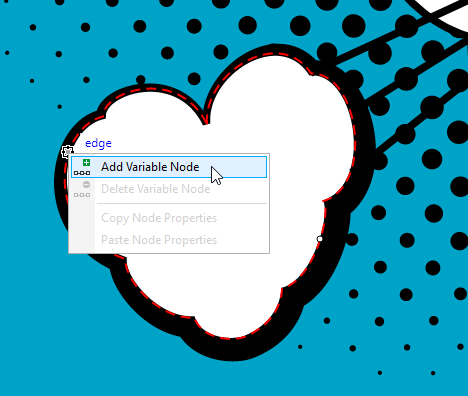
At this node, we’ll make the inside thickness zero as before, and hold Shift to adjust the outside width.
The Properties docker/inspector
In addition to the property bar fields, you can also use the Properties docker (Properties inspector for Mac users) to adjust widths. Note that you can do this whether or not the Variable Outline tool is active, as long as the curve is selected.
In the Variable Outline section of the docker, you can see the two nodes added to the curve, based on percent distances along the curve, starting from the curve’s start point.
If the Variable Outline tool is active, you can move a node by dragging it in the drawing. With any tool active, you can also move nodes by dragging them on the node controller, or by entering a percent distance. For the currently selected node, you can adjust widths in the docker as well.
Enabling the Lock icon constrains the width added or subtracted from either side to be identical.
Double-clicking along the node controller adds another node to the curve, and double-clicking a node removes it. When the Variable Outline tool is active, you can do this directly on the curve itself. A selected node can also be deleted from the property bar, or from the context menu.
How to copy variable outlines
This design has several few similar clouds, and you can make them all look uniform by copying the entire variable outline from the cloud you just worked on.
Select a different cloud with the Variable Outline tool and click Copy Variable Outline in the property bar.
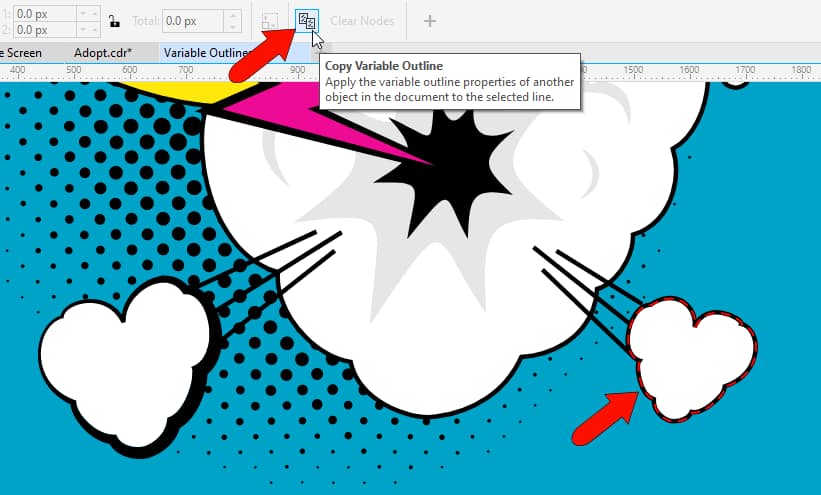
Then click the curve with the variable widths you want to copy.

On the curve with copied properties, the wider part may appear on the opposite side from the original cloud, with the new widths inward and not outward. In this case, you need to reverse this cloud’s start and end points, by activating the Shape tool and clicking Reverse Direction. This means, for example, that a node that was previously located at a 25% distance along the curve is reversed to be now located at 75%.
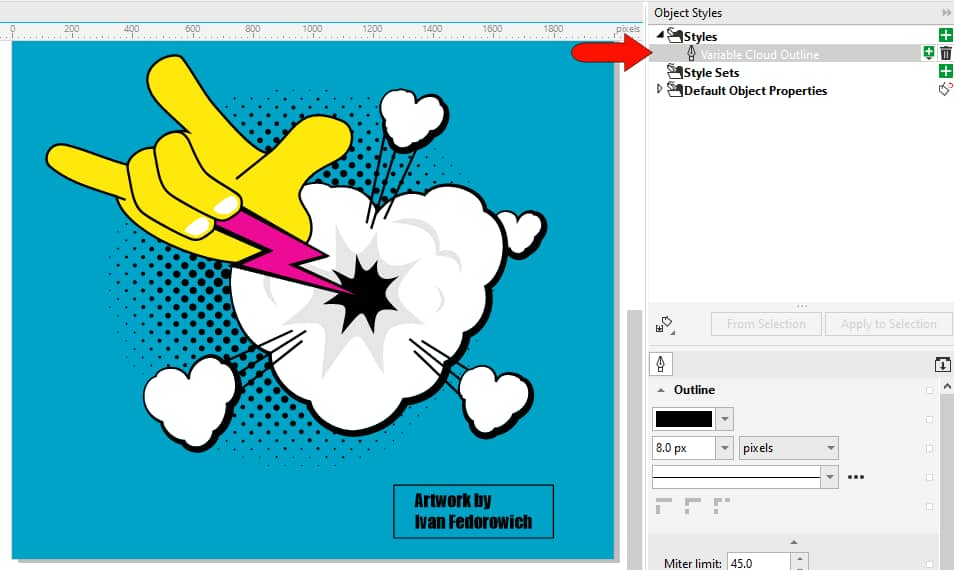
How to save variable outlines as an object style
If these are variable width settings you want to use on other objects or in different designs, you can save them as an object style. Right-click on a cloud curve and choose Object Styles > New Style From > Outline and assign a name for the new style.
With the Object Styles docker open, in the current drawing, you can now drag this object style onto any curve to apply the same properties.
To use this style in another drawing, you would have to export the style sheet, and import it into the new drawing.
The Outline Pen window
Variable widths can also be accessed from the Outline Pen window. Select one of the straight lines and double-click the Outline icon to open this window.
Double-click on the node controller to add a node, place it at the very end, and change the total width to 2 pixels. This updates the widths for Sides 1 and 2.
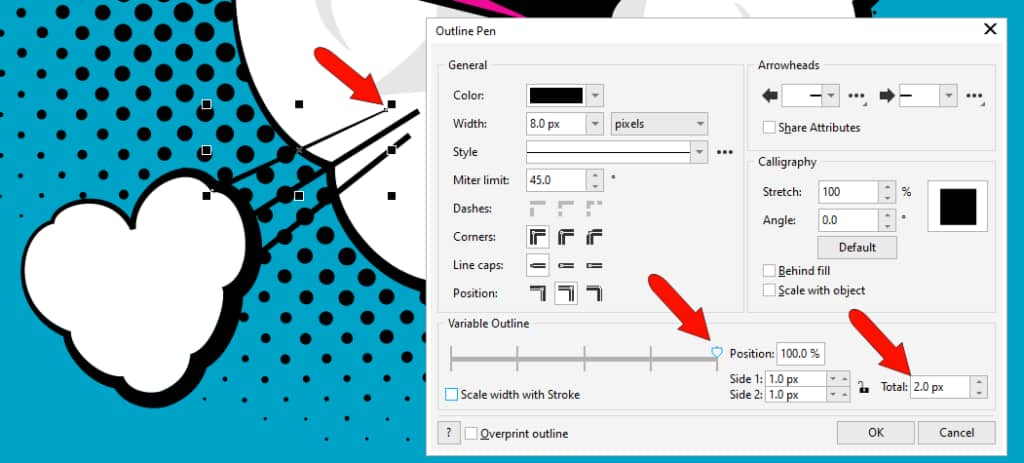
Add another new node at the other end, with a total width of 16. This is an easy way to get a uniform taper.
And when you return to the Variable Outline tool, you can select the neighboring lines one at a time, and copy the variable width properties from the tapered line.

Adding variable outlines to shapes
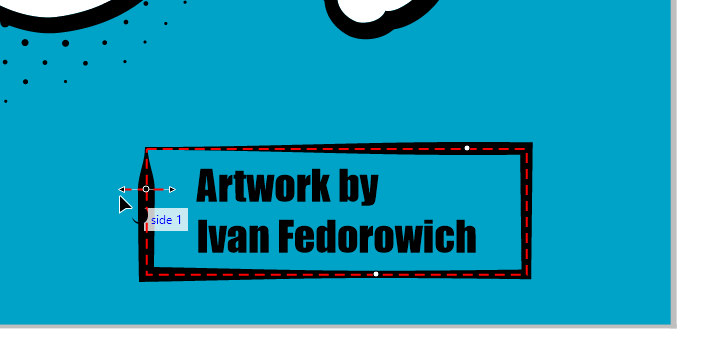
Finally, variable widths can be applied to any objects with outline widths, such as rectangles, ellipses, Bezier or pen curves, etc. With the Pick tool, select the rectangle around the artist’s name. The outline width and type are listed in the property bar, which also has a Variable Outline tool icon.
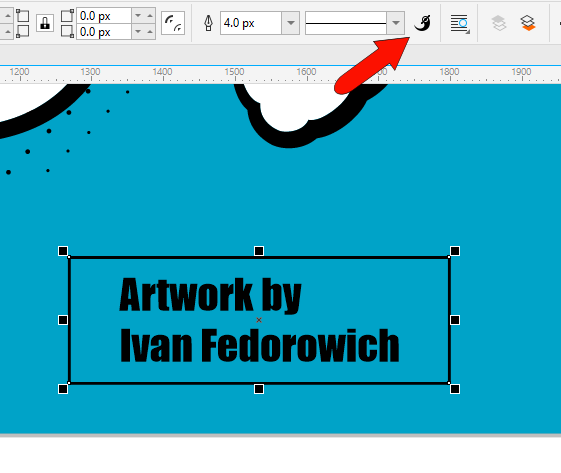
Now, as before, add some nodes to give the rectangle the same whimsical look as the objects in the drawing itself.
Start your FREE 15-day trial and embark on a design journey with powerful tools for vector illustration, layout, photo editing, typography, and collaboration.

Comments (2)
Reader Interactions
Comments
Variable Outline – Which version of Corel has this feature/ tool?
The Variable Outline tool is available in the CorelDRAW Graphics Suite subscription and in CorelDRAW Graphics Suite 2023.