
Learn how to use the Adjustments docker and Adjust menu to easily apply a variety of filters and effects to an image or specific image area. In the CorelDRAW Graphics Suite March 2022 Subscriber Update, there have been many additions and enhancements to this photo editing workflow, including the introduction of presets and the ability to create your own non-destructive stackable adjustment presets. The enhanced Adjust menu has new shortcuts and commands designed to save you time, and the Adjustments docker has been updated with new filters, editing options, interface elements and controls.
Thanks for watching! We hope you found this tutorial helpful. You will find a written version of this tutorial below, and a printable PDF copy to download on the Download Resources tab above.
Learn how to use the Adjustments inspector and Adjust menu to easily apply a variety of filters and effects to an image or specific image area. In the CorelDRAW Graphics Suite March 2022 Subscriber Update, there have been many additions and enhancements to this photo editing workflow, including the introduction of presets and the ability to create your own non-destructive stackable adjustment presets. The enhanced Adjust menu has new shortcuts and commands designed to save you time, and the Adjustments inspector has been updated with new filters, editing options, interface elements and controls.
Thanks for watching! We hope you found this tutorial helpful. You will find a written version of this tutorial below, and a printable PDF copy to download on the Download Resources tab above.
Start your FREE 15-day trial and embark on a design journey with powerful tools for vector illustration, layout, photo editing, typography, and collaboration.
Download these free resources:
Written tutorial for Windows (PDF, 1.3 MB)
Written tutorial for Mac (PDF, 1.3 MB)
CorelDRAW Graphics Suite resources
Quick Start Guide (PDF, 2 MB)
Keyboard Shortcuts (PDF, 3.5 MB)
CorelDRAW and Corel PHOTO-PAINT user guides
For CorelDRAW Graphics Suite subscription and perpetual licenses (2018 to 2024), languages include English, Português do brasil, 简体中文, 繁體中文, Čeština, Deutsch, Español, Français, Italiano, 日本語, Polski, Русский
CorelDRAW Community
CorelDRAW learning center
Facebook
X (formerly Twitter)
YouTube
What’s new in CorelDRAW Graphics Suite
Introduction to PHOTO-PAINT
Adding effects in CorelDRAW
 CorelDRAW Graphics Suite
 Ultimate Vector Bundle Vol. 1
 CorelDRAW Standard 2021
 Ultimate Vector Bundle Vol. 2
 Corel Vector
How to use the Adjustments docker
The Adjustments docker provides PHOTO-PAINT users with a range of non-destructive features and enhancements, for more efficient and accurate image editing. This docker provides instant access to the most critical and frequently used filters, enabling you to see results, in real time and in context, of one or more effects. Filters can be applied to an entire image, or to specific parts of an image using masks. All adjustments are available in CorelDRAW as well.
In this tutorial, we are using the Corel PHOTO-PAINT March 2022 Subscriber Update version. This subscription-exclusive update has a wealth of user-inspired enhancements to frequently used photo editing features, and an updated Adjust menu with new tools, shortcuts, and commands.
Click on any of the images below to view full-size.
The Adjustments docker should be open by default. If it isn’t open, it can be turned on via the Window > Dockers menu, or by clicking the plus icon along the list of open dockers.
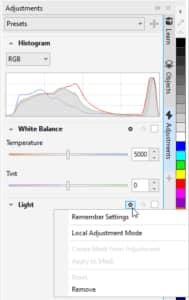
This docker centralizes several adjustment tools in one place, including several presets. From the available filters, Histogram, White Balance, and Light are displayed by default. Each can be expanded or collapsed and clicking the Options icon for any adjustment opens a menu with the Remove option.
Clicking the Add Adjustments icon at the bottom of the docker opens a menu in which you can toggle on or off the adjustments that appear in the docker. You can also see keyboard shortcuts in this menu.
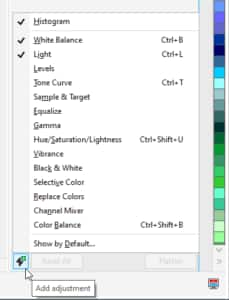
The list of adjustments can be controlled in the Adjust menu as well, where you can also find auto-adjustment options from several filters. The Show by Default option opens a window in which you can choose the adjustments to be included in the docker by default for any document.

How to apply adjustments to an image
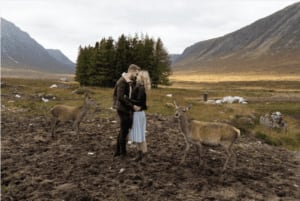
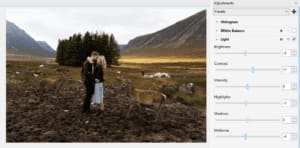
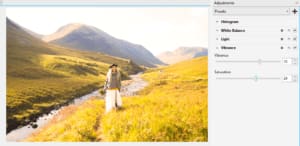
Let’s start with some basic image corrections. In this photo, the subject is too bright and the contrast is too low.
To correct this, start in the Light adjustment, and reduce the Brightness setting.
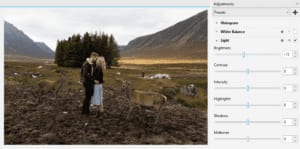
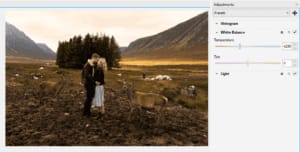
The bright areas are still too bright, so reduce Highlights and Midtones as well, and sharpen the image by bumping up the contrast just a bit.
Now open White Balance and reduce the temperature to produce an autumnal sunset mood. Both Temperature and Tint sliders are dynamic, so as you change the temperature, the available tints change accordingly.
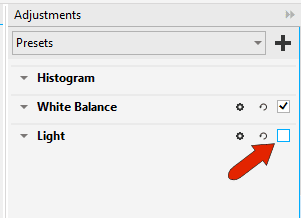
Each of these non-destructive adjustments can be toggled off or on, to see the impact of each effect.
To apply the same set of adjustment to another photo, choose Adjust > Copy Adjustments. Then in the target photo, choose Adjust > Paste Adjustments.
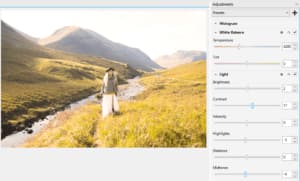
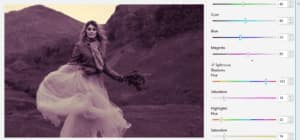
To bring more color into play, display the Vibrance adjustment, and increase the vibrance to bring out more of the background. The saturation can come up as well, but not so much that the subject looks unnatural.
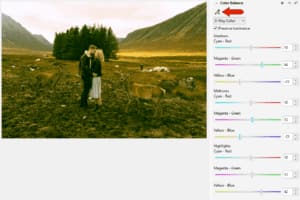
The Color Balance filter is used to individually adjust colors in the shadows, highlights and midtones. There is also an option to use the eyedropper to sample an area that should be neutral gray, for reference in adjusting other colors. Moving the Yellow-Blue slider for highlights toward blue shifts the sky and parts of the landscape toward a cooler blue, which works nicely for our subject. For shadows, moving the Magenta-Green slider a bit toward green removes the red cast from the foreground.
You can reset any filter individually by clicking its Reset icon. Or, to reset all filters, click the Reset All button at the bottom of the docker.
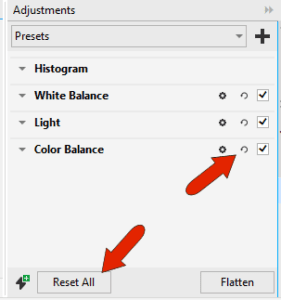
Also located at the bottom of the docker, the Flatten option applies all effects permanently. This clears the docker, which means you can no longer adjust any of the applied filters. But you could continue adding new adjustments.
Using the Black & White adjustment
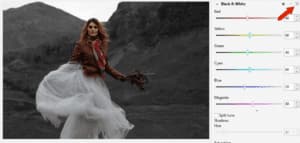
The Black & White filter helps bring some creativity to your photo editing. As soon as the adjustment is added, the image turns to grayscale. You can use the color sliders to control how dominant the individual colors are in the black and white subject. In this example, increasing the red channel achieves more contrast.
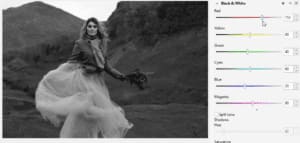
Turn on Split tone to go for a hip, retro look. Choose colors for shadows and highlights, and increase each saturation level.
Reset this filter to go back to grayscale.
How to apply adjustments to an image area
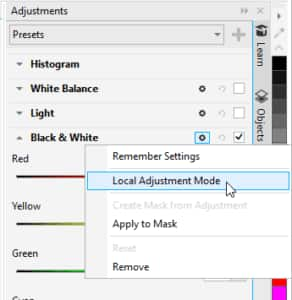
We’ve seen how to apply an adjustment to an entire image, and adjustments can be applied partially as well. Click the Options icon for Black & White and choose Local Adjustment Mode.
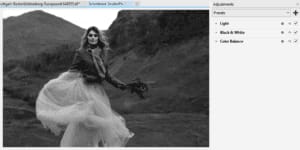
This activates your most recently-used mask tool, which in this example is Smart Selection Mask. Carefully trace around the subject, and you can use the mask options in the Property Bar to edit the mask, such as using Additive Mode to capture some of the pixels that were left out.

The grayscale filter is applied only to the subject, but you can choose Mask > Invert Mask to apply the filter to the background instead, then turn off the mask marquee. In the docker, a local adjustment is indicated by a gray square.
To learn more, watch our full tutorial Using masks in PHOTO-PAINT.
How to use adjustment presets
At the top of the docker, you can access a collection of pre-defined presets in several categories, such as Sepia Tone in the Black and White category, or Two Tone in the Color category.

All adjustments included with the selected preset are added to the docker, and you can make your own tweaks to any adjustments or add more filters. In this example, the Black & White adjustment was added, with an increased red channel as before.
You can also create your own presets. This is handy for images that have extensive filters applied, since you can save time by not applying the same filters one by one to other images. To save the current adjustments as a preset, click the plus icon at the top of the docker. Assign a preset name and add the preset to an existing category or create a new category.
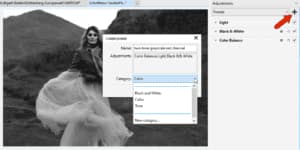
After saving the preset, you can find it in the Presets drop-down, ready to be applied to another image.
Using adjustments and presets in CorelDRAW
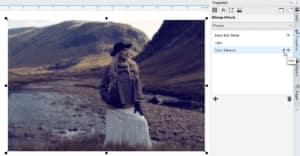
In CorelDRAW, adjustments and presets are applied from the Effects tab of the Properties docker.
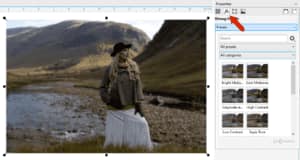
Applying a preset applies all of the filters from the preset. Each can be turned on and off or edited, or you can select a filter and delete it.
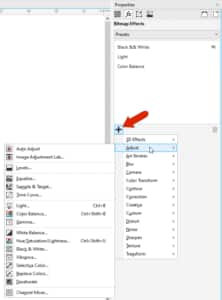
For more filters, click Add Effect and choose Adjust and this menu includes an Auto Adjust option as well as the other adjustments available in PHOTO-PAINT.
Start your FREE 15-day trial and embark on a design journey with powerful tools for vector illustration, layout, photo editing, typography, and collaboration.
