
The new Focus Mode in CorelDRAW is a game changer when working with complex designs and overlapping objects. In this tutorial, you’ll learn how you can bring a single object, or group of objects, into sole focus, enabling you to edit in isolation only those elements of your artwork.
Artwork by Cynthia de Melo Silva.
Thanks for watching! We hope you found this tutorial helpful. You will find a written version of this tutorial below, and a printable PDF copy to download on the Download Resources tab above.
Start your FREE 15-day trial and embark on a design journey with powerful tools for vector illustration, layout, photo editing, typography, and collaboration.
Download these free resources:
Written tutorial (PDF, 1.5 MB)
CorelDRAW Graphics Suite resources
Quick Start Guide (PDF, 2 MB)
Keyboard Shortcuts (PDF, 3.5 MB)
CorelDRAW and Corel PHOTO-PAINT user guides
For CorelDRAW Graphics Suite subscription and perpetual licenses (2018 to 2024), languages include English, Português do brasil, 简体中文, 繁體中文, Čeština, Deutsch, Español, Français, Italiano, 日本語, Polski, Русский
CorelDRAW Community
CorelDRAW learning center
Facebook
X (formerly Twitter)
YouTube
What’s new in CorelDRAW Graphics Suite
CorelDRAW tools
Objects, layers and pages
 CorelDRAW Graphics Suite
 Ultimate Vector Bundle Vol. 1
 CorelDRAW Standard 2021
 Ultimate Vector Bundle Vol. 2
 Corel Vector
How to use Focus Mode
The new Focus Mode in CorelDRAW is a game changer when working with complex designs and overlapping objects. Now you can bring a single object, or group of objects, into sole focus, enabling you to edit in isolation only those elements of your artwork. The new floating breadcrumb toolbar makes it easy to navigate in and out of nested groups, reducing the need for multiple open dockers, and freeing up more workspace.
Focus Mode was introduced in the CorelDRAW Graphics Suite September 2023 Subscriber Update and is available exclusively to subscribers.
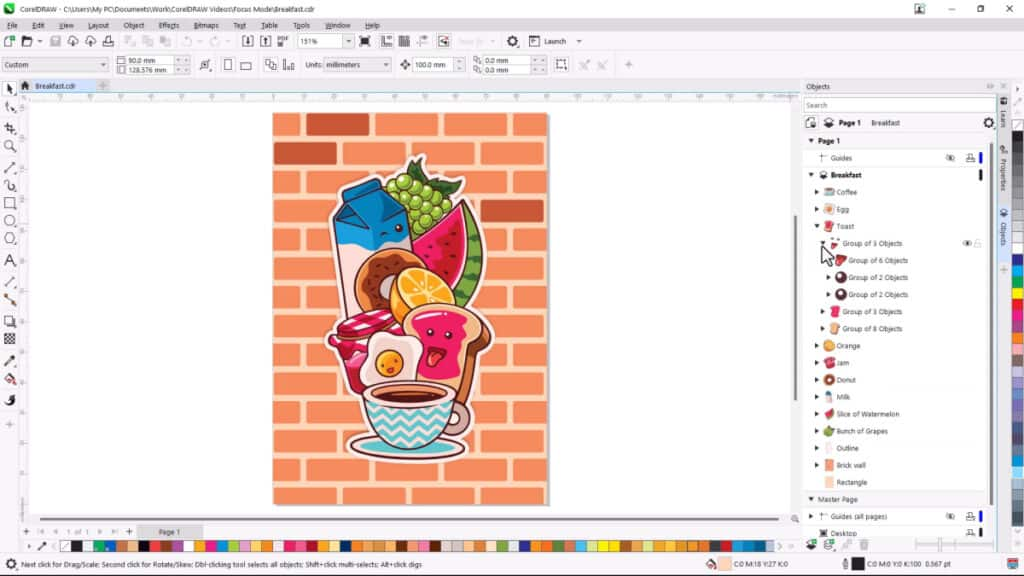
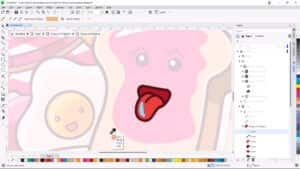
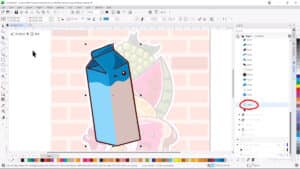
To demonstrate Focus Mode, we are using this original artwork by Cynthia de Melo Silva. In the Objects docker (Objects inspector for Mac users), we can see that the main “Breakfast” layer is comprised of multiple groups. Some groups, like “Orange”, contain only single curves. Other groups, like “Toast”, have a mix of single objects and nested groups.
Click on any of the images below to view full-size.
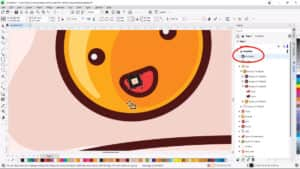
Let’s say we want to edit part of the happy face in the egg yolk. Without Focus Mode, we would have to drill into that group via the Objects docker and select the object to change. Or, going back to the main layer of the document, with the Pick tool active, we can hold the Ctrl key and click repeatedly on a curve to drill down into nested groups until we reach the object we want.
But if we were to mistakenly Ctrl-click the wrong element, we’d be back up to the top of the group level and would need to start over to get to the object we want to work with.
Also, when we add a small new rectangle to this group of two objects, the new object isn’t part of the group – it’s actually placed at the very top of the objects list, just under the layer name.
Adding this object to its desired group requires a drag-and drop into the right spot in the Objects docker, and perhaps even an order change.
In a simple document this might be easy, but it’s not quite so easy in a complex document like this one, with many nested groups.
Now let’s see how much easier group editing can be in Focus Mode.
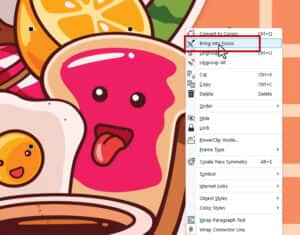
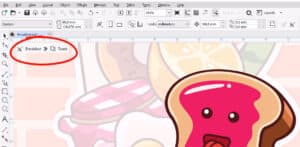
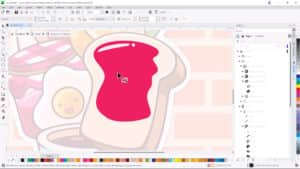
There are several ways to enter Focus Mode, which we’ll demonstrate by editing the face of the jelly on the toast. To bring the group of objects that makes up the face into Focus Mode, right-click on the toast group and choose Bring into Focus.
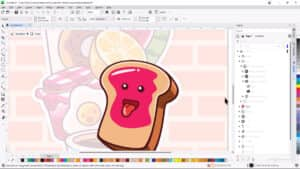
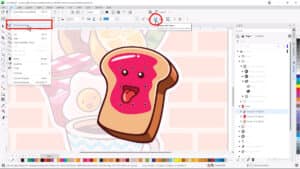
Now only this group appears in full color, shown in its entirety even though other design elements are placed above this group.
All other objects in this document are faded in the background in the drawing window, and appear greyed out in the Objects docker as well. Only the toast group is in full color.
None of the other objects that are greyed out can be accessed, and any changes made while in Focus Mode will be done within the confines of the active group.
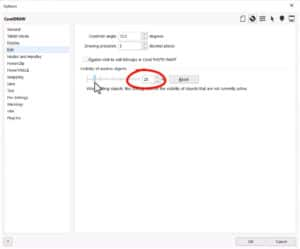
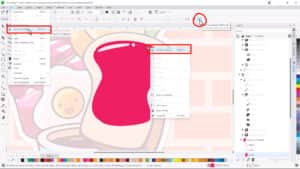
The level of fading can be adjusted by clicking the Options icon and choosing CorelDRAW, then opening the Edit tab. The default visibility is 20%, but this can be adjusted, with the fade level shown in real time in the drawing window.
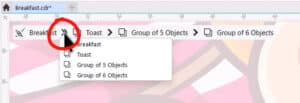
Also note the floating breadcrumbs toolbar, that shows the hierarchy of layers and which object or group is in Focus Mode.
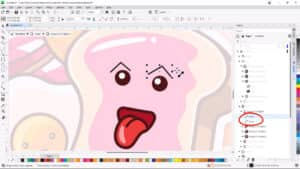
We can also use the Pick tool to select the group of three objects that comprise the face. To bring this group of objects into focus, we can click the Bring into Focus icon on the property bar, or under the Edit menu choose Bring into Focus.
Now we are one level deeper on the breadcrumbs toolbar, and the corresponding group of three objects is active in the Objects docker.
If we use the 2-Point Line tool to add some eyebrows, both curves are added at the top of the active group, which is now a group of five objects rather than three.
The mouth is another nested group of six objects, and another way to drill down is to go back to the Pick tool and double-click this group. Now with only this group’s objects available for editing, we can select this curve and change its fill color.
Or, if we want to match this fill to the color of another curve in the drawing, we can use the Color Eyedropper and click to match the top of the toast. Note that the color we’re picking up is this curve’s actual color, not the faded version of the color, as we can see when we click to apply the fill.
Next, we want to adjust the shape of the jelly on the toast, which is part of a different group. The double-arrow next to the first breadcrumb opens the list of all breadcrumbs which we can navigate, or we can just click the previous breadcrumb to go one level back.
The Esc shortcut key can also be used to drill out of groups. If objects are selected, pressing Esc the first time deselects them. Pressing Esc again goes one level up in the breadcrumbs.
We’ll double-click to focus on the jelly curve group and use the Shape tool to adjust the nodes of the large curve.
There are a number of ways to exit Focus Mode:
- Click the Exit Focus Mode icon on the property bar.
- Press Shift + Esc.
- Right-click and choose the Exit Focus Mode option from the context menu.
- Under the Edit menu, choose Exit Focus Mode.
- Click the first breadcrumb on the breadcrumbs toolbar.
- Activate the Pick tool and double-click anywhere outside the active group.
Once we exit Focus Mode, the toast goes back to its original placement in the group hierarchy, partially hidden by other objects.
Let’s look at the milk group next. We’ll double-click to bring this group into focus so we can edit this white-filled curve. This curve isn’t part of another nested group, but we can still bring just this curve into focus. This creates a new temporary group called Focus Group containing just the one curve.

If changes are made to the curve in this temporary group, without adding any new objects, once you finish editing and go back up one level the temporary group disappears because a group isn’t needed to contain only a single object.
However, if a new object, such as the “2%” text is added to the Focus Group, it will remain as a group since it now contains multiple objects.
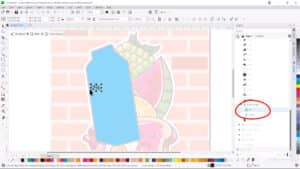
And when we exit Focus Mode, the new group remains because it contains more than one object. The group name is now Group of 2 Objects.

Now that you know how to use Focus Mode, give it a try and see how it can be a game changer when working with complex designs and overlapping objects.
Start your FREE 15-day trial and embark on a design journey with powerful tools for vector illustration, layout, photo editing, typography, and collaboration.

Comments (2)
Reader Interactions
Comments
Will the Focus Mode feature make its way into the standalone version of Corel
Draw 2023?
Hi Dan,
The Focus Mode feature is only available with a CorelDRAW subscription.
Best regards,
The Discovery Center team