
The Replace Colors filter, introduced in CorelDRAW Graphics Suite 2021, allows you to edit images with greater control, thanks to a new color wheel and interactive range control that makes adjusting hue and saturation within a selection more precise. Learn how to replace colors throughout an entire image or within a specific image area or object.
Thanks for watching! We hope you found this tutorial helpful. You will find a written version of this tutorial below, and a printable PDF copy to download on the Download resources tab above.
See how the Replace Colors filter, introduced in CorelDRAW Graphics Suite 2021, allows you to edit images with greater control, thanks to a new color wheel and interactive range control that makes adjusting hue and saturation within a selection more precise. Learn how to replace colors throughout an entire image or within a specific image area or object.
Thanks for watching! We hope you found this tutorial helpful. You will find a written version of this tutorial below, and a printable PDF copy to download on the Download Resources tab above.
Start your FREE 15-day trial and embark on a design journey with powerful tools for vector illustration, layout, photo editing, typography, and collaboration.
Download these free resources:
Written tutorial for Windows (PDF, 919 KB)
Written tutorial for Mac (PDF, 1 MB)
CorelDRAW Graphics Suite resources
Quick Start Guide (PDF, 2 MB)
Keyboard Shortcuts (PDF, 3.5 MB)
CorelDRAW and Corel PHOTO-PAINT user guides
For CorelDRAW Graphics Suite subscription and perpetual licenses (2018 to 2024), languages include English, Português do brasil, 简体中文, 繁體中文, Čeština, Deutsch, Español, Français, Italiano, 日本語, Polski, Русский
CorelDRAW Community
CorelDRAW learning center
Facebook
X (formerly Twitter)
YouTube
What’s new in CorelDRAW Graphics Suite
Color, fills and transparency
Introduction to PHOTO-PAINT
 CorelDRAW Graphics Suite
 Ultimate Vector Bundle Vol. 1
 CorelDRAW Standard 2021
 Ultimate Vector Bundle Vol. 2
 Corel Vector
How to use the Replace Colors filter
Whether you want to replace colors throughout an entire image, or just a specific object or area, the Replace Colors filter introduced in CorelDRAW Graphics Suite 2021 allows you to edit images with greater control and precision.
Click on any of the images below to view full-size.
Introduction to the Replace Colors filter
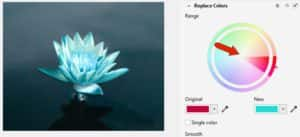
Our first example starts with this image in Corel PHOTO-PAINT, and we want to change the color of the flower.

The Replace Colors filter is available in the Adjustments docker, which can be opened by going to Window > Dockers > Adjustments, or by clicking the plus sign along the list of open dockers.
NOTE: the Adjustments docker was introduced in PHOTO-PAINT 2021.
If the Replace Colors filter isn’t listed, click the Add Adjustment icon and turn on that filter.

Click the Original eyedropper to sample the color on the photo that you want to change.
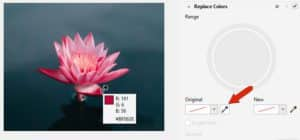
Open the New color dropdown window and select a new color, in this case we chose a light blue.
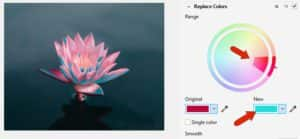
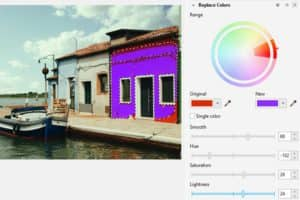
Once you have selected the replacement color, the color wheel will be displayed. In this example, we can see on the color wheel that the default saturation range leaves out the lighter reds.
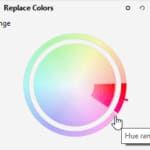
When you hover over the various edges of the highlighted range on the color wheel, white borders appear where ranges can be adjusted.
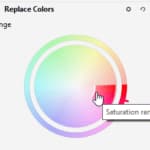
You can move either saturation border for different effects. The full saturation range includes all of the red pixels and changes them to blue.
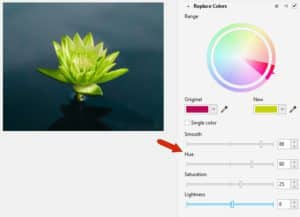
You can also drag the Hue handle to change the original color, and the Hue Range side borders can be adjusted as well, to include a narrower or wider range of hues. The Smooth slider can be used to adjust the color transition between changed and unchanged pixels.
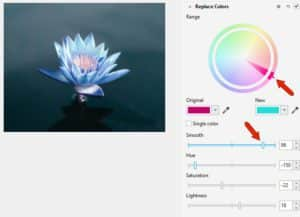
If you don’t love the new color you can adjust the target hue and change saturation and lightness as well.
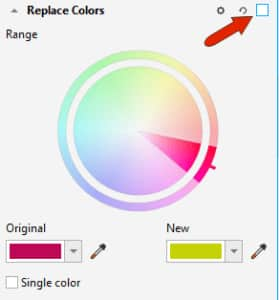
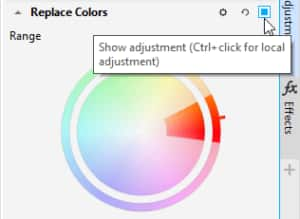
Like all adjustments, the Replace Colors adjustment is non-destructive – it can be toggled on and off using the check box in the top right corner.
More adjustment filters can be added as well.
Adjustments are also listed on the Effects docker (Window > Dockers > Effects). In this docker you can select any of the effects and they can be toggled on and off, reordered, selected and deleted, or edited.
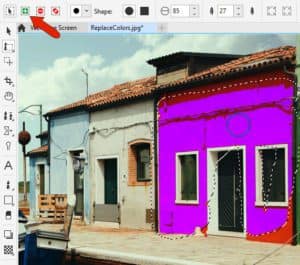
Using Local Adjustment Mode to replace colors of an object
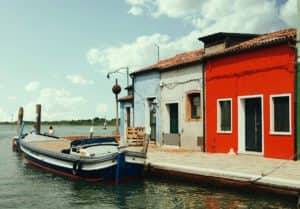
The previous example showed how to replace colors throughout an entire image. But in our next example, we’ll replace the color of just the red building, without affecting other red areas such as the roof tiles, bricks around the window, and other spots.
In the Replace Colors adjustment, click the Options icon, and choose Local Adjustment Mode.
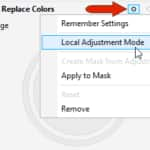
This activates your most recently used Mask tool, which in this example is the Brush Mask tool. Note that any mask tool can be used for a local adjustment.
Start the interaction by sampling the original red color and then choosing a new color.
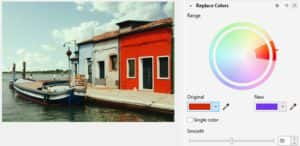
On the property bar, set your mask to Normal mode and adjust the brush size by dragging with the Alt key pressed. Use the brush to paint the effect only on the red façade.
With the local adjustment already defined, you can increase the Saturation range on the color wheel, and use the sliders to adjust the Smoothness, Saturation and Lightness settings.
There are now three options in the check box for displaying this effect: off, on, and if you hold down the Ctrl key and click in the box, the mask will be displayed, which is handy if you need to make any adjustments to the mask.
You can work with the mask marquee turned off as well, by going to Mask > Mask Marquee.
If there are any spots that you need to add or remove from the mask, you can switch to Additive or Subtractive mode on the property bar and brush over those spots.

Using the Replace Colors filter in CorelDRAW
The Replace Colors filter is available in CorelDRAW 2021 as well. In this example we have an imported bitmap image selected.

To use the Replace Colors filter, go to Effects > Adjust > Replace Colors. In the Replace Colors window, you can zoom and pan directly on the preview. Enable the Preview checkbox in the bottom left corner if you want to see the results on the image itself.
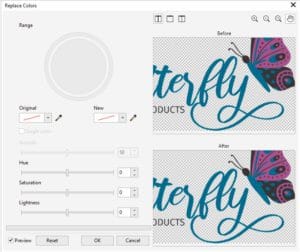
The interaction here is the same: sample the color to change and set the new color. If you only want one color changed, enable the Single Color option; this disables the color wheel since it’s not needed for a single color change.
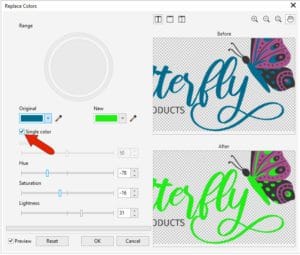
Click OK to finish.
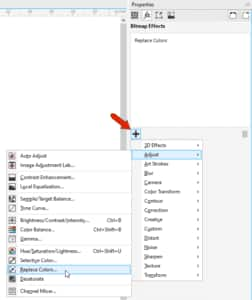
The Replace Colors adjustment in CorelDRAW is also non-destructive. In the Properties docker (Window > Dockers > Properties), with the bitmap still selected, open the FX tab.
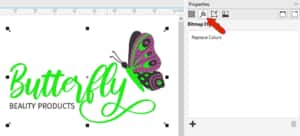
Here you can toggle the effect on or off, edit it, or select and delete it.
Along with other effects, a Replace Colors filter can be added directly from this docker, by clicking the plus icon and choosing Adjust > Replace Colors.
Now that you know how to use the Replace Colors filter in CorelDRAW and PHOTO-PAINT, give it a try today and see how easy it is to edit images with greater control and precision.
Start your FREE 15-day trial and embark on a design journey with powerful tools for vector illustration, layout, photo editing, typography, and collaboration.
