In this tutorial, we will show you how to create a variable data file using CorelDRAW’s enhanced print merge workflow, which now includes support for QR codes, images, and .xlsx data. With variable data printing, design elements such as text, graphics and images can be changed from one printed piece to the next, by taking information from a database or external file and inserting it into the design.
NOTE: The enhanced print merge functionality, including support for QR codes, images and .xlsx data, was introduced in the September 2023 Subscriber Update and is available exclusively to CorelDRAW Graphics Suite subscribers.
Start your FREE 15-day trial and embark on a design journey with powerful tools for vector illustration, layout, photo editing, typography, and collaboration.
Download these free resources:
Written tutorial (PDF, 2 MB)
CorelDRAW Graphics Suite Resources
Quick Start Guide (PDF, 2 MB)
Keyboard Shortcuts (PDF, 3.5 MB)
CorelDRAW and Corel PHOTO-PAINT user guides
For CorelDRAW Graphics Suite subscription and perpetual licenses (2018 to 2024), languages include English, Português do brasil, 简体中文, 繁體中文, Čeština, Deutsch, Español, Français, Italiano, 日本語, Polski, Русский
What’s new in CorelDRAW Graphics Suite
Importing, exporting and printing
Marketing and branding projects
 CorelDRAW Graphics Suite
 Ultimate Vector Bundle Vol. 1
 CorelDRAW Standard 2021
 Ultimate Vector Bundle Vol. 2
 Corel Vector
Creating variable data printing files
Using the print merge feature allows you to create a single, time-saving template for documents such as mailing envelopes, business cards, or personalized marketing materials, that need to be created or printed multiple times. Print merge fields, such as name, phone number, or email, take their text or numbers from a table, enabling you to quickly generate one document for each record in that table.
In this tutorial, we’re using the CorelDRAW subscription version. In the September 2023 Subscriber Update, the print merge workflow was enhanced to include support for Excel spreadsheets, QR codes, and images. These features are available exclusively to subscribers.
Reviewing the print merge materials
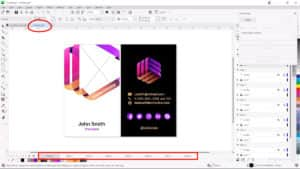
In this tutorial, we’re using a business card design to demonstrate how to use print merge to generate a separate business card for each employee.
Click on any of the images below to view full-size.

We have one Excel spreadsheet that contains employee data, including name, title, location, email, extension, and a link to each employee’s profile page on the company website.
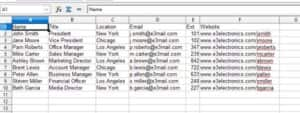
A second spreadsheet lists each employee with the file path link to where their profile picture is stored on the computer.

In the business card design, some of the design elements will be the same for all cards, such as the logo, company name, website, and social media icons. Other text objects, such as name, email, and phone extension, are design placeholders that will be replaced with print merge fields, whose data will come from the employee data spreadsheet. There is also a PowerClip object that will contain a print merge image field, to be filled in with each employee’s profile picture. There is also space to add a print merge field for a QR code.
Configuring data sources
To add a text print merge field, go to File > Print Merge > Create/load Print Merge and the Configure Data Source window will open. If you want to enter the print merge data manually, click the Add Column button and enter your data. In our example, all our data is in spreadsheets that can be imported. To import data, click the Import Data Source button and select your file, either Excel, CSV, TXT or RTF format.
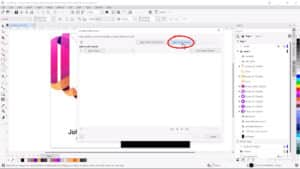
We’ll choose the “Employee Data” Excel file first. Click Open and the data will be imported into the Configure DataSource window. There are 9 employee records, reflecting the data we saw in the employee data spreadsheet.
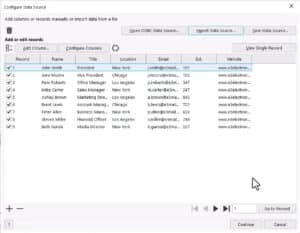
In our spreadsheet there are a couple of updates that need to be made to the employee information. Mike’s extension should be 242, and Beth’s title is now Media Coordinator. These changes can be done in the Configure Data Source window, or in the original data source file. If the original source data file is updated, the warning triangle on the sync icon indicates that the current data is out of sync.
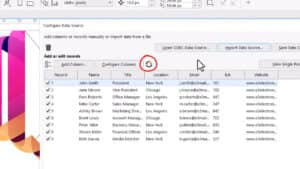
Clicking this icon updates the data and the updates are reflected in the Configure Data Source window.
If you have print merge data from more than one source, you can combine them in this window. For example, our data for the employee profile pictures is in a separate spreadsheet. To add additional data, click Add Column, click the Import Column icon to the right of the Name text box, and choose the secondary data source – in our case, the employee photo spreadsheet. In the Choose Column window we’ll select the column we want to add, which is “ProfilePic” in this example, and then click Add. Since this data uses file path links to the stored photos, we’ll choose the Path type, as opposed to Text or Numeric.
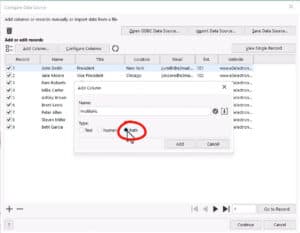
After clicking Add, that column is added to our table in the Configure Data Source window.
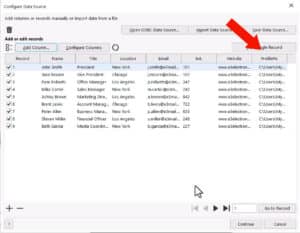
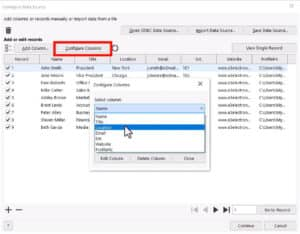
To make changes to columns themselves, click the Configure Columns button. In our example, the Location column isn’t needed, so we’ll select that column from the dropdown list and then click Delete Column. Next, we’ll select the Ext column from the dropdown list, click the Edit Column button and edit it to read Extension. Once the changes to the columns are complete, click Close.
All records are selected by default. To the left of the Add Column button is the Select All/Deselect All icon that you can toggle on and off, but you can also select only certain records. To view a single record, select the record and click View Single Record. Use the arrows at the bottom of the window if you want to scroll through the rest of the records.
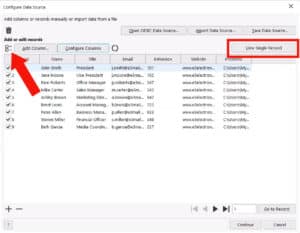
When you’re done with single records, click the View All Records button to return to the table.
Changes can also be made directly in this table. In our example, Peter has recently left the company, so we’ll highlight his record and click the Delete icon in the bottom left corner. And Pam wants her full first name on her card, so we’ll click her name field and edit it to read Pamela.
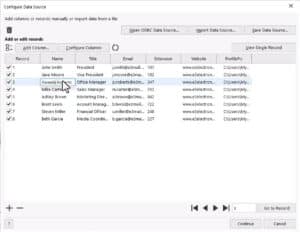
To add a new record, click the Add icon and fill in data manually.
At this point, because we’ve merged data from two spreadsheets and also made some edits directly in the table, we can click the Save Data Source button to generate a new Excel file with all the updated business card data.
Once all the data additions and edits are complete, click Continue and the Print Merge window will open.
Adding print merge fields for text
Before we start adding print merge fields into our business card design, here is a helpful tip. By default, print merge fields have black text and are placed in the center of the drawing window. So if your document has a black or dark color background, it can be difficult to see the print merge fields. To make things easier, we’ll zoom out on our document and shift it over to the side of the drawing window so that the print merge fields will be easier to see when they’re first added in the center of the drawing window.
The first field we’ll add is for the employee name, to replace the name placeholder. Select the Text data type and select the field you want to enter from the Data source columns dropdown list. Then click Insert Field and the print merge field will be added in the center of the workspace.
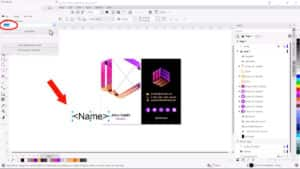
NOTE: Print merge fields are indicated by blue handles when selected, as opposed to black handles that appear for regular text objects.
We’ll continue to add the other print merge text fields for Title, Email, and Extension, and move them closer to the corresponding placeholder text.
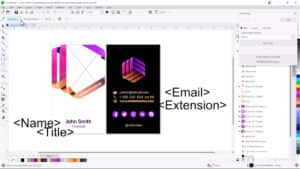
We want to match the properties of each placeholder element to its corresponding print merge field. To do this, we’ll activate the Attributes Eyedropper tool and enable Outline, Fill, and Text properties from the dropdown list on the property bar.
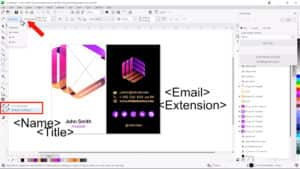
Click the “Name” placeholder text to sample the attributes, then click on the <Name> print merge field to apply the attributes. To sample the next placeholder text “Title”, hold the Shift key as you click (this resets the Attributes Eyedropper tool back to sampling) then click the <Title> print merge field to apply the attributes. Repeat this process for the remaining print merge fields.

Now we need to align the placeholders with their corresponding print merge fields. This can be done using the Pick tool to move the fields into place and align visually, but for precise alignment we’ll select the <Name> print merge field, then hold down the Shift key and select the “Name” placeholder text. With both objects selected, press the C key to align centers horizontally, and the E key to align centers vertically. We’ll do the same for the <Title> field.
For the <Email> field we’ll shift-select the print merge field and the placeholder text, press E to align vertically and L to align left. The <Extension> field is part of the phone number text, so we’ll first remove the placeholder extension and then move the print merge field approximately into place and align vertically using the E key.

Now we can carefully select and delete the placeholder name, title, and email. If you find it difficult to select the placeholder elements in the drawing window, you can find and select them in the Objects docker instead. And the last step for our print merge text fields is to center-align the text of the Name and Title fields.
We still need to add print merge fields for the employee photos and QR codes, but if you want to see how your print merge is looking so far, go to File > Print Merge > Create Merged Document (if you still have the Print Merge window open, you can also click the Create Merged Document button). This produces a new file, called PrintMerge1, which has a separate page for each of the 8 employee records, with name, title, email, and extension correctly filled in.
Adding print merge fields for QR codes
To add a QR code print merge field to our business card design, we’ll return to the source document. In the Print Merge window we’ll select QR code data type and choose URL from the Type dropdown list, since our QR codes will link to each employee’s profile page on the company website. The data will come from the Website column.
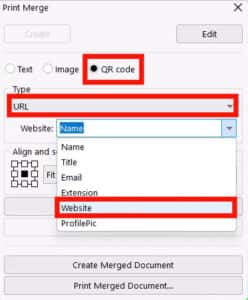
Once we click Insert Field, the QR code field is added to the business card design. We can use the Pick tool to resize and position it above the Name field, then shift-select the Name field and QR code field and press C to center-align.

Adding print merge fields for images
To add a print merge field for images, choose the Image data type and then select your source from the Data source columns dropdown list; in our example it is the Profilepic column that contains file path links for each employee photo.
NOTE: if at any time you close the print merge window before you’ve finished adding all your fields, just go to File > Print Merge > Edit Print Merge and click Continue to work with the same data.
When using an image print merge field, you need to select a placeholder image first. The placeholder image is a temporary image that will be replaced with the actual images when you run the print merge. It is best to use a placeholder image that matches the dimensions of your actual images – in our example we’ll use one of the employee photos as the placeholder image.
There are several options to align and scale the images:
- Actual size: the image is not resized and is placed in its original location.
- Fit proportionally: the image is resized so that its longest dimension fits inside the bounding box. The aspect ratio is preserved, and the entire image is visible, but there may be empty areas in the bounding box.
- Fill proportionally: the image is resized to fill the bounding box without being distorted. The aspect ratio is preserved, and the bounding box is full, but there may be parts of the image that fall outside the bounding box and are not visible.
- Stretch to fill: the image is resized and distorted to fill the bounding box. The aspect ratio is not preserved, the bounding box is full, and the whole image is visible.
We’ll choose Fill Proportionally with center alignment, click Insert Field, and drag out the image at the approximate right size.
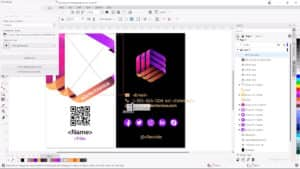
In our example, we’re using a PowerClip frame for our image, so we’ll place it in the frame and on the PowerClip floating toolbar we’ll choose Fill Proportionally from the Fit Contents dropdown list.

Once all the elements are in place, go to File > Print Merge > Create Merged Document to create a merged document that you can review. If you’re happy with the results, you can print and/or save the merged document.
To print a merged document, you can print directly from the merged document or return to the source document and use File > Print Merge > Print Merged Document. To save a merged document, simply use the Save command.
Start your FREE 15-day trial and embark on a design journey with powerful tools for vector illustration, layout, photo editing, typography, and collaboration.


Comments (2)
Reader Interactions
Comments
Hello Corel experts. We would like to design a 6 X 11 postcard using Variable Data Printing Files
just like this video shows.
https://learn.corel.com/tutorials/creating-variable-data-printing-files/
Can you please recommend someone that is skilled to do this task? We are willing to pay well for their services.
Thanks,
Hello, we suggest you visit the CorelDRAW Community forum to ask for recommendations for this job.
Best regards,
The Discovery Center team