
Learn how to easily create a personalized calendar using your own photos and a calendar template. In this tutorial, we’ll show you how to add your photos to the template, position and resize them to fit, and place them in the proper order in the Layers palette. You’ll also learn how to add your own text – either specific calendar activities like birthdays and holidays, or even a nice quote to go along with your photo. Once your calendar is complete you can share it online or print it out.
Want more calendar styles? Browse our template collection in the New From Template catalog right in PaintShop Pro.
Thanks for watching! You will find a written version of this tutorial below, and a printable PDF copy to download on the Download resources tab above.
Download your FREE 30-day trial and make every shot your best shot with PaintShop Pro, your all-in-one photo editing and design software.
Download these free resources:
Written tutorial (PDF, 1.07 MB)
2024 Calendar template in .pspimage format (Zip file, 24 MB)
2024 Calendar template in PNG format (Zip file, 43 MB)
PaintShop Pro resources
Keyboard shortcuts (PDF, 173 KB)
PaintShop Pro User Guides
Partner and User websites
PaintShop Pro User Forum
Scrapbook Campus (Tips and tricks, workshops, master classes, and more)
Creation Cassel (Scripts, picture tubes, and other PaintShop Pro tools, plus weekly freebies)
PaintShop Pro Maniacs (Facebook group)
PaintShop Pro (Facebook group)
What’s new in PaintShop Pro
Working with templates
Holiday projects
Featured products
 PaintShop Pro 2023 Ultimate
 AI HDR Studio 3.0
 PaintShop Pro 2023
 Vision FX 2.0
How to use calendar templates
In this tutorial, you’ll learn how to create a personalized calendar in PaintShop Pro using your own photos and a calendar template. We’ll show you how to add your photos to the template, position and resize them to fit, and place them in the proper order in the Layers palette. You’ll also learn how to add your own text to mark special occasions like birthdays and holidays, and how to make advanced creative customizations.
For this tutorial, we are using a Calendar with Notes template but techniques and tools can be applied to the free calendar template available to download above, or templates that you may have purchased from the Discovery Center store or PaintShop Pro New from Template catalog.
Click on any of the images below to view full-size.
Part 1: The basics
- Open your calendar template in PaintShop Pro.
- Make sure to open the Materials and Layers palettes if they aren’t already open by selecting Palettes > Materials and Palettes > Layers.
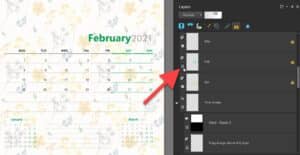
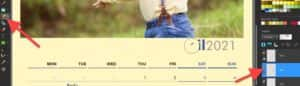
If we look at the Layers palette, we can see that we have each month of the year as a different layer. Underneath that, we have an image mask area for adding your own custom image, and a variety of different seasonal backgrounds.
NOTE: not all calendar templates will include a selection of backgrounds. But further on we’ll show you how to add your own background if you wish.
How to select a month
- In this example, the Visibility (eye) icon on the left side of the layer is toggled on for January.
- To select a different month, toggle the January layer off, and toggle the month of your choice on.
Choosing a template background
Scroll down further in the Layers palette to the “4 Seasons Background” layer group. Here, we have many different seasonal backgrounds. Use the Visibility icon to toggle off the Spring background, and toggle on the background of your choice.
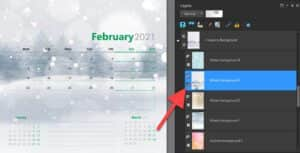
At the top of the Layers palette is the Opacity slider. You can use this to adjust the opacity of each layer. In this particular template, there are varying levels of transparency for different backgrounds.
If you find that the background is too dark, you can lower the Opacity level so that the text is more clearly visible over top of your selected background.

How to add photos
The beauty of these calendar templates is that you can showcase your favorite photos, whether you are creating a calendar for yourself or as a gift for someone else.
There are a few different ways to bring your photos into the PaintShop Pro template:
1. Using the Organizer and Navigation Palettes
- Open the Organizer palette by going to Palettes > Organizer.
- Click the Show Navigation icon to open the Navigator.
- In the Navigator, locate the folder where you’ve saved your images.
- When you click on the folder, all the images in that folder will be displayed in the Organizer.
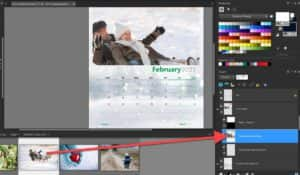
- In the Layers palette, select the image mask group.
- Now drag your photo from the Organizer directly into the Layers palette above the layer that says “Drag/place image above this layer”.
2. Using File > Open
- Go to File > Open or click on the Open icon and browse to the location where your photo is stored on your computer.
- Select the photo and click Open.
- When the photo is open in PaintShop Pro, go to Edit > Copy (or use Ctrl + C).
- Switch to the calendar template and in the Layers palette, select the layer below the image mask.
- Go to Edit > Paste As New Layer (or use Ctrl + V) to paste in your photo.
NOTE: if your photo ends up in the wrong layer order in the Layers palette you can simply drag it up or down to the correct layer.
3. Using Drag and Drop
- In the Layers palette, select the layer below the image mask.
- Locate your photo on your computer and simply drag it right into the Layers palette
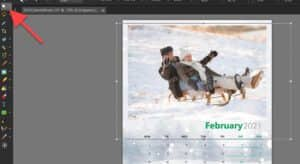
Once you have your photo placed in the calendar template you can use the Pick tool to resize and/or reposition it so it fits in the calendar nicely.
How to add text
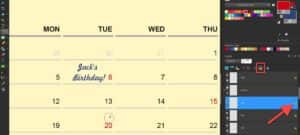
You can use the Text tool to add any kind of text to your calendar. For example, you can add holidays, birthdays, or other special events. Or important reminders, appointments, etc. Some templates even have space to write notes for the month, which you can do with the Text tool or write by hand on your printed calendar. Let’s say we want to add a holiday to this calendar.
- In the Layers palette, select the image mask layer or month layer that you want to add your text to.
- It’s important to note that the text will appear on it’s own vector layer above whatever layer you have selected in the Layers palette, so make sure you are not adding text below a layer that will block the text from being visible, such as a background layer. If this happens, simply drag the text layer up in the Layers palette until it is visible.
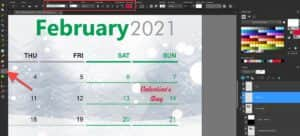
- Activate the Text tool and click on your calendar where you want to write your title. In this example we are adding “Valentine’s Day” on February 14th.
- Type out your text and then click the Apply checkmark on the Tool Options toolbar along the top.
- On the Tool Options toolbar you can use the various settings to change the font style, color, size, formatting etc.
- You can use the Text tool or the Pick tool to reposition your text if necessary.
Saving and printing your calendar
As you are working on your calendar template, you should be saving periodically as a .pspimage file to preserve all the layers. Once you’ve finished designing one month of your calendar, use File > Save Copy As to save the image in JPG or PNG format to print out each month individually.

Part 2: Advanced creative options
In this section we’ll explore some ideas for customizing your calendar template. Not all templates are built exactly the same, so the options for customization may differ slightly. But the goal here is just to provide some creative inspiration if you are looking for more advanced options.
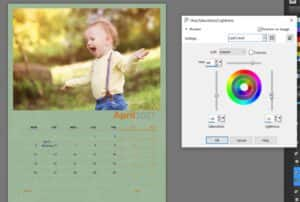
Changing the color scheme of a template background
As mentioned before, the example template we are working with has a variety of image backgrounds included, so we have options to modify these backgrounds.
- In the Layers palette, select the background layer you are using.
- Go to Adjust > Hue and Saturation > Hue/Saturation/Lightness and play around with the sliders to change the color scheme.
Adding a custom background
If you want to use your own custom background, or the template you are using does not include any background images, you can add your own very easily. This could be a solid color background, a gradient or pattern fill, or even a photo.
- Toggle off the Visibility icon of the current template background.
- In the Layers palette scroll down to the bottom, right-click on the background layer and select Duplicate.
- In the Materials palette, select a color that you want to use for the background.
- Or double-click on the Foreground and Stroke Properties (top) swatch to open the Material Properties Here you can select any color, pattern, or gradient that you want to use as a background.
- You can even use the Eyedropper tool and sample a color from your photograph to make a matching background.
- Once you have selected your color, pattern, or gradient fill, activate the Flood Fill tool.
- On the Tool Options toolbar, make sure the Match Mode is set to None and that Use All Layers is NOT checked.
- Make sure that the duplicate layer is selected in the Layers palette and then click anywhere on the template with the Flood Fill tool to fill the layer.
- If necessary, adjust the transparency level so your text is clearly visible.
How to customize font color and style
In most calendar templates, the pre-existing text elements, such as numbers, names of the months, and days of the week have been converted to raster layers. The reason for this is to preserve the appearance and formatting of the text in case you don’t have that particular font installed on your computer. Because these text elements have been converted to raster, you cannot use the Text tool to modify them. But there are other ways that you can customize the text.
First, we’ll show you how to change the color of the name of the month.
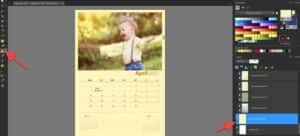
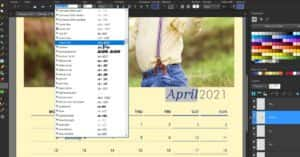
- In the Layers palette, select the month layer you want to customize.
- Have a look at the elements on this layer. In addition to the month name, are there other elements that are the same color? In this example, the color of “April” is also used for the text, numbers, and lines in the Saturday and Sunday columns.
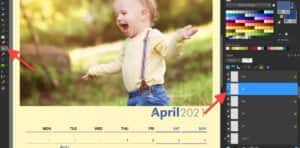
- If you want to change all the elements that use the same color:
- Select the new color in the Materials palette.
- Activate the Color Changer tool (in the same tool group flyout as the Flood Fill tool).
- Click on one of the colored elements that you want to change, such as the “A” in April.
- If you want to change only the color of the month name but not the other same-color elements:
- Activate the Selection tool.
- Use it to draw a selection around the month name.
- Then click on one of the letters inside the selection area with the Color Changer tool.
- When you’re done, use Ctrl + D to remove the selection marquee.
Now we’ll show you how to change the font style of the month name. As mentioned before, the month name and year are part of a raster layer and therefore can’t be edited with the Text tool. Instead, you’ll have to use the Eraser tool to erase “April” or your chosen month.
Then use the Text tool to add the month in your desired font and use the Tool Options toolbar to make any adjustments needed to the size and color.
You can also change the color of the dates if, for example, you wanted to highlight a special date with a different color. You could use the Color Changer tool as we just did with the text, making sure to first create a selection around the number that you want to re-color. But here is another method that would also work on the month name.
- In the Layers palette, click on the month layer that you want to edit.
- At the top of the Layers palette, click on the Lock icon to lock the transparency of this layer. This means that any changes you make will only affect the non-transparent elements i.e. the number.
- In the Materials palette, select the new color that you want to use.
- Activate the Paintbrush tool and adjust the nib size so that it is just large enough to cover the number: you can do this by holding down the Alt key and dragging up or down with your mouse; or by changing the nib size on the Tool Options toolbar.
- Once your brush is the correct size, simply paint over the date(s) you want to highlight with the new color.
Adding a background to the calendar grid
Here is one last customization option. Let’s say you have chosen a dark background pattern or color but find that it is difficult to see the calendar grid on top of it. You could change all elements of the calendar grid to a light color, using the methods above. Or instead, you can add a white background behind the calendar grid very easily.
- Activate the Rectangle tool.
- In the Materials palette, set the Background and Fill (bottom) swatch to white or whatever light color you want to use.
- On the Tool Options toolbar, set the Width to 0 if you don’t want a border around the rectangle.
- If you do want a border, adjust the Width and Line Style settings to your liking and set the Foreground and Stroke (top) swatch in the Materials palette to your chosen border color.
- Use the Rectangle tool to draw out a rectangle roughly the size of the calendar grid, then click the Apply checkmark on the Tool Options toolbar.
- You can use the Pick tool if you need to resize and/or reposition the rectangle.
- Make sure to arrange the layer on the Layers palette so it is underneath all the text.
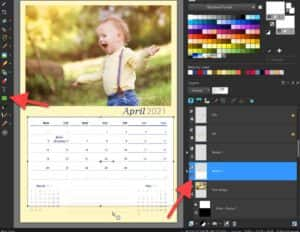
And now we have a beautiful custom calendar that we can print out and give as a unique gift for our family and friends!

Download your FREE 30-day trial and make every shot your best shot with PaintShop Pro, your all-in-one photo editing and design software.
