
Adding a chiseled wood effect is a great way to enhance your design projects. This tutorial will show you how to do so using the Drop Shadow tool in CorelDRAW.
Start your FREE 15-day trial and embark on a design journey with powerful tools for vector illustration, layout, photo editing, typography, and collaboration.
CorelDRAW Graphics Suite resources
Quick Start Guide (PDF, 2 MB)
Keyboard Shortcuts (PDF, 3.5 MB)
CorelDRAW and Corel PHOTO-PAINT user guides
For CorelDRAW Graphics Suite subscription and perpetual licenses (2018 to 2024), languages include English, Português do brasil, 简体中文, 繁體中文, Čeština, Deutsch, Español, Français, Italiano, 日本語, Polski, Русский
CorelDRAW Community
CorelDRAW learning center
Facebook
X (formerly Twitter)
YouTube
What’s New in CorelDRAW Graphics Suite
 CorelDRAW Graphics Suite
 Ultimate Vector Bundle Vol. 1
 CorelDRAW Standard 2021
 Ultimate Vector Bundle Vol. 2
 Corel Vector
Introduction
Create a wood carving design, or chiseled effect, to add perspective to your next graphic design project. In this video tutorial, you will learn creative uses for the Drop Shadow tool in order to create a fun piece of art.
Creating Your Own Wood Carving Design
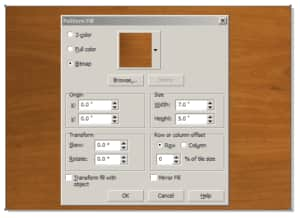
1. To begin, you will need to find a suitable texture for your design. In this example I will be using wood grain. Create a 5″x7″ rectangle and from the Pattern Fill dialog, select Bitmap and browse to where your file is located. Once imported, set the size (width and height) to the size of the rectangle and click OK.
2. Duplicate this rectangle(Ctrl + D). Next, position the rectangle to the center of the page by tapping the letter P on the keyboard.
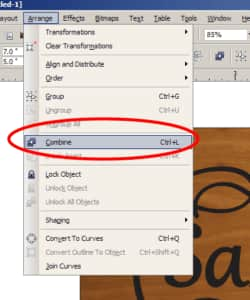
3. Import or create the image that you want to apply this effect to. Size and position the image on the duplicated rectangle (top). With both the image and rectangle selected, from the Arrange menu selectCombine (Ctrl + L).
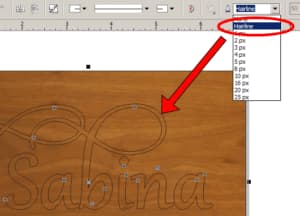
4.Give it a hairline outline, if it already doesn’t have one.
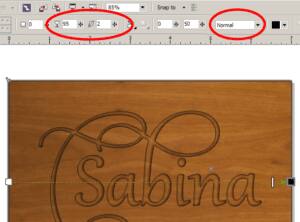
5. Add a black Drop Shadow to the top object and set the opacity to about 95, feathering to about 2-3 and transparency operation to Normal.
6. From the Arrange menu, break the Drop Shadow apart.And then, nudge it to the right three times using the right cursor key and then down three times with the down cursor key.

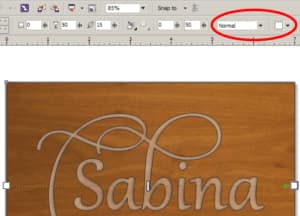
7. Create a second Drop Shadow using the top object. Set the transparency operation to Normal and then make it white.
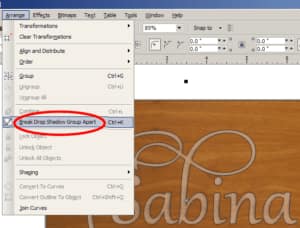
8. From the Arrange Menu select Break Drop Shadow Group Apart.
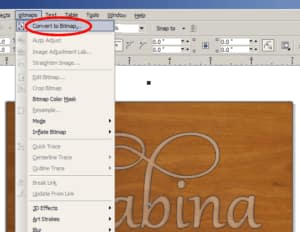
9. Select the white Drop Shadow and from the Bitmap menu select Convert to Bitmap (in this example I will keep the default settings) and then click OK.

10.Then, apply a Uniform transparency to the Bitmap and adjust the Starting transparency to make it lighter.

11. Position this Drop Shadow in the opposite direction to the black one by tapping the up cursor key three times as well as the left cursor key.

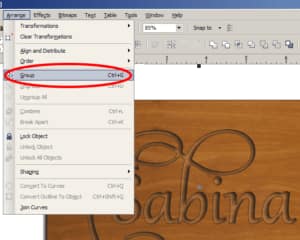
12. Select all these objects by double-clicking the Pick tool and then group them by going to the Arrange menu > Group (or by pressing Ctrl + G on your keyboard).
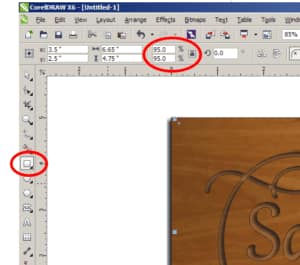
13.Create a rectangle slightly smaller than your design.
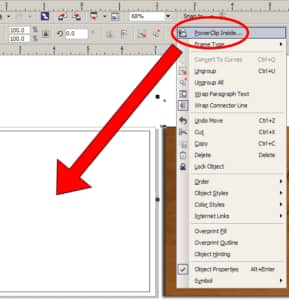
14. Finally, Powerclip the design into the rectangle to remove the appearance of the Drop Shadows that go beyond the image.

And that’s how you create a chiseled effect using CorelDRAW.
Start your FREE 15-day trial and embark on a design journey with powerful tools for vector illustration, layout, photo editing, typography, and collaboration.
