Learning how to create a magazine cover can be applied to all kinds of projects. A school report, a community newsletter or just an actual magazine! Creating a professional looking magazine cover is made simple with the power of CorelDRAW and the PowerClip feature. Organize your page layout with ease and use the alignment guides to ensure everything is even and in good proportion. Take a moment to watch the free tutorial video and learn how to make your own magazine cover!
Start your FREE 15-day trial and embark on a design journey with powerful tools for vector illustration, layout, photo editing, typography, and collaboration.
What’s New in CorelDRAW Graphics Suite
 CorelDRAW Graphics Suite
 Ultimate Vector Bundle Vol. 1
 CorelDRAW Standard 2021
 Ultimate Vector Bundle Vol. 2
 Corel Vector
In this tutorial, you will learn how to create a magazine cover that will draw the attention of your readers. There are many styles of magazine covers to choose from, so feel free to pick any one as a starting point. In this project, we will create a cover for a photography magazine.
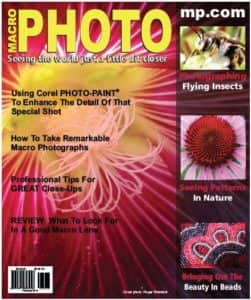
In this tutorial, you will learn about
- Importing photos
- Using the PowerClip feature
- Working with transparency
- Working with artistic text
- Inserting a bar code
Importing photos
While it is easy enough to import a single image at a time, here you will learn how to import multiple image at the same time.
- Click File > New to create a new document. In the Create a New Document dialog box, choose Letter from the Size list box, and RGB from the Primary color mode list box.
- Press Ctrl + I to open the Import dialog box, and navigate to the folder that contains your images.
- Hold down Ctrl, click the images that you want to import, and then click Import.
- Click in the document to position each image on the page.
Using the PowerClip feature
The PowerClip feature allows you to take an object or group of objects and put them inside a “container” The objects can be raster or vector and the container must be a vector object or group of vector objects.
The PowerClip feature allows you to take an object or a group of objects and put them inside a “container” (called a “frame”). The objects can be bitmaps or vector images, and the container must be a vector object or a group of vector objects.
This feature is useful when you want to place photos (bitmaps) in your magazine layout.
1. First, choose the photo that you want to use as the main background of the magazine cover. If you want to resize the image, type values in the Object size boxes on the property bar. If the Lock ratio button is enabled, the object will be resized proportionally.
2. Next, create the frame for this image. In this case, the image will cover the entire page, so you can simply double-click the page with the Rectangle tool to create a rectangle the size of the page.
3. Select the photo, and click Object > PowerClip > Place Inside Frame. When the mouse pointer changes to a big black arrow, click the rectangle frame to place the photo inside the frame.
4. You may want to reposition the photo inside the frame. To make the PowerClip object editable, click Object > PowerClip > Edit PowerClip. Position, resize, or crop the photo as necessary to get the look you want. In this example, the image is cropped to ensure that the finished file is not unnecessarily large. When you’re done editing the photo, click Object > PowerClip > Finish Editing This Level.

5. Create three smaller rectangles for the other three photos that will be used for the cover, and PowerClip the photos in the rectangles. This time, select the photo and drag it with the right mouse button on top of the rectangle until the pointer changes to crosshairs. Release the mouse button, and choose PowerClip Inside from the pop-up menu. To enter edit mode, simply hold down Ctrl and click the PowerClip object.
Note: Do not resize a bitmap by simply dragging a control handle. Instead, select the bitmap, and click Bitmap > Convert to Bitmap. In the Convert to Bitmap dialog box, choose the resolution you require. For example, if you want to reduce the resolution from 512 dpi to 300 dpi, type 300 in the Resolution box. Resizing the bitmap in this way will help you avoid larger files and longer print times.
6. If you want to adjust the contrast or brightness of the photos, press Ctrl + B to open the Brightness/Contrast/Intensity dialog box, and move the sliders.
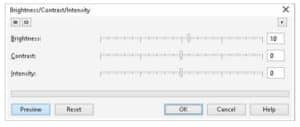
Similarly you will need to convert this to a bitmap afterwards with this as it is 1044 DPI and should be reduced to 300 DPI.
Working with transparency
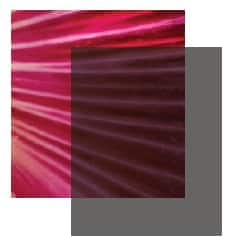
Along the right side of the magazine cover, there is a darker color bar that enhances the visual impact of the cover and gives it a professional look. It allows the underlying photo to be seen while providing a darker background for the smaller photos and light-colored text. To create this color bar, you will place a semi-transparent rectangle on top of the background photo.
- Create a rectangle with the desired dimensions, and give it a solid black fill.
- Click the Transparency tool in the toolbox.
- On the property bar, click the Uniform transparency button, and move the Transparency slider to adjust the transparency effect.
- Position the rectangle along the right edge of the page.
How to Work With Artistic text
CorelDRAW offers two types of text, artistic text and paragraph text. Artistic text is typically used for signs, banners, logos, headers, and titles. It is used when the designer may need to modify the individual character shapes or apply special effects. In this project, artistic text will be used.
Paragraph text is primarily used for what is referred to as copy or body text. It is ideal for large blocks of text, such as reports or instruction manuals, that require formatting capabilities similar to those of a word-processing application.
When you’re creating text for a magazine cover, font selection is important. You want the text to stand out and be clearly visible from a distance in order to draw the reader’s attention. For this reason, a bold sans-serif font such as Arial Black is preferred.
1. Click the Text tool in the toolbox, and click anywhere on the page. Type the words MACRO and PHOTO.
2. Resize the word PHOTO to 140 pt. Resize the word MACRO to 25 pt, rotate it 90º counterclockwise, and position it to the left of the word PHOTO.
3. Select both words with the Pick tool, and press Ctrl + D to duplicate them. With only the duplicates selected, click the yellow swatch on the color palette. Press the Arrow keys to move the yellow version of the words so that it’s only slightly offset from the black version.

4. Using the Text tool, add the rest of the text to the magazine cover. Apply bold formatting so the titles stand out.
Inserting a bar code
Bar coding is an identification method that lets you collect data. The Barcode wizard in CorelDRAW lets you generate bar codes in a wide range of industry-standard formats. You can also change the properties of the bar code.
1. Click Object > Insert Barcode to launch the Barcode wizard.
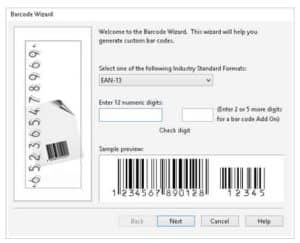
2. From the list box with industry standard formats, choose EAN-13. This format is generally used for periodicals.
3. Enter twelve digits in the first text box and five digits in the second text box, and click Next.
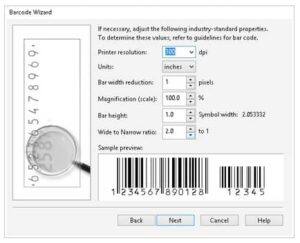
4. On the next page, you have the option to adjust the properties of the bar code. Accept the default settings, and click Next.
5. Depending on the type of barcode selected, there may be the ability to modify the text properties.
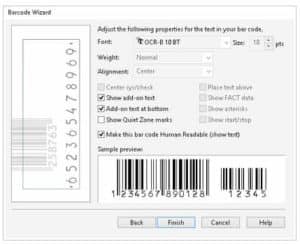
6. When you’re done, click Finish to close the wizard and place the newly created barcode in the center of the page. Now it is simply a matter of moving it into position.
Creating a magazine cover can be a lot of fun. By using a few simple tools in CorelDRAW and following some basic principles of design, you can create a professional-looking cover for your magazine.
Start your FREE 15-day trial and embark on a design journey with powerful tools for vector illustration, layout, photo editing, typography, and collaboration.

