Learn how to design crisp, clean web graphics with enhanced features in CorelDRAW that ensure pixel-perfect precision. This tutorial demonstrates the key tools to use when creating images for the web, including how to work in Pixels view, how to align objects and nodes to the pixel grid, and how to use pixel snapping.
STC logo artwork in this tutorial was created by Agus Riyanto.
Thanks for watching! We hope you found this tutorial helpful and we would love to hear your feedback in the Comments section below. You will find a written version of this tutorial below, and a printable PDF copy to download from the Download Resources tab above.
Learn how to design crisp, clean web graphics with enhanced features in CorelDRAW that ensure pixel-perfect precision. This tutorial demonstrates the key tools to use when creating images for the web, including how to work in Pixels view, how to align objects and nodes to the pixel grid, and how to use pixel snapping.
STC logo artwork in this tutorial was created by Agus Riyanto.
Thanks for watching! We hope you found this tutorial helpful and we would love to hear your feedback in the Comments section below. You will find a written version of this tutorial below, and a printable PDF copy to download on the Download Resources tab above.
Start your FREE 15-day trial and embark on a design journey with powerful tools for vector illustration, layout, photo editing, typography, and collaboration.
Download these free resources:
Written tutorial for Windows (PDF, 350 KB)
Written tutorial for Mac (PDF, 740 KB)
CorelDRAW Graphics Suite Resources
Quick Start Guide (PDF, 2 MB)
Keyboard Shortcuts (PDF, 3.5 MB)
CorelDRAW and Corel PHOTO-PAINT user guides
For CorelDRAW Graphics Suite subscription and perpetual licenses (2018 to 2024), languages include English, Português do brasil, 简体中文, 繁體中文, Čeština, Deutsch, Español, Français, Italiano, 日本語, Polski, Русский
What’s New in CorelDRAW Graphics Suite
 CorelDRAW Graphics Suite
 Ultimate Vector Bundle Vol. 1
 CorelDRAW Standard 2021
 Ultimate Vector Bundle Vol. 2
 Corel Vector
Creating Pixel-perfect Web Graphics
When creating digital output, such as web graphics or social media banners, we often work in pixels – the tiny squares that combine to form the overall image. In this tutorial, we’ll look at the pixel-perfect workflow in CorelDRAW, and go over some of the new pixel tools and features introduced in CorelDRAW Graphics Suite 2019.
Click on any of the images below to view full-size.
Creating a New Document
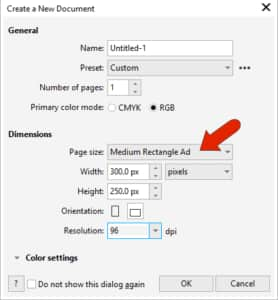
Go to File > New and select the Web preset. This will set your color mode, units of measure and resolution to the correct settings for web graphics. There are also a number of Page size presets for the most common sizes of web graphics and banners.
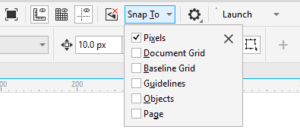
In the Snap To dropdown list, make sure that Pixels is checked. Generally, when working with the pixel grid it’s best to keep only pixel snapping on and turn off all other snaps.
Zoom in on the lower left corner of the page and the pixel grid starts to appear. One complete pixel aligns exactly with this corner. Because this page size is set in complete pixels, each corner has one pixel grid square.
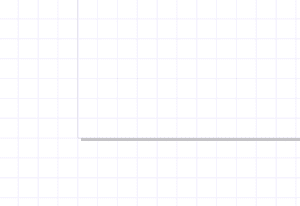
Note: In earlier versions of CorelDRAW, pixels were centered on the page, which sometimes resulted in partial pixels along all edges.
The pixel grid appearance is set in the Layout > Document Options window, on the Grid tab. This is where you can adjust the grid opacity or change its color.
Align with Pixel Grid
As a basic example, activate the Rectangle tool (F6), which is the tool you’d start with to create a button in a web banner. Click a swatch in the Color palette to set a fill color, and right-click a swatch for the outline color. Set the outline width to 2 pixels.
Note: When you set these object properties, you may see a popup asking you to confirm a change to the default properties – just click OK.

Zoom in so that the pixel grid is visible. Drag to create the rectangle, and its corners will snap to grid corners.
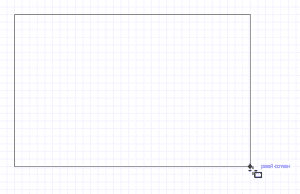
Zoom out so that the pixel grid is no longer visible and create a second rectangle. Now if you zoom back in to see the pixel grid, you will see that the second rectangle has also snapped to the pixel grid.
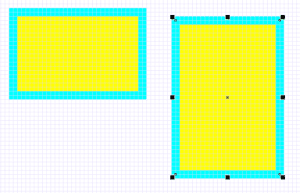
Because these rectangle outlines have an even number of pixels, when you use the Pick tool to move a rectangle, the rectangle nodes will still align with grid corners, with these corners centered within the outline.
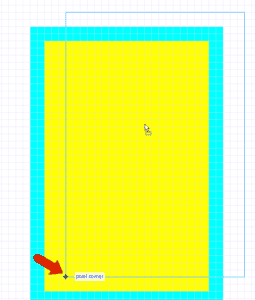
This applies to resizing as well – alignment is always relative to grid corners.
If you change the outline width to another even number like 4 pixels, the alignment will remain consistent with grid corners.
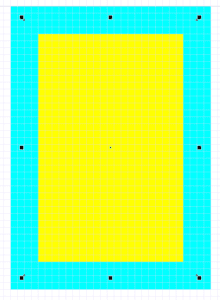
If you change the outline width to an odd number like 3 pixels, the outline now has 2 correctly filled pixels and 2 partially filled pixels.
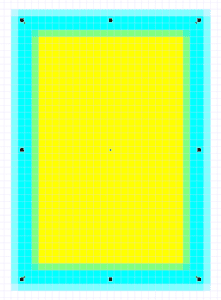
You can align this rectangle to the pixel grid easily by right-clicking on the rectangle and choosing Align with Pixel Grid. Now the outline is pixel-perfect, this time aligned with grid center points, so that the outline will remain within its 3-pixel border.
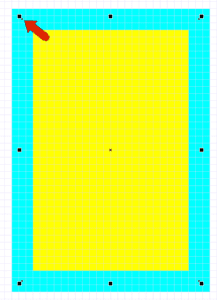
As you move or resize this rectangle, each corner always aligns to a grid center. And this will be the case for any odd number of outline pixels.
An outline of none, or 0 pixels, is treated as an even-number pixel outline. When aligned to the pixel grid, the rectangle goes back to aligning to grid corners. If you switch to hairline outline, this is treated like a 1-pixel outline and aligning to the pixel grid switches to grid centers.
This pixel alignment applies to curves as well. Activate the Pen tool, which should still have the 2-pixel outline. As you draw with the Pen tool, each click aligns to a grid corner, even when zoomed out too far to see it. (Though if you had started with an odd number of pixels, each click would have aligned to a grid center.)
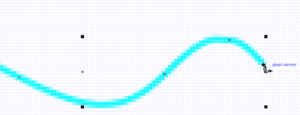
The Shape tool displays the curve nodes, each of which is on a grid corner. Editing this curve with the Shape tool also keeps nodes on grid corners.
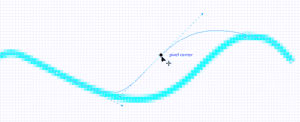
Select the curve and change the outline width to an odd number. Then open the Align and Distribute docker (Window > Dockers > Align and Distribute), which is another place where you can find the Align with Pixel Grid option. After clicking this button, each node aligns to a grid square center, actually changing the curve geometry just a bit.
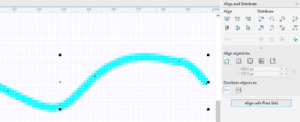
If you move the curve, and the nodes become out of alignment, you can simply click the Align with Pixel Grid button to align again.
Now let’s compare drawing from scratch with the pixel snap on and off.
Uncheck Pixels in the Snap To dropdown list. Activate the Common Shapes tool and choose one of the arrows, keeping the 2-pixel outline. Drag to create the arrow, keeping the Ctrl key pressed to maintain the aspect ratio. The overall arrow size contains pixel fractions (73.5 px in this example). This is because Snap To > Pixels is turned off.
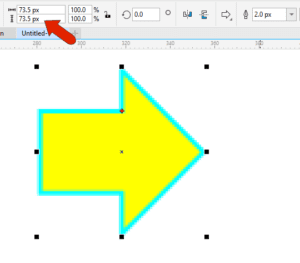
Press Ctrl + Q to convert the arrow shape to curves. When you activate the Shape tool, you can see that the nodes don’t align to the pixel grid.
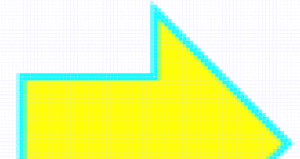
Click Align to Pixel Grid, and now you will see that the nodes sit on grid corners, and the dimensions in pixels are nice, clean numbers.
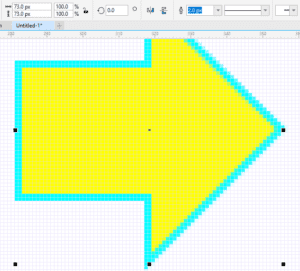
Now go back to the Snap To dropdown and enable Pixels again. Create the same arrow shape. Notice that the dimensions in pixels contain no decimals, and the nodes are aligned to grid corners.
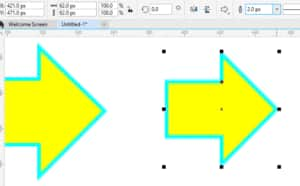
Now that you are familiar with the pixel tools in CorelDRAW, you can create precise, pixel-perfect web graphics any time.
Start your FREE 15-day trial and embark on a design journey with powerful tools for vector illustration, layout, photo editing, typography, and collaboration.


Reader Interactions