Learn how to customize the CorelDRAW workspace with toolbars, buttons and shortcut keys tailored to your specific graphic design workflow. Everyone works differently and has their favorite go-to tools and features but not everything can be found on a default toolbar. In this tutorial we will review the main customization options and show you how to create a custom workspace. You will learn how to create a new toolbar and add commands to it; how to change your toolbar buttons into captions for easier viewing; how to add commands to right-click menus; how to create or modify shortcut keys; and finally, how to save your new custom workspace.
Thanks for watching! We hope you found this tutorial helpful and we would love to hear your feedback in the Comments section at the bottom of the page. You will find a written version of this tutorial below, and a printable PDF copy to download on the Download Resources tab above.
Start your FREE 15-day trial and embark on a design journey with powerful tools for vector illustration, layout, photo editing, typography, and collaboration.
Download these free resources:
Written Tutorial (PDF, 574 KB)
CorelDRAW Graphics Suite Resources
Quick Start Guide (PDF, 2 MB)
Keyboard Shortcuts (PDF, 3.5 MB)
CorelDRAW and Corel PHOTO-PAINT user guides
For CorelDRAW Graphics Suite subscription and perpetual licenses (2018 to 2024), languages include English, Português do brasil, 简体中文, 繁體中文, Čeština, Deutsch, Español, Français, Italiano, 日本語, Polski, Русский
What’s New in CorelDRAW Graphics Suite
 CorelDRAW Graphics Suite
 Ultimate Vector Bundle Vol. 1
 CorelDRAW Standard 2021
 Ultimate Vector Bundle Vol. 2
 Corel Vector
How to Customize the CorelDRAW Workspace
In this tutorial we will show you 5 ways to customize the CorelDRAW workspace so that your most commonly used tools are right at your fingertips.
Let’s get started by reviewing where the main customization options areas are in CorelDRAW. Go to Tools > Customization. In the Options dialog box you will see the Customization section in the left menu. This is where you control what toolbars are displayed. We will be adding Commands (buttons) to a new Command Bar (toolbar).
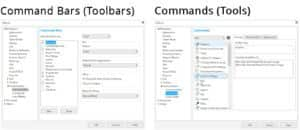
Creating a New Workspace
The first step to customize the CorelDRAW workspace is to create a new workspace. In the Customization Options dialog box:
- click on Workspace at the top of the left column
- click New to create a new workspace
- enter a name and description, then click OK
Your new workspace should now have a checkmark beside it, indicating that it is the workspace in use.
Creating a New Toolbar
Now we will create a custom toolbar (also called Command Bar).
- click on Command Bars in the Customization area then click New
- type in a name and press Enter
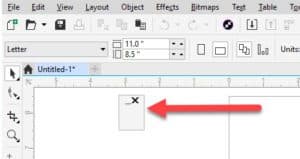
Your new toolbar will appear somewhere in the workspace, but it may be difficult to see since it is just a small box with an X in the top right corner. You may have to move the Options dialog box to the side or click OK to close it in order to see the new toolbar.
You can drag the toolbar anywhere you want in the workspace. It can float, or you can dock it in the top or left tool bar areas. We recommend leaving it floating on the left-hand side of the page while we add commands to it. We will dock it later.
Adding Tools to a Toolbar
For this example, we will use the Wireframe View and Enhanced View commands to demonstrate. If you closed the Customization Options dialog box to find your new toolbar, open it again (Tools > Customization).
- click on Commands in the Customization section
- click on the dropdown box and select View
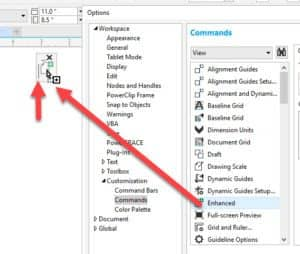
- scroll down and you will see Enhanced first
- click on Enhanced, and keeping your left mouse key held down, drag it over to your new toolbar
- when you see a grey dotted line appear in the empty toolbar window, you can let go of your mouse to drop the command onto the toolbar
Note: If you let go of the command outside of the new toolbar area, it will create a whole new toolbar.
Go back to the Commands window and scroll down until you find Wireframe under the View list. Add it to your new toolbar as you did with the Enhanced command.
If you are not sure which menu your command is listed under, click on the Binoculars icon beside the dropdown menu and type the name of the command you are looking for. It will jump to the first result it finds but you can click on Find Next until you get to the command you want.

Once you find the command you want, drag it onto your new toolbar. Click Close to close the search window then click OK to exit the Commands dialog box.
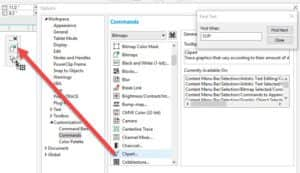
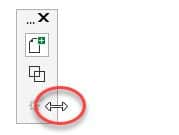
Tip: If you want your tool bar to display the commands horizontally, you can grab the right edge and pull it out.
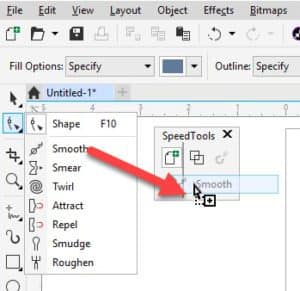
You can also add tools from existing toolbars to your new toolbar. Hold down the Ctrl and Alt keys, then select the tool and drag it to your new toolbar. This is especially handy for commands that are hidden within a tool group flyout, for example the Smooth tool under the Shape tools group.
Docking your Toolbar
You can dock your toolbar into the Property Bar area at the top of the interface.
- click on the name of your new toolbar
- hold down your mouse key and drag it up to the Property Bar
- a shaded grey area will appear, and you can drop your new toolbar there
Note: if you want to move your new toolbar to another spot, right-click on one of the tools and uncheck Lock Toolbars. A grey dotted line will appear, indicating that you can now move your toolbar.
When you add a toolbar to the Property Bar, the workspace may condense the tools. You will see two small right-pointing arrows. This means there are more tools that aren’t displayed. You can expand the toolbar by dragging the thin line out to the right until all buttons are visible.

Replacing Toolbar Icons with Captions
You can turn your most commonly used toolbar icons into captions (tool names) so you can easily recognize them. We will use Group and Ungroup as an example, but in order to make them show up we first need to create some objects that we can group:
- activate the Rectangle tool and create 3 rectangles anywhere on the page
- activate the Pick tool and lasso the rectangles by drawing a marquee around them
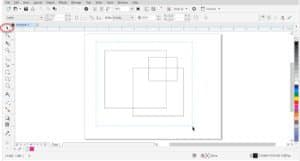
Right-click on the Group objects button and choose Customize > Toolbar Item > Caption Only.

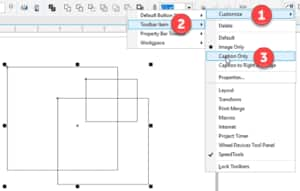
You will now see the caption Group Objects instead of the button. Click on it to group the rectangles together. Repeat the process of creating captions for the Ungroup and Ungroup All buttons.
Customizing Right-click Menus
Another way to customize the CorelDRAW workspace is to add commands to the right-click menus. In this example we will use the Edit text command.
Go to Tools > Customization to open the Customization Options window again. The first thing we have to do is turn on the Context Menu Bar. This is where all the right-click menu information is stored. Click on Command Bars in the Customization section and then put a checkmark beside Context Menu Bar.
Now let’s find the Edit text command by clicking on the Commands and selecting the Text category in the dropdown menu. Scroll down until you find Edit Text.
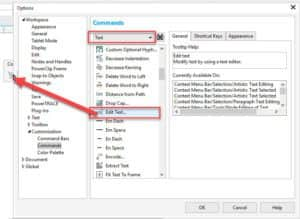
Now you can click and drag it to the Context Menu Bar but first make sure you know exactly where you want it to go. In this case, we want the Edit Text command to appear as part of the right-click menu of Selected Artistic Text.
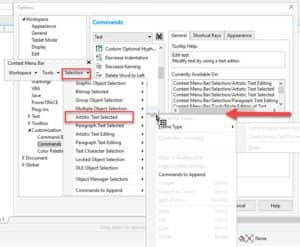
Grab the Edit Text command and drag it over to the Context Menu Bar while holding down your mouse key. Still with your mouse key held down, drag it over top of Selection and the Selection menu will expand, then you can drag it over top of Artistic Text Selected, then over to the flyout that appears to the right. The grey line insertion indicator shows you where the command will appear when you let go of your mouse key to drop the command into the right-click menu.
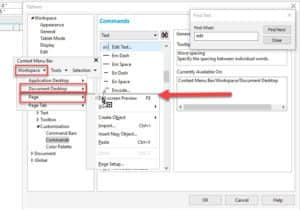
You can add the same Edit Text command to other right-click menus as well. For example, if you are speed editing you might not always right-click directly on your text, so if you add the Edit Text command to the right-click menus for Document Desktop and Page it will be even easier to access. To try this, follow the same steps to drag the Edit Text command to Workspace > Document Desktop and Workspace > Page on the Context Menu Bar.
Click OK to close the Customization Options window. If you want to try out your newly customized right-click menus, activate the Text tool and create some text anywhere on the page.
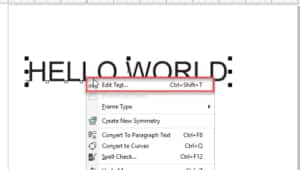
Activate the Pick tool and select the text you created. Now right-click on the text and/or the document desktop and/or the page and you will see the Edit Text command is now in the right-click menu.
Adding and Modifying Shortcuts
Another way to customize the CorelDRAW workspace is by adding new shortcuts or modifying existing shortcuts. In this example we will again use the Wireframe View and Enhanced View commands that we previously added to our new toolbar.
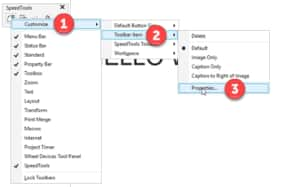
- right-click on the Enhanced View icon
- select Customize > Toolbar Item > Properties
- click on the Shortcut Keys tab on the right side of the window
Type “Q” (or whatever you want the shortcut to be) in the New Shortcut Key box and click Assign, then click OK.
Note: if you hold down the Shift key to type a capital Q, the shortcut will show as Shift + Q, so just press the Q key on your keyboard.
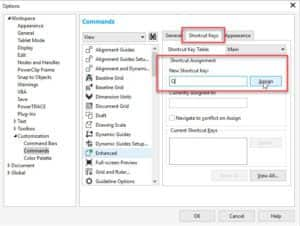
Repeat the same process for the Wireframe View command and assign “W” as the shortcut. Now you can easily switch between Wireframe and Enhanced views simply by using the Q and W keys on your keyboard. And if you look under the View menu you will now see the shortcuts next to the command in the menu.
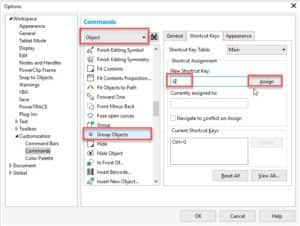
You can also modify existing shortcuts. In this example we will simplify the shortcuts for the Group and Ungroup commands from Ctrl + G and Ctrl + U to just G and U:
- go to Tools > Customization
- click on Commands
- select the Object menu in the dropdown box
- scroll down until you find the Group Objects command
- select it then click on the Shortcut Keys tab
- type G in the New Shortcut Key box then click Assign
- repeat the same process with the Ungroup Objects command, assigning U to be the new shortcut key
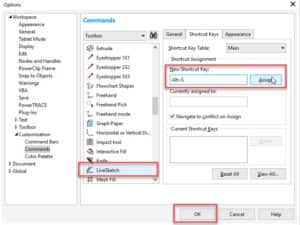
What happens when you try to assign a shortcut that is already in use? For example, we want to assign “S” to be the new shortcut key for the Page Sorter View command. But when you type S in the New Shortcut Key box you will see it appear as Currently assigned to the LiveSketch command.
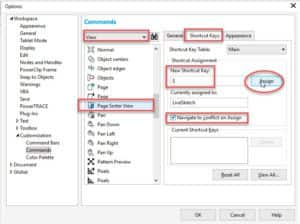
Add a check beside Navigate to conflict on Assign. Now after you click Assign to make S the new shortcut key, it will automatically bring up the LiveSketch command and you can assign a new shortcut key (such as Alt + S) here to resolve the conflict.
Saving your Custom Workspace
Once you have completed the modifications to customize the CorelDRAW workspace, it is important to save it, so you can reload at any time or share it with another user. Go to Tools > Customization. Your new workspace should have a check beside it, indicating that it is the workspace in use. Click on the Export button.
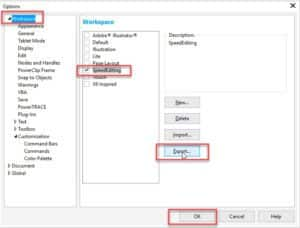
You will have the option to select which workspace elements you want to export, then choose a location on your computer to save it, enter a file name and click Save.
If you need to reinstall your workspace, go to Tools > Customization and click on Workspace. Then click the Import button and browse to your saved workspace, select it and click Open.
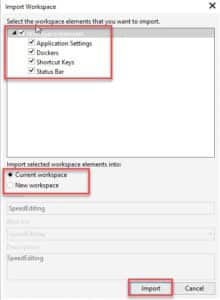
Choose the workspace elements to import and if you want to import into a new or current workspace. Then click Import.
Now that you are familiar with some ways to customize the CorelDRAW workspace, you can easily create a workspace that will put your favorite tools right at your fingertips and speed up your workflow.
Start your FREE 15-day trial and embark on a design journey with powerful tools for vector illustration, layout, photo editing, typography, and collaboration.


Comments (1)
Reader Interactions
Comments
She was a GREAT teacher that made you feel positive as you learned!!