
Add some dramatic flair to your footage by learning how to do time lapse video in VideoStudio. Creating a time lapse effect makes your video project appear to move much faster than it was originally shot. Whether it be a flower blooming in a matter of seconds or a powerful shot of a city coming to life at night, learning how to do time lapse video can open the door to new and exciting forms of expression in your video projects.
You will learn how to:
- Use the Auto Capture feature to capture photos
- Build your time lapse video project
- Resize your clips and make color corrections
Thanks for watching! You will find a written version of this tutorial below, and a printable PDF copy to download on the Download resources tab above.
Download a FREE 30-day trial and turn your best moments and life experiences into unique movies with this easy and fun video editor packed with intuitive tools and creative effects.
Download these free resources:
Written Tutorial (PDF, 476 KB)
VideoStudio User Guides and Help files
For VideoStudio X9 to 2023, languages include English, Deutsch, Français, Italiano, Nederlands, 简体中文, 繁體中文, 日本語
What’s new in VideoStudio
Speed and motion editing techniques
Advanced video editing projects
Featured products
 VideoStudio Pro 2023
 Studio Backlot Membership
 VideoStudio Ultimate 2023
 Vision FX 2.0
Mesmerize your audience by adding some drama to your movie using the time lapse video in VideoStudio. This technique makes your video project appear to move much faster than it was originally shot. You may use either a regular photo camera or a video camera in order to create a time lapse video.
Click on any of the images below to view full-size.
How to use Auto Capture
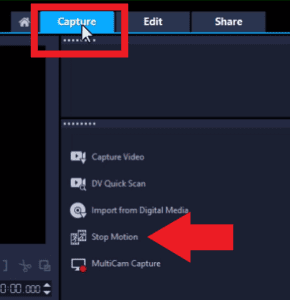
If you don’t already have the photos for your time lapse, you can use the Auto Capture feature. Open Video Studio and click on the Capture tab. Then click Stop Motion.
Connect your camera to your computer and select it from the dropdown menu above the preview pane. You’ll see a live preview of what the camera is capturing in the preview pane.
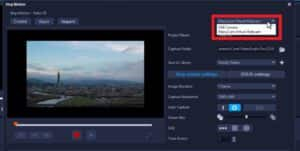
Change your Project Name and select a folder where you want to save your captured photos to. You can also choose where to save the photos directly into the Video Studio Library.
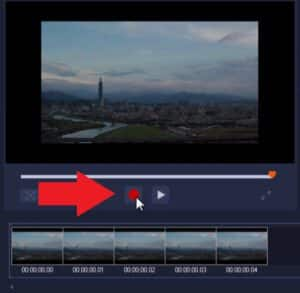
Click on the line icon to enable Auto Capture.
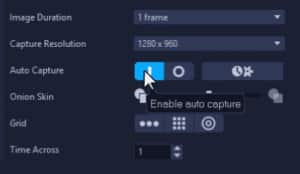
- Select how many frames you want your image duration to be (1 frame is a good starting point)
- Click on the Settings icon beside the Auto Capture icons.
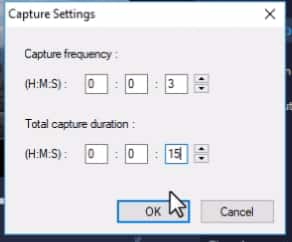
Before you begin capturing, determine how long you want your time lapse to be, so you know how many photos you’ll need to capture.
For example, if you want 15 seconds of skyline footage and you’re shooting at 30 frames per second, you’ll need 450 photos or frames to be captured because 15 seconds X 30 frames each second = 450 photos.
If I was recording this skyline over a span of two hours, I’d divide the total recording time in seconds by the number of photos (450) which means the capture interval would be every 16 seconds.
- Adjust the Capture Interval which sets the time interval between image captures and set the Duration which is the length of time you want Auto Capture to run for.
- Click the red circle icon to start the Auto Capture. Preview the images by clicking on the thumbnails at the bottom.
Once you’re finished capturing all the images, click on Save then Exit.
Creating a time lapse video
- Click on the Edit tab at the top.
- Right-click on the timeline and select Insert Photo for Time Lapse/Strobe.
- Browse to the location of your photos and click on the first one. Then hold down CTRL on your keyboard and press A to highlight all the images in the folder. Then click Open.
A dialogue box will pop up with different settings you can use to customize your time lapse video.
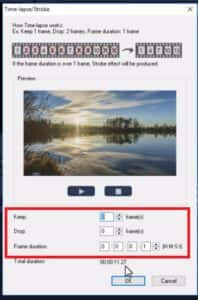
For a standard time-lapse video, keep all of the frames with a frame duration of 1 second each and press Play to preview.
To lengthen the time lapse video, increase the frame duration.
To make the time lapse video shorter, you can keep or drop a certain number of frames, and this sequence will be repeated throughout all of the photos.
When you’re happy with your settings, click OK.
Give VideoStudio some time to render this and all of your images will now be added to the Video track on the timeline.
Repositioning images and adding effects
- Zoom up on the timeline so you can see the clips individually.
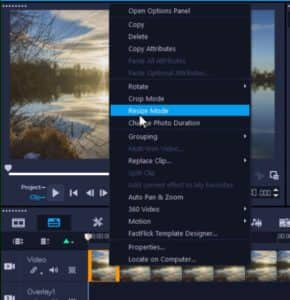
- Right-click on the first image and select Resize Mode.
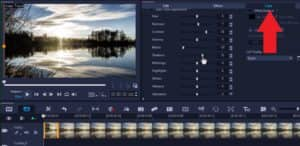
- Drag the image to reposition it and click and drag the orange boxes to zoom up.
- Double-click on the first image on the timeline and click on the Color
- Adjust some of the settings under Color Correction to make changes to the color scheme.
- Right-click on the first clip on the timeline and select Copy Attributes.
- Then press and hold CTRL on the keyboard and press A to select all of the clips on the timeline.
- Right-click on one of the images and select Paste All Attributes.
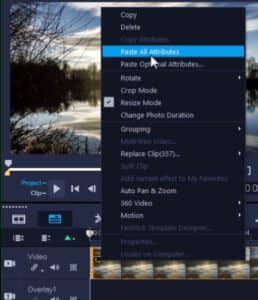
Preview your time lapse and you can see that all of the effects have been added throughout each frame.
And now you’re ready to export and share this cool time lapse video!
Download a FREE 30-day trial and turn your best moments and life experiences into unique movies with this easy and fun video editor packed with intuitive tools and creative effects.
