
Animated overlays are very simple to use and an easy way to make your movies and slideshows more dynamic and eye-catching. In this tutorial we will review how to install overlay packs and basic adjustments such as rotating, resizing and adjusting the speed. You will learn how to loop multiple overlays for longer clips and how to combine them to increase the density of the effect. We will also demonstrate a few advanced creative options to help inspire you to do more with your overlays.
If you are using VideoStudio 2019 or higher, download a free overlay sample to try it out yourself.
Thanks for watching! You will find a written version of this tutorial below, and a printable PDF copy to download on the Download Resources tab above.
Download a FREE 30-day trial and turn your best moments and life experiences into unique movies with this easy and fun video editor packed with intuitive tools and creative effects.
Download these free resources:
Sample overlay (Zip file, 2.7 MB)
Written tutorial (PDF, 592 KB)
VideoStudio User Guides and Help files
For VideoStudio X9 to 2023, languages include English, Deutsch, Français, Italiano, Nederlands, 简体中文, 繁體中文, 日本語
What’s new in VideoStudio
Using templates, overlays and graphics
Advanced video editing projects
Featured products
 VideoStudio Pro 2023
 Studio Backlot Membership
 VideoStudio Ultimate 2023
 Vision FX 2.0
How to use animated overlays
Adding overlays is as simple as importing them into your media library and then dropping them onto the timeline. But there are many ways you can adjust and customize animated overlays to suit your video projects and add creative effects.
Click on any of the images below to view full-size.
How to install overlay files
Most overlays packs are delivered in the form of an .exe file, which is a program that will install the overlays onto your computer.
- Open the folder where you downloaded the .exe file.
- Double-click on the file to run the installer.
- Review and accept to the terms of the license agreement.
- Click Finish once the installation is complete.
The overlays will be installed in a folder located on your desktop and you’re ready to import them into VideoStudio.
- Click on the Graphic icon in the media library.
- Then select Animation from the Gallery dropdown menu.
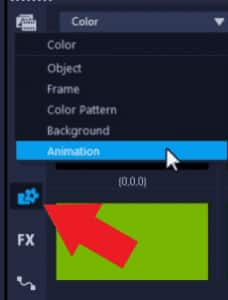
Here you’ll have a variety of other animations you can use.
- Click on the Add icon to the right of the Gallery dropdown menu.
- Browse to your desktop where the overlay files have just been installed.
- Select the files and click Open.
Now you’ll see the overlays have been added to the Animation library and are ready to use. You can click on one and then press Play in the preview pane to see what it will look like.
How to adjust animated overlays
To begin working with overlays, drag the overlay file from the media library onto Overlay 1 Track in the timeline.
To resize and reposition overlays:
- Adjust the size of the overlay by dragging the orange handles in or out.
- Click and drag the overlay to reposition it.
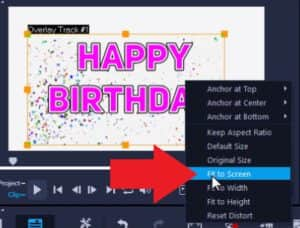
- To have the overlay fit the full screen, right-click on the overlay on the preview pane and choose Fit to Screen.
To adjust speed or rotation of overlays:
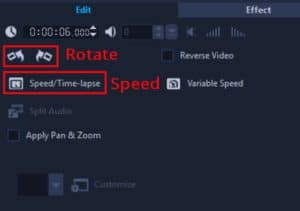
There are other adjustments you can make by double-clicking on the overlay to open the Options panel, then selecting the Edit tab
- To rotate the overlay, click on the Rotate Left or Rotate Right
- To adjust the speed of the overlay, click on Speed/Time Lapse button and then drag the slider left or right to speed up or slow down the overlay.
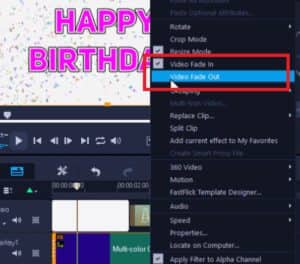
You can also apply a fade in/out effect by right-clicking on the overlay in the timeline and selecting Video Fade in and Video Fade Out, so the overlay softly fades in and out and isn’t so harsh.
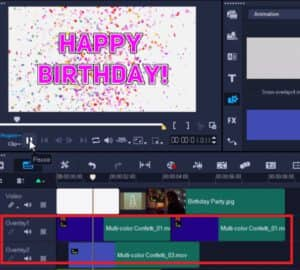
How to loop and layer animated overlays
The overlays are short, and you may want to adjust the duration, so they play throughout a longer video clip. You can easily make them loop without affecting the speed.
- Right-click on the overlay in the timeline and select Copy.
- Click to place the copied overlay beside the first one on the overlay track in the timeline.
Let’s say you want to layer a second confetti overlay on top of the first one to create an even bigger confetti explosion.
- Right-click on an empty area in the timeline and select Track Manager.
- In the Track Manager window, change the amount of overlay tracks to 2 or more from the dropdown menu.
- Now you can add more animated overlays to the new overlay tracks.
- Overlay track 1 is the bottom layer, so overlays on track 2 and up will be layered over top of it.

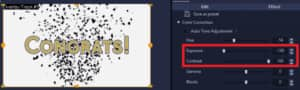
How to change the color of animated overlays
With the color correction tools in VideoStudio you can change the color of the overlay files, from a slight adjustment to a completely different color.
Double-click on the overlay to open the Options panel and click on the Color tab.
NOTE: The Color tab was introduced in VideoStudio 2019. In previous versions you can find the color adjustment tools on the Correction or Video tab in the Options panel.
From here you can adjust any of the levels in the Color Correction section to change the color levels of the overlay.

Adjust the Hue setting to change the colors.
Or to create a black and white effect, adjust the Exposure level all the way down and the Contrast level all the way up.
How to add effects to animated overlays
You can also add effects to the animated overlays, using filters from the Filter library. In this example we will add a motion effect.
- Click on your overlay on the timeline to select it.
- Click on the FX tab along the left of the media library to display the filters.
- Select an effect such as Wiggle and drag that on top of the overlay on the timeline.
- Press play to preview the effect and you’ll see the confetti is moving around from side to side.
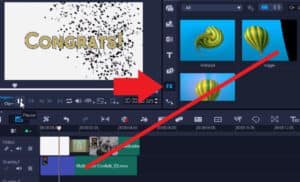
You can try out any of these effects to customize your overlays.
How to crop animated overlays
If you want your overlays to cover only a certain portion of your image or video clip, you can use Crop Mode to make them fit. By cropping the overlays instead of resizing them to fit, you can retain the proper size and proportion of the elements in the overlay.
In this example we have an image of a woman in front of a window, and we want to add a falling snow overlay. Drag the snow overlay onto Overlay Track 1 and resize it to fit to screen as we learned before.
If you preview this, it looks like it is snowing inside the house, and that’s not the effect we want. We need to crop the overlay to fit in the window portion of the image.
- To do this, right-click on the overlay on the timeline and select Crop Mode.
- Drag the edges of the overlay on the preview pane so that they are cropped to the size of the window.
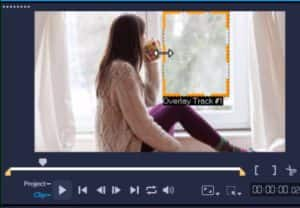
Now it looks like it is snowing just outside the window.

These are just a few examples of how you can adjust and customize animated overlays. We hope this inspires you to try out different ways to create your own unique overlay effects.
Download a FREE 30-day trial and turn your best moments and life experiences into unique movies with this easy and fun video editor packed with intuitive tools and creative effects.
