
In this tutorial, we’ll show you some creative ideas to enhance your video projects with graphics, such as using graphics as decorations on your GIFs or slideshows, adding motion to graphics, creating lower thirds, and creating custom titles.
Thanks for watching! We hope you found this tutorial helpful. You will find a written version of this tutorial below, and a printable PDF copy to download on the Download Resources tab above.
Download a FREE 30-day trial and turn your best moments and life experiences into unique movies with this easy and fun video editor packed with intuitive tools and creative effects.
Download these free resources:
Written Tutorial (PDF, 1.12 MB)
VideoStudio User Guides and Help files
For VideoStudio X9 to 2023, languages include English, Deutsch, Français, Italiano, Nederlands, 简体中文, 繁體中文, 日本語
What’s New in VideoStudio
Using Templates and Overlays
Featured products
 VideoStudio Pro 2023
 Studio Backlot Membership
 VideoStudio Ultimate 2023
 Vision FX 2.0
How to use graphics in VideoStudio projects
In this tutorial, we’re going to share some creative ideas on how you can enhance your videos with graphics (also called clipart). If you’d like to learn more about any of these editing processes, you’ll find links below for more in-depth tutorials.
Getting started
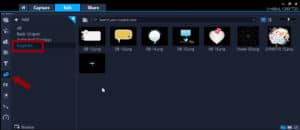
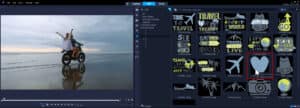
In the media library you’ll find a selection of graphics that are included with VideoStudio. Click the Overlays icon and then select Graphics.
If you want to find more graphics to add to this library, you can go to the Store tab of the Welcome screen. Then filter by Free and there is a lot of content here, including an Overlay Graphics and Animations pack and a Graphic Pack.

You can also find content to purchase in other categories including animated overlays, motion graphics, and AR stickers.
You may also use your own graphics that you already have (like your logo) or content that you get from stock sites.
To bring your own graphics into VideoStudio, simply drag and drop them into the media library or click the Import Media icon.
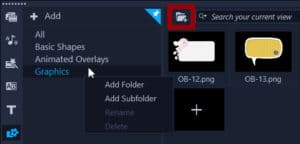
TIP: If you have a lot of graphics and want to keep them organized, you can create new folders or subfolders in the media library by right-clicking and selecting Add Folder or Add Subfolder.
Using graphics as decorations
We’ll start with some fun and easy ways that you can use graphics to enhance your VideoStudio projects.
In our first example, we’re making a video slideshow to celebrate a friend’s birthday. We have our video clips and photos on the timeline, and now we want to add some graphics.
- Drag the graphic from the media library onto the Overlay track on the timeline.
- To resize and/or reposition the graphic, use the orange control handles in the preview pane.

- To adjust the duration that the graphic is on screen, drag out either end of it on the timeline.

You can also add some effects to the graphics by double-clicking on the graphic on the timeline to open the Edit panel.
Under Basic Motion, you can choose the direction you want the graphic to enter or exit by clicking on the arrow icons. Or you can keep the graphic static by clicking on the icon in the middle.
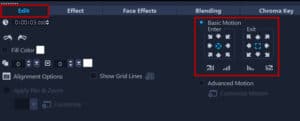
Under the Enter and Exit options there are icons that you can use to create a fade in or fade out of the graphic, or to add rotation to the graphic. All of these effects can be used in combination or on their own.
You can also add graphics to GIFs. Just drag your GIF, or the clip you want to turn into a GIF, onto the Video track on the timeline. Then add your graphics to the Overlay track and add any effects you want. Then simply export as a GIF by going to Share > Custom > and choosing the GIF format.
To learn more, watch the full tutorial Creating GIFs in VideoStudio.
Adding motion to graphics
You can use more advanced motion effects to animate a graphic. One option is to make the graphics follow a preset motion path.
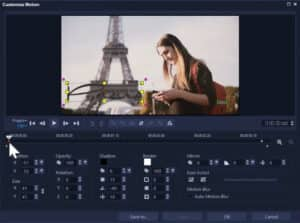
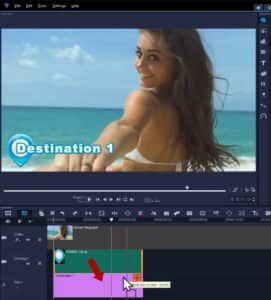
In this example we’re making a video for a travel vlog, and we want to add some motion to the Paris graphic.

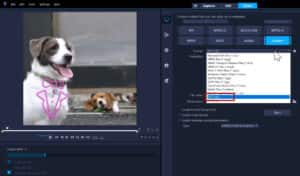
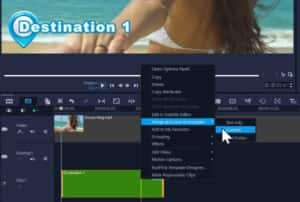
To do this, right-click on the graphic on the Overlay track on the timeline and go to Motion > Customize Motion. Click on the first keyframe and make sure the graphic is placed where you want it to begin. Then click on the last keyframe and click and drag the graphic to where you want it to end. Now when you press play, you’ll see the graphic follows this path. You can even click on the motion path and drag it inwards or outwards to create a curve in the motion and then press OK.
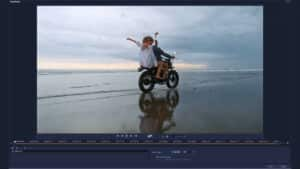
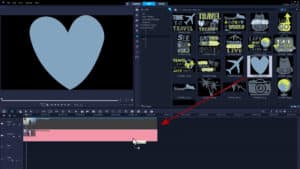
Another thing we can do is use motion tracking to make the graphic follow a person or moving object in your video. In this example, we want to make the heart graphic follow the bike rider along the beach.
Select your video on the Video track and click on the Track Motion icon from the toolbar. Then drag the red tracker on top of the person or object that you want to track.
Now we have to add a matched object that will follow what we are tracking. Make sure Add matched object is selected and choose Custom to set the matched object placeholder wherever you’d like. Then click on the Track Motion button to track the motion of the object and press OK when it has finished tracking. Now locate your graphic in the library that you want to use, then drag it on top of the placeholder and press CTRL on your keyboard before releasing.
When we press Play to preview, you can see our travel graphic follows the bikers along the beach!
To learn more, watch the full tutorials Adding Custom Motion Effects and Creating Custom Motion Paths.
Creating lower thirds and custom titles
Another way to use graphics is to create a lower third. In this example, we’ll create a series of lower third titles to use on our travel vlogs.
First, click on the Title tab and double-click on the preview pane to add a title. On the Title Options panel, choose your desired font type, size and color. We’re also going to click on Border and add an Outer Stroke Border to the text. On the timeline, adjust the title length for however long you want it to appear on screen.

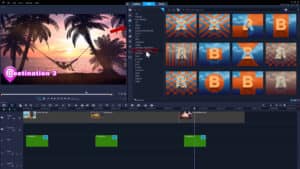
Now go to the Graphics section of the media library and drag a graphic you want to use down onto the Overlay track. For our project, we’re going to use a travel pin graphic. In the preview pane you can resize and position the graphic where you like. On the timeline, you can adjust the length so it matches the length of the title. Now click on the graphic and drag it over top of the title so that they merge into one.
If you want to save this custom title to use in future projects, right-click on the title, choose Merge and Save as Template, then select the folder to save the title in. Once you’ve saved the custom template, you will find it on the Title tab of the media library.
You can even repeat this process using similar graphics to create a set of lower thirds that all have the same style to use again and again in your projects.
To learn more, watch these full tutorials: Creating a Lower Thirds Graphic Animation and Creating Motion Titles in VideoStudio.
To easily add motion to these titles, select a transition from the Overlay Transitions category in the media library and add it to the beginning and end of your titles.
These are just a few ways you can enhance your videos using graphics in VideoStudio.
Download a FREE 30-day trial and turn your best moments and life experiences into unique movies with this easy and fun video editor packed with intuitive tools and creative effects.
