This content applies to CorelDRAW 2023 and earlier.
With the CorelDRAW.app you can turn good ideas into great designs the moment they arise. Learn how to open, edit and save files with this web app.
Thanks for watching! We hope you found this tutorial helpful. You will find a written version of this tutorial below, and a printable PDF copy to download on the Download Resources tab above.
Start your FREE 15-day trial and embark on a design journey with powerful tools for vector illustration, layout, photo editing, typography, and collaboration.
Download these free resources:
Written tutorial (PDF, 536 KB)
CorelDRAW Graphics Suite resources
Quick Start Guide (PDF, 2 MB)
Keyboard Shortcuts (PDF, 3.5 MB)
CorelDRAW and Corel PHOTO-PAINT user guides
For CorelDRAW Graphics Suite subscription and perpetual licenses (2018 to 2024), languages include English, Português do brasil, 简体中文, 繁體中文, Čeština, Deutsch, Español, Français, Italiano, 日本語, Polski, Русский
CorelDRAW Community
CorelDRAW learning center
Facebook
X (formerly Twitter)
YouTube
What’s New in CorelDRAW Graphics Suite
 CorelDRAW Graphics Suite
 Ultimate Vector Bundle Vol. 1
 CorelDRAW Standard 2021
 Ultimate Vector Bundle Vol. 2
 Corel Vector
Overview of CorelDRAW.app
With the powerful, web-based CorelDRAW.app, simply sign in from any device to access your work – no installation is required, and it works on any platform including both Windows and Mac.
CorelDRAW.app is available exclusively to CorelDRAW Graphics Suite subscribers and CorelDRAW Technical Suite subscribers. For accessing CorelDRAW.app you need CorelDRAW Graphics Suite authenticated in your Corel customer account.
The URL is https://coreldraw.app, and you can sign in with your Corel customer account credentials.
You can start with a new design, for which you can choose one of the preset document sizes, or enter a page size, or leave the dimensions blank for an infinite canvas. Templates and existing files can also be used.
Click on any of the images below to view full-size.
Key tools and features of the workspace
Because it is a web application, the workspace in CorelDRAW.app is slightly different from CorelDRAW itself.
To demonstrate some of the differences, we will be using the Cynthia’s Party template from New from Template > Social Media.
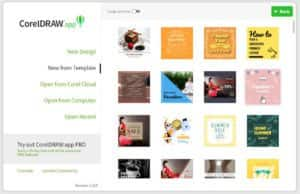
Much of the look and feel of the app will seem familiar to CorelDRAW users, but there are a few differences:
- mouse wheel: pans the document up and down
- Ctrl + mouse wheel: zooms in and out
- Shift + mouse wheel: pans side to side
- Spacebar (hold): drag to pan anywhere
All the drawing and editing tools are in the toolbar across the top. This toolbar includes the Pick and Shape tools, lines and shapes, curves, shaping and text. You can also import images.

The toolbar is context sensitive. For example, when objects are selected the tools for mirroring, rotating, grouping, and ordering are enabled in the toolbar.
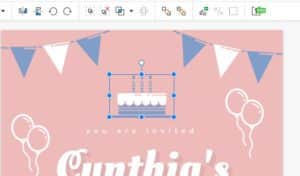
Menus and panels
You can control the display with options in the View menu such as the View > Canvas, which include rulers and grid, several types of snaps, and the various panels.
The Modify menu is where you can find arrange, align, and transform options.
On the left, you will find the Panels interface. Panels are similar to the dockers that appear on the right side of the CorelDRAW workspace, and are as follows:
- Objects lists the objects on each page, like the Objects docker in CorelDRAW.
- Libraries provides access to online content, similar to Corel CONNECT.
- Symbols is a place to store objects you want to reuse.
On the right is where you can control properties of selected objects. We’ll quickly change the font and color of the “Cynthia’s” text object with a couple of clicks.
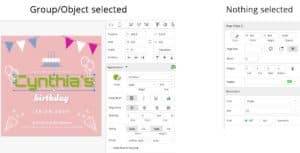
If an object or group is selected, this panel displays settings to adjust alignment, position, size, or various appearance properties, plus add effects, fills and borders.
If nothing is selected, this panel displays general information about the document itself, including page size, margins, etc.
Working with objects
Drawing tools will feel familiar as well. While creating objects, if snaps are enabled, a variety of indicators will pop up to make lining up with other objects…a snap!
To try out the drawing tools, activate the Rectangle tool on the top toolbar. Create a rectangle, round the corners with the corner slider, set a fill and border in the Fills and Borders tools, reduce the opacity, and apply a blur effect all from the object properties on the right.
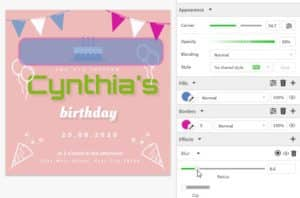
When an object is selected with the Pick tool, you can move it, scale it, or rotate it.
You can also drag objects in the Objects panel to rearrange object order, create layers, and add objects to layers from the Objects panel.
NOTE: some app features are marked “Pro.” Accessing pro features requires an upgrade from standard to pro level, through a subscription.
Saving documents
When a document is complete, and you’re ready to save it, there are several options. Choose File > Save As, and you can use either the CDRAPP format for use in the app, or CDR format if you want to open the document in CorelDRAW.
Either format can be saved to the CorelCLOUD with the green Save button or can be downloaded with the gray Download button.
All open documents are listed in the top right corner, and while saving to the cloud, you’ll get an indicator while the document is synching.

While in the CorelDRAW.app, you also can open a CorelDRAW file from your computer. The original CorelDRAW content remains in a locked layer, and at this time you can’t edit this content while in CorelDRAW.app. But any new objects you add will appear in the Objects panel.
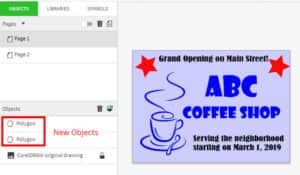
Any objects you add while in the app will be including when saving this document back to CDR format. Then you can open the downloaded CDR document in CorelDRAW and continue editing and adding content.
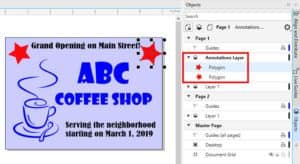
With the new CorelDRAW Graphics Suite, your imagination doesn’t have be limited to your desk. Wherever inspiration strikes, open the Corel.DRAW. app in a browser on any device and start designing.
Start your FREE 15-day trial and embark on a design journey with powerful tools for vector illustration, layout, photo editing, typography, and collaboration.

