
Learn how to design, modify and export a custom cover image for your business or personal Facebook page, using a few simple tools in CorelDRAW.
Learn how to design, modify and export a custom cover image for your business or personal Facebook page, using a few simple tools in CorelDRAW.
Start your FREE 15-day trial and embark on a design journey with powerful tools for vector illustration, layout, photo editing, typography, and collaboration.
What’s New in CorelDRAW Graphics Suite
 CorelDRAW Graphics Suite
 Ultimate Vector Bundle Vol. 1
 CorelDRAW Standard 2021
 Ultimate Vector Bundle Vol. 2
 Corel Vector
How to Design a Facebook Cover Image
On your Facebook page, there are two key places where you can express yourself or create your own “brand.” The first is your usual profile picture, but the second, the Facebook cover image or timeline banner, can be a challenge. A banner can be an ideal place to create your own design. While your profile picture can show off what you look like, your banner can show people who you are.
The cover image we will create today is for a flower shop called “Nancy’s Nook”. If you want to follow along step-by-step to create this image, make sure you have downloaded the sample files and saved them on your computer.
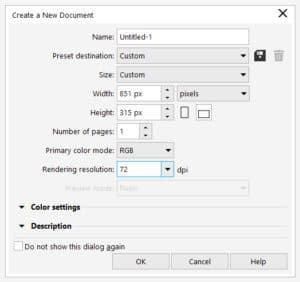
Begin by creating a web document in CorelDRAW. Go to File > New. Set your Preset destination to Web. Set your width to 851 px and your height to 315 px. This is the size that is currently needed for a Facebook cover image. Facebook does change this sometimes, so it helps to do your research before you make your image. Set the resolution to 72 dpi . Then click OK.
Click on any of the images below to view full-size.
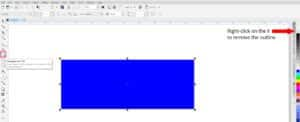
Next, you need to create a rectangle that fills the entire document. Double-click the Rectangle tool in the left toolbox. This will create the rectangle on your page. Click on a blue color in your Color Palette to give it a color for now. To remove the outline around the rectangle, right-click on the X at the top of the Color palette.
Now, we are going to make some thin rectangles for the edges of the design. But first we have to set our duplicate distance to 0 px so the duplicates land right on top of each other. Activate your Pick tool and click on your page outside of the rectangle to make sure nothing is selected, then set the duplicate distance values to 0 in the interactive toolbar.

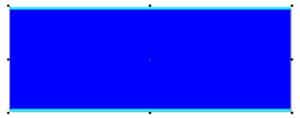
Select the main rectangle, then go to Edit > Duplicate. Set the color of this rectangle to another color. Now click on the bottom center handle and drag it up to make a thin rectangle. Now duplicate this thin rectangle and align it to the bottom. To do this, hold down the Shift key and select the thin rectangle plus the large rectangle, then hit “B” on your keyboard.
Now, let’s add a texture fill to the main rectangle. First, make sure you have only the main rectangle selected then double-click on the Fill bucket in the Status Bar along the bottom of the interface. This will bring up the Edit Fill dialog box. At the top you will see all the different type of fills available to you. We are going to use the texture fill which is the second one from the right.
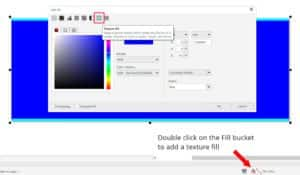
There are lots of choices of textures that you can choose from by clicking the little arrow next to the texture sample, but we are going to use the default one (Aerial clouds) and change it to match our design better. Let’s lighten the dark blue. Click on the blue color swatch next to the word Light and then click inside the large color square to select a lighter blue. Then click OK.
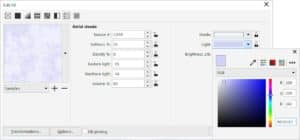
You now have a textured background fill.

Next let’s import the company logo. Go to File > Import and browse to where we have it saved, click the file and click Import. You can hit the space bar and it will just land in your document. Now drag it to the center of our blue background. We will tweak its placement later.

Next, we will import some flower clip art and arrange them in our cover image to look pleasing. Go to File > Import, then browse to where you saved the clip art images. Select one and click Import. This time instead of hitting space bar you can click and drag to draw a rectangle on the right side of the logo and the clip art will appear where you drew that rectangle. Import the second clip art image and let’s put this one the left side of the logo.

Now let’s enlarge the rose image and reposition it. When enlarging clip art or shapes, it is always best to use the corners to proportionally enlarge them.
Since we’ve enlarged the rose image, it now covers up the edges of our banner so to fix that, we will “PowerClip” it inside the texture fill rectangle. PowerClip means put it inside a shape that masks part of your art. With your roses selected, go to Object > PowerClip > Place Inside Frame. Your cursor will now turn into a little arrow. Click on your large blue texture rectangle and it becomes a PowerClip with the roses inside. Alternatively, you can right-click on the clip art and choose PowerClip to put the roses into the rectangle as well. Now, we can tweak it a bit to make the roses a bit larger and rotated. Hold the Ctrl key on your keyboard and click on the blue texture rectangle. This will take you into “PowerClip editing mode”. Click on the roses to select them. We can now enlarge them or rotate them as needed. To rotate, click a second time so the corner nodes turn into arrows, and click on one and drag to rotate. To exit editing mode, hold the Ctrl key on your keyboard while clicking outside the rectangle.

Next, let’s mirror the other flowers so they fit better on the left side of the logo. Select the flower image with your Pick tool and locate the Mirror buttons in the Interactive Property Bar. Click on the Mirror horizontally icon and this will flip the flowers from left to right. Now you can drag them to where they look the best.

Now for some final tweaks…
Let’s color those thin rectangles to match the design by choosing one of the greens in the stems of the roses. To do this click the Eye Dropper tool in the Toolbox, move your mouse over the stem, select a shade of green you like and click on it. This will grab that color. Now, mouse over a thin rectangle and watch your cursor. If you see a solid square, it will put that color in the fill of that object. If you see an outline square it will put that color in the outline of that object. When you see the solid square icon, click on the thin rectangle. Put this same color in the bottom thin rectangle. Your thin rectangles should now be the color of the rose stem you sampled.

We are almost done. All we have left to do is export our Facebook cover image. Go to File > Export. From the Save as type dropdown list choose PNG then click the Export button. Then click OK and we are done. You are ready to upload your new Facebook cover image to your page.

Start your FREE 15-day trial and embark on a design journey with powerful tools for vector illustration, layout, photo editing, typography, and collaboration.
