
Introduced in CorelDRAW 2020 are two new AI-assisted features that help improve the quality of a source bitmap as you trace it: JPEG artifact removal and upsampling. This tutorial will show you how to use these controls on the new Adjustments tab of the PowerTRACE™ feature to convert low resolution bitmaps into print-ready vector images.
Thanks for watching! We hope you found this tutorial helpful. You will find a written version of this tutorial below, and a printable PDF copy to download on the Download Resources tab above.
Start your FREE 15-day trial and embark on a design journey with powerful tools for vector illustration, layout, photo editing, typography, and collaboration.
Download these free resources:
Written tutorial for Windows (PDF, 1 MB)
Written tutorial for Mac (PDF, 707 KB)
CorelDRAW Graphics Suite resources
Quick Start Guide (PDF, 2 MB)
Keyboard Shortcuts (PDF, 3.5 MB)
CorelDRAW and Corel PHOTO-PAINT user guides
For CorelDRAW Graphics Suite subscription and perpetual licenses (2018 to 2024), languages include English, Português do brasil, 简体中文, 繁體中文, Čeština, Deutsch, Español, Français, Italiano, 日本語, Polski, Русский
CorelDRAW Community
CorelDRAW learning center
Facebook
X (formerly Twitter)
YouTube
What’s New in CorelDRAW Graphics Suite
 CorelDRAW Graphics Suite
 Ultimate Vector Bundle Vol. 1
 CorelDRAW Standard 2021
 Ultimate Vector Bundle Vol. 2
 Corel Vector
Convert bitmaps to vectors with AI
Corel PowerTRACE™ allows you to convert bitmap images, such as JPEGs, into vector images. And with the new Adjustments tab in CorelDRAW 2020, JPEG artifact removal and upsampling are built into the process to help improve the quality of the source bitmap as you trace it.
Click on any of the images below to view full-size.
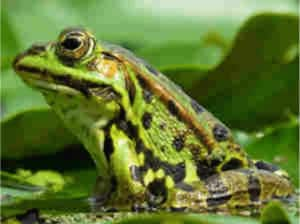
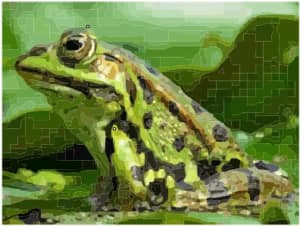
In the first example, we’ll create a vector image from this low-resolution photo of a frog, which has JPEG artifacts in the background and along the edges, as a result of dithering or JPEG compression.
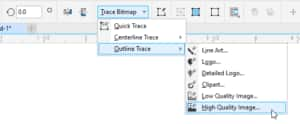
With the image selected, go to Trace Bitmap > Outline Trace and select an image type. In this example we are using High Quality Image.
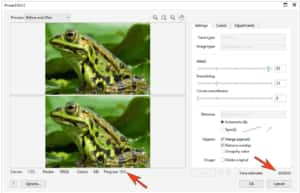
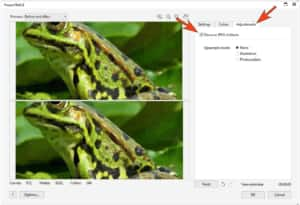
This will open the PowerTRACE window. In addition to the new Adjustments tab on the right, you will also see the estimated tracing time in the bottom right corner and a progress indicator under the preview window.
TIP: you can maximize the PowerTRACE window and zoom in on your image to better view the before and after results.
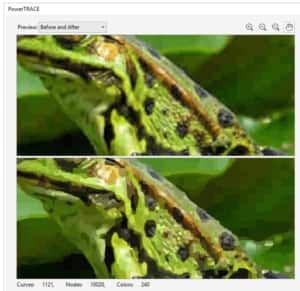
In this example, we can clearly see the artifacts in the background in trace results.
If we were to click OK without using the controls on the new Adjustments tab, this would be the result:
But let’s look at how the trace results can be improved with the Adjustments tab. We’ll first check Remove JPEG Artifacts and immediately the curves of the background are much smoother than before.
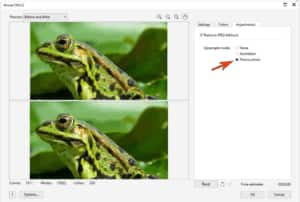
The next step is to choose an Upsample mode: None, Illustration or Photorealistic. For this image we will use Photorealistic, but you can try the different modes on your own image to see which results are more suitable.
Now when we click OK to complete the trace process, the differences are clear, particularly throughout the background and along edges of the frog.

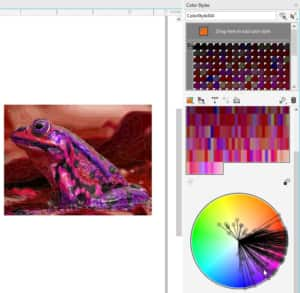
Now that our frog photo has been converted to a vector image, we can easily make changes or add effects. For example, we can change the color scheme:
- Open the Color Styles docker (Window > Dockers > Color Styles).
- Select the vector trace results and drag over onto the Color Styles This will create a color style based on the colors in your image.
- Click one of the color swatches in the style to open the Harmony Editor.
- Drag any of the nodes around on the color wheel to create a new color harmony for your image.
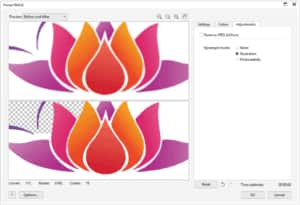
The new Adjustment options also work nicely for bitmap versions of digitally-created images, such as this lotus flower image.

With the image selected, we choose Trace Bitmap > Outline Trace > High Quality Image. If we were to click OK without using the controls on the new Adjustments tab, this would be the result:

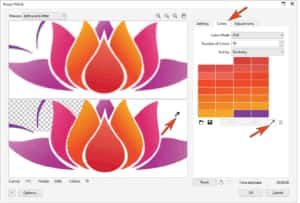
And this would be the result when we use the Illustration upsampling mode on the Adjustments tab, with much smoother edges:
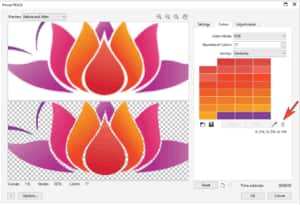
There is still some white background remaining, so click on the Colors tab and use the eyedropper to pick up the white pixels.
Then click the Delete (trash can) icon to remove these pixels and complete the trace process.
Start your FREE 15-day trial and embark on a design journey with powerful tools for vector illustration, layout, photo editing, typography, and collaboration.
