In this tutorial, you will learn how to convert raster to vector design using the PowerTRACE feature in CorelDRAW. Low-resolution raster images, such as JPGs or bitmaps, are usually not suitable for projects such as screen printing, embroidering, signage or vinyl cutting, but sometimes that’s all you have to work with. In these cases, you can use CorelDRAW’s PowerTRACE feature to convert your logo or design into a single-color vector image, which can be enlarged without losing quality.
Thanks for watching! We hope you found this tutorial helpful and we would love to hear your feedback in the Comments section at the bottom of the page. You will find a written version of this tutorial below, and a printable PDF copy to download on the Download Resources tab above.
Start your FREE 15-day trial and embark on a design journey with powerful tools for vector illustration, layout, photo editing, typography, and collaboration.
Download these free resources:
Written Tutorial and Sample Image (Zip, 1 MB)
CorelDRAW Graphics Suite resources
Quick Start Guide (PDF, 2 MB)
Keyboard Shortcuts (PDF, 3.5 MB)
CorelDRAW and Corel PHOTO-PAINT user guides
For CorelDRAW Graphics Suite subscription and perpetual licenses (2018 to 2024), languages include English, Português do brasil, 简体中文, 繁體中文, Čeština, Deutsch, Español, Français, Italiano, 日本語, Polski, Русский
CorelDRAW Community
CorelDRAW learning center
Facebook
X (formerly Twitter)
YouTube
What’s New in CorelDRAW Graphics Suite
 CorelDRAW Graphics Suite
 Ultimate Vector Bundle Vol. 1
 CorelDRAW Standard 2021
 Ultimate Vector Bundle Vol. 2
 Corel Vector
Converting a Multi-color Raster Image to a Single-color Vector
Low-resolution raster images, including JPGs or bitmaps, are usually not suitable for project such as screen printing, embroidering, signage or vinyl cutting, but sometimes that’s all you have to work with. In these cases, you can use CorelDRAW’s PowerTRACE feature to convert raster to vector image, creating a single-color design which can be enlarged without losing quality.
Some of the key factors in getting clean, high-quality output with little or no manipulation after using PowerTRACE to convert raster to vector are:
- Start with a higher resolution image if at all possible – this will result in a better trace
- Avoid texture fills and gradient fills if at all possible, these can sometimes be a challenge when tracing. Solid colors just trace better
- Avoid fine detail because it will result in many objects once traced and can make it difficult to clean up the file after tracing
Let’s get started by creating a new document by going to File > New. The page size is not critical to this exercise, so you can just choose Letter size.
Next, import the sample Logo.jpg file by clicking on File > Import and browse to the location on your computer where you downloaded the sample file. Select it and click Import. Then press the spacebar and the logo will be placed in the center of your page.
In order to distinguish between the white in the logo and the white page background we are going to add a solid color background. Double-click on the Rectangle tool in the toolbox. This will create a rectangle the size of your page. Now select a blue color or any color on your palette.
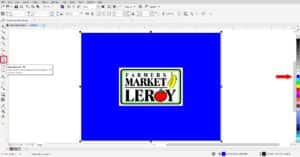
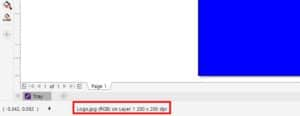
Now let’s do some analysis of the quality of our logo before we open PowerTRACE. Select the logo with the Pick tool and look at the status bar at the bottom of the CorelDRAW interface. Here you can see the file resolution – ours is 200 x 200 dpi so it should trace well. We also see that the logo is on a white background and has white in the middle.
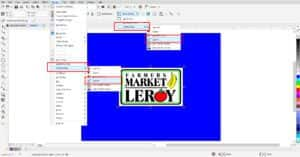
With your logo selected, go to Bitmaps > Outline Trace > Clipart. You can also find this in the interactive toolbar under Trace Bitmap.
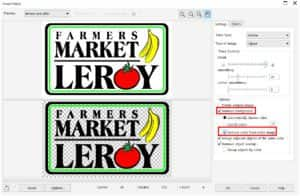
The PowerTRACE window will open, showing the original logo on the top and the trace results on the bottom. You can compare the two images and decide if you need to make any adjustments in the Settings panel on the right.
Under Options, the Remove Background setting is enabled, and you can see that it has removed the white around the outside of the logo border. Let’s also enable Remove color from entire image and that will remove the white inside the design. If you wanted a full-color vector version of this logo you could click OK now and be finished.
Since we want a single-color vector, we are going to continue to simplify our colors more right inside PowerTRACE. Click on the Colors tab at the top of the PowerTRACE window. You can see all the colors in the logo are listed here.
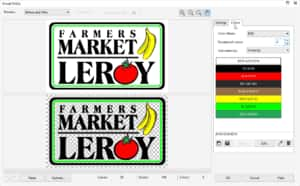
In order to simplify this down to one color, we just have to merge the colors together. Since we want our final logo to be black let’s choose which parts will need to be black and which parts we don’t need or that can be white (not printed).
Click on first black color. You can see in the trace preview that there are now diagonal lines across the black areas to indicate the color you have selected. Hold down the CTRL key on your keyboard and click the second black color on the list. With both black colors selected, click the MERGE button. Now there is only one black color showing in the list.
Next, we’ll change the light green inner border of the logo to black. Select the color on the list and click the Edit button. Change the color to black by dragging your mouse to the bottom of the color window, or by entering the RBG or Hex number values in the top right. Click OK.
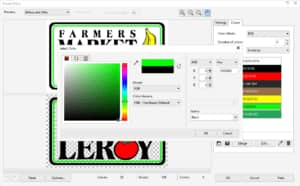
Once again, we have two slightly different shades of black in our color list, that can be merged together as we did before. Select the first black, hold down the Ctrl key, select the second black and click on the Merge button.
For the red and green in the tomato, and the yellow and brown in the banana, we will change those to white. Remember that we had set the option to remove the background color (in this case white) from the entire image. So, if we change the color of the tomato and banana to white, we are in fact making them transparent, so that only their borders will be printed.
Go through the color merge process again, by selecting the red color, holding down your Ctrl key and selecting the brown, yellow and green. Click the Merge button and the resulting color is displayed in the list. Click the Edit button and change the color to white.
We can see now that the original white on the list was not exactly the same as this new white we created, so we need to merge those two together as well.
Now our design has been simplified to black and white and we are ready to see our final result, so click OK.
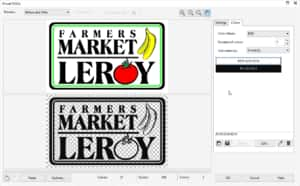
Once you click OK and the PowerTRACE window closes, you might wonder where your new vector image is. It has been placed on top of the original JPG logo, so use the Pick tool to drag it to another area on the page.

Use your mouse wheel to zoom in closely and see the differences between the original and the traced image. The edges and lines in the JPG logo are not smooth at all and wouldn’t look good when printed.

Select the vector image with the Pick tool and use one of the corner handles to enlarge it to any size – you will see that no matter how large you make the image; the lines will remain very clean and sharp.

You can easily change the color by clicking on a different color in the Color palette on the right. If you want to see the vector lines of the image, go to View > Wireframe.
And that’s just how simple the process is to convert raster to vector, resulting in a single-color image that can be used for screen printing, embroidery, signage or vinyl cutting.
Start your FREE 15-day trial and embark on a design journey with powerful tools for vector illustration, layout, photo editing, typography, and collaboration.

