
This content applies to CorelDRAW 2023 and earlier.
CorelDRAW’s Comments docker includes easy-to-use annotation tools for adding notes and comments directly in the design file. This tutorial will show you how to use each of the note and markup tools, plus how to view, respond to, and resolve feedback from other collaborators.
Thanks for watching! We hope you found this tutorial helpful. You will find a written version of this tutorial below, and a printable PDF copy to download on the Download Resources tab above.
This content applies to CorelDRAW 2023 and earlier.
CorelDRAW’s Comments inspector includes easy-to-use annotation tools for adding notes and comments directly in the design file. This tutorial will show you how to use each of the note and markup tools, plus how to view, respond to, and resolve feedback from other collaborators.
Thanks for watching! We hope you found this tutorial helpful. You will find a written version of this tutorial below, and a printable PDF copy to download on the Download Resources tab above.
Start your FREE 15-day trial and embark on a design journey with powerful tools for vector illustration, layout, photo editing, typography, and collaboration.
Download these free resources:
Written tutorial for Windows (PDF, 660 KB)
Written tutorial for Mac (PDF, 715 KB)
CorelDRAW Graphics Suite resources
Quick Start Guide (PDF, 2 MB)
Keyboard Shortcuts (PDF, 3.5 MB)
CorelDRAW and Corel PHOTO-PAINT user guides
For CorelDRAW Graphics Suite subscription and perpetual licenses (2018 to 2024), languages include English, Português do brasil, 简体中文, 繁體中文, Čeština, Deutsch, Español, Français, Italiano, 日本語, Polski, Русский
CorelDRAW Community
CorelDRAW learning center
Facebook
X (formerly Twitter)
YouTube
What’s new in CorelDRAW Graphics Suite
CorelDRAW tools
Marketing and branding design projects
 CorelDRAW Graphics Suite
 Ultimate Vector Bundle Vol. 1
 CorelDRAW Standard 2021
 Ultimate Vector Bundle Vol. 2
 Corel Vector
Working with comments and annotations
When you’ve completed a draft or phase of a design project, and you’re ready for feedback from colleagues or clients, CorelDRAW’s Comments docker makes the commenting process easy. This space is where other CorelDRAW users can add notes, suggestions, or questions, eliminating the need for marked-up image files or PDFs.
Click on any of the images below to view full-size.
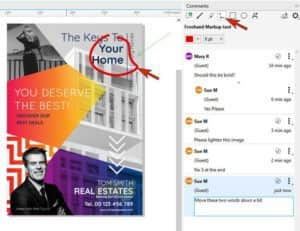
We’ll start with this sample real estate brochure, which is based on artwork by CorelDRAW user Marcin Wilczynski. This draft document will be sent to our client for their review and feedback.

You wouldn’t need to provide feedback on your own work, but let’s say you want to insert a question for the colleagues or clients who will be receiving the file for feedback.
Go to Window > Dockers > Comments. The first step is to sign in, so that those you’re sharing the file with will know who the comments are from. You can use a Google or Microsoft Office 365 account or sign in as a guest.

Once signed in, you can use the Sign In/Out icon in the bottom left corner of the docker, to sign out or switch accounts.

The various types of annotation tools can be found along the top of the docker. To add a question to the document, we’ll use the Arrow Markup tool. You can set the arrow color, line width and choose Start or End arrow.

When you click and drag to create an arrow, a comment box will automatically appear in the docker for you to enter a comment or question.

Pressing Tab or Enter closes the comment. Mary is listed as the note author, along with a time stamp. Once the file is ready for feedback, save and close.
Now Mary’s file has been received by the client Sue, who is responsible for providing feedback. Sue can see the arrow left by Mary, and hover over it to see the text of the comment.

To answer questions and leave feedback, the reviewer first needs to open the Comments docker and sign in.
How to use the markup tools
Clicking the arrow highlights the note in the docker and highlighting the note in the docker selects the note marker. This is very helpful for identifying a specific comment in a long list of comments.

The reviewer can reply to the comment by filling in the field below the note, or by clicking the Actions icon and choosing Reply.

The reviewer can now go through the document and provide more feedback.
In the top left corner, the reviewer can use the Note tool to place a comment to lighten the image.

With the Highlighter tool, you can set the color and width, sweep over what you want to mark, and enter the note text.

You can use the Freehand Markup tool to mark an area in the document, then enter the note.
Both the Rectangle Markup tool and Ellipse Markup tool enable you to draw a shape on the document, with or without a fill.

The Collaborative Text tool works only on text objects. While you move the mouse, the cursor gets a small arrow when above text. When you click, you’re commenting on the entire text string.

If you want to edit the text of one of your own comments, click the Actions icon, choose Edit, and make the change.

NOTE: You can’t edit comments made by others; the Edit option will be grayed out. Similarly, you can delete your own comments, but you can’t delete comments left by others.
Once the reviewer has finished adding comments, they can save the file to send back to the designer for the actual revisions.
Then when the designer signs into the Comments docker, they can see all of the client’s replies and comments.

After reading a note and making the change, you could reply to the comment. Or, if you have nothing to add, click the Resolve icon. (The Resolve icon can also be used to reopen a previously resolved comment.) Resolve is also an option available in the Actions menu.

By default, resolving a comment hides that comment. But you can open the Options and show resolved comments.

Sometimes a comment can stand in the way of the objects that need to be edited. The Options menu has an option to toggle annotations on and off.

Now that you have learned the basics of annotating directly in a design file you can use these collaboration tools to work with clients and colleagues in a simplified workflow that eliminates confusion and speeds up the decision-making and approval process.
Start your FREE 15-day trial and embark on a design journey with powerful tools for vector illustration, layout, photo editing, typography, and collaboration.
