In this tutorial we’ll show you how to turn an ordinary photo into a 3D photo, using an effect that is also known as the “out of bounds” effect. This photo editing technique will make it appear as though part of your photo is coming right out of the frame. Although the results are quite impressive, this technique is actually quite simple.
Thanks for watching! We hope you found this tutorial helpful. You will find a written version of this tutorial below, and a printable PDF copy to download on the Download Resources tab above.
Download your FREE 30-day trial and make every shot your best shot with PaintShop Pro, your all-in-one photo editing and design software.
Download these free resources:
Written Tutorial (PDF, 1 MB)
PaintShop Pro resources
Keyboard shortcuts (PDF, 173 KB)
PaintShop Pro User Guides
Partner and User websites
PaintShop Pro User Forum
Scrapbook Campus (Tips and tricks, workshops, master classes, and more)
Creation Cassel (Scripts, picture tubes, and other PaintShop Pro tools, plus weekly freebies)
PaintShop Pro Maniacs (Facebook group)
PaintShop Pro (Facebook group)
What’s New in PaintShop Pro
Getting Started in PaintShop Pro
Photo Editing Projects
Featured products
 PaintShop Pro 2023 Ultimate
 AI HDR Studio 3.0
 PaintShop Pro 2023
 Vision FX 2.0
Create a 3D photo effect
In this tutorial we will show you how to create a 3D photo effect, also known as the “out-of-bounds” effect. The first example uses one photo and a frame we create ourselves. The second example uses two photos, one of which is a blank photo frame.
Click on any of the images below to view full-size.
3D photo effect with one photo
To begin, open the photo you want to work with in PaintShop Pro’s Edit tab. For the first example, we are using this photo of a killer whale. Once we are done, the whale will appear to be leaping out of the frame.

Step 1: Add a background for your 3D photo
In the Layers palette, right-click on your photo (Background layer) and select Duplicate. This way, your original photo will remain intact.
At the bottom of the Layers palette, click on the New Layer icon and select New Raster Layer. This will be the background of the 3D photo.
Activate the Flood Fill tool and select a bright, contrasting color in the Materials palette, such as yellow. In the Tool Options palette, make sure Use all layers is unchecked, then click on the image with the Flood Fill tool to fill the new layer with yellow.
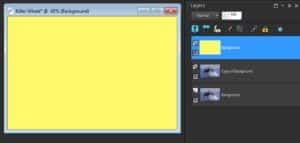
In the Layers palette, drag the solid color layer below the copied photo layer. Then click on the copied photo layer to make it the active layer so that new objects will be placed above this layer.

Step 2: Add a frame
To create the frame, activate the Rectangle tool. In the Materials palette set the Foreground (top) swatch to the color you want the frame to be (in this case we are using red), and set the Background (bottom) swatch to transparent by clicking on the small checkerboard icon under the swatch.
In the Tool Options palette, adjust the Width setting so that it is thick enough to stand out. You may have to adjust this setting a few times to get a width that suits the size of your photo.
With the Rectangle tool, click and drag on your photo to draw the rectangle so that part of the photo is outside the frame, in this case the whale’s head.
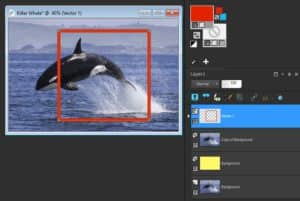
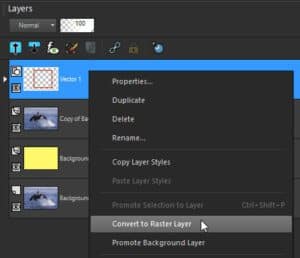
Because a rectangle is a vector object, it’s created on its own vector layer. But for the modifications that need to be made to this frame, the rectangle must be a raster object. This is easy to do: right-click on the layer in the Layers palette and select Convert to Raster Layer.
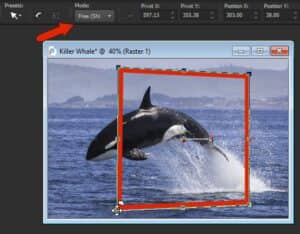
To give the frame a 3D look, activate the Pick tool and set the Mode to Free in the Tool Options palette. Now use the Pick tool to move the two nodes on the left up and down.
Step 3: Remove the background outside the frame
Now we need to remove the parts of the photo outside of the frame. In the Layers palette, click on the copied photo layer to make it the active layer.
Activate the Selection tool and in the Tool Options palette set the Selection type to Rectangle and the Mode to Replace. Click and drag on your photo to create a selection area then press the Delete key to remove. Press Ctrl + D to deselect the area you just deleted.
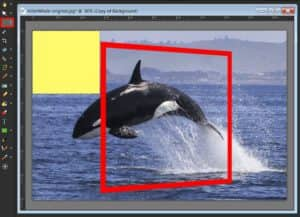
Follow these steps again to remove other areas outside of the frame.
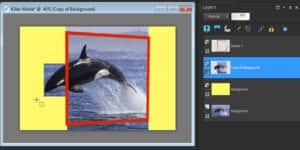
TIP: Where there are non-rectangular areas, such as the trapezoid shapes above and below the frame, switch to the Freehand Selection tool and set the Selection type to Point to point. Click once on the starting point then click on the next 2 corners of the shape. Double-click on the fourth corner to complete the selection area then press the Delete key to delete.
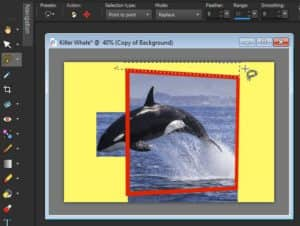
For any leftover areas that need to be removed, you can use the Eraser tool and the Background Eraser tool. In the Tool Options palette, set the Hardness to 100 and adjust the Size if needed (you can also adjust the brush size by holding down the Alt key and dragging up or down on your photo with the Eraser tool).
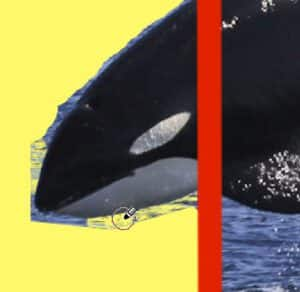
Use the Eraser tool for areas that AREN’T close to your subject, in this case the whale’s head.
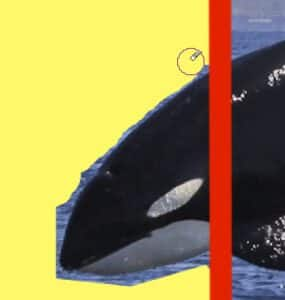
Then switch to Background Eraser tool for areas that ARE close to your subject. The Background Eraser erases pixels of the same color as where you click. You may need to adjust the Tolerance setting in the Tool Options palette, depending on how closely your background color(s) match your object color(s). The bright yellow color we chose for the background layer makes it easy to see which pixels need to be removed.
Step 4: Remove the frame behind your subject/object
Once the background is removed from around the outside of the frame, the next step is to erase the part of the frame that should be behind your 3D subject/object (i.e. the whale’s head).
In the Layers palette, click on the frame layer to make it the active layer. Adjust the Opacity slider to reduce the opacity of this layer, to make it easier to see where you need to erase.
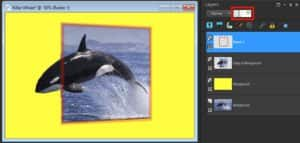
Now use the Eraser tool to remove the parts of the frame that should be behind the whale. Once you are done, bring the layer opacity back up to 100.

Step 6: Add a new background (optional)
The bright yellow background we originally created was very helpful when erasing but isn’t the look we want for our final 3D photo so we will replace it with a pattern instead.
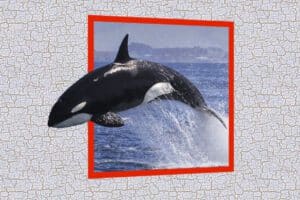
In the Layers palette, click on the yellow background layer to make it the active layer. In the Materials palette, click on the Foreground (top) swatch to open the Material Properties window. Select the Pattern tab and then choose the pattern you wish to use (we used the Cracked Paint pattern). Activate the Flood Fill tool and click on your image to fill with the pattern.
3D photo effect with two photos
This technique can be used with a set of two images as well. For this example, we are using a photo of a frame hanging on a wall and a photo of a lizard. We’ll use the 3D photo technique to make it look like the lizard is coming out of the frame.
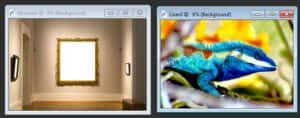
In our photo of the frame on the wall, the frame is filled with white and we need to remove that and replace it with the lizard. To remove the pixels inside the picture frame, we first need to promote the Background layer so that it becomes a raster layer. In the Layers palette, right-click on the Background layer and select Promote Background Layer.
Because the area to remove is a solid color rectangular area we can use the Selection tool easily. Activate the Selection tool and click and drag to create a selection area around the white background, then press Delete.
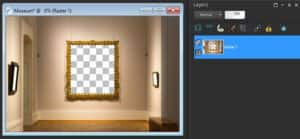
Now we need to add the lizard image to the photo. You can do this by copying (Ctrl + C) the lizard photo and pasting it (Ctrl + V) onto the photo frame image, or by dragging it directly into the Layers palette. Once the lizard image has been added, make sure to drag it below the photo frame layer in the Layers palette then reduce the layer opacity.
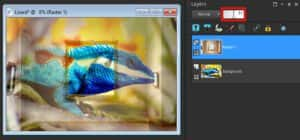
Activate the lizard layer and use the Pick tool, in Scale mode, to resize and move it into place.
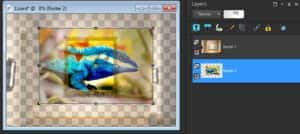
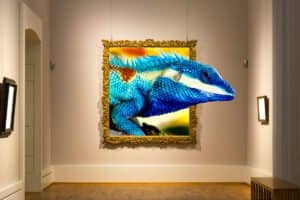
Going back to the frame layer, use the Eraser tool with a small brush size to carefully erase the part of the frame that should be behind the lizard’s head, as well as all pixels that block the lizard’s head.
Once you are done, bring the layer opacity back up to 100. And we now have a new museum masterpiece!
Download your FREE 30-day trial and make every shot your best shot with PaintShop Pro, your all-in-one photo editing and design software.


Comments (1)
Reader Interactions
Comments
WOW!. I love this effect. Bookmarked it.