
In this tutorial, we’ll review the basics of opening and importing photos into PaintShop Pro. Learn how to open popular file formats like JPG and PNG, and how to import content from your camera or scanner. We’ll also take a look at how to use the Navigation and Organizer palettes to bring your files into PaintShop Pro.
Thanks for watching! You will find a written version of this tutorial below, and a printable PDF copy to download on the Download Resources tab above.
Download your FREE 30-day trial and make every shot your best shot with PaintShop Pro, your all-in-one photo editing and design software.
Download these free resources:
Written tutorial (PDF, 804 KB)
PaintShop Pro resources
Keyboard shortcuts (PDF, 173 KB)
PaintShop Pro User Guides
Partner and User websites
PaintShop Pro User Forum
Scrapbook Campus (Tips and tricks, workshops, master classes, and more)
Creation Cassel (Scripts, picture tubes, and other PaintShop Pro tools, plus weekly freebies)
PaintShop Pro Maniacs (Facebook group)
PaintShop Pro (Facebook group)
What’s new in PaintShop Pro
Getting started in PaintShop Pro
PaintShop Pro tools
Featured products
 PaintShop Pro 2023 Ultimate
 AI HDR Studio 3.0
 PaintShop Pro 2023
 Vision FX 2.0
Opening and importing photos
In this tutorial, you’ll learn how to open and import your photos into PaintShop Pro.
So what is the difference between opening and importing? When you open a file, you are opening it “as is”, bringing in the content, characteristics and settings that were saved with the file. When importing a file, PaintShop Pro will bring content in from a hardware source such as a camera or scanner or even allow for a screen capture.
When scanning, depending on your scanner you may also have options to set the resolution, color mode, file format or other settings.
How to open photos
PaintShop Pro can open popular image files including JPEG, PNG and TIF but also other photo editing software formats like AI and PSD. You can view the full list of compatible image files here.
There are several ways you can open photos in PaintShop Pro:
From your Windows desktop
- Drag the photo from your computer into PaintShop Pro, or
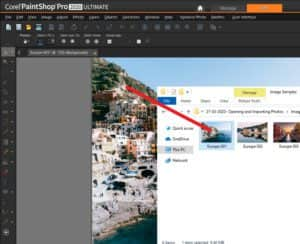
- Right-click on the file on your computer and choose Open With > PaintShop Pro.
TIP: You can associate specific file formats with PaintShop Pro, such as JPEG, TIF, or PNG, so that these files will open in PaintShop Pro when you double-click them from the Windows desktop.
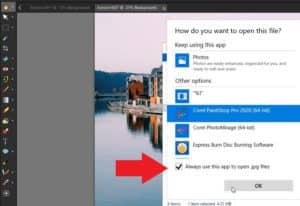
- Right-click on file on your computer, select Open With > Choose Another App.
- Select PaintShop Pro and check Always use this app to open .jpg files and click OK.
- Now you can just double-click on any JPG image on your desktop and it will automatically open in PaintShop Pro.
From within PaintShop Pro
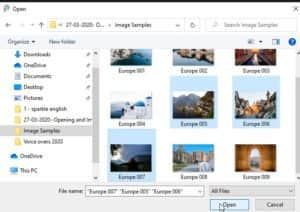
- File > Open or use the Open icon or Ctrl + O.

- In the Look in drop-list, choose the folder where the file is stored.
- Click the name of the file that you want to open. If you want to open multiple files, hold down Ctrl, and click the filenames.
- Click Open.
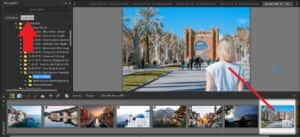
To open an image from the Organizer palette
- In the Organizer palette, click the Show/Hide Navigation button to display the Navigation palette.
- In the Navigation palette, click one of the following tabs:
- Collections — displays a custom list of cataloged folders and a list of virtual collections
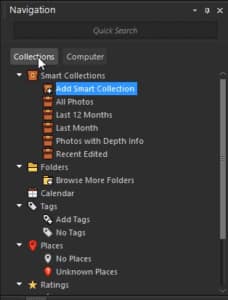
- Computer — displays a list of all folders and devices on your computer
NOTE: If you are opening a RAW photo file, the Camera RAW Lab dialog box will open so you can adjust the settings that are stored with the RAW photo file.
To open a recent file
- Go to File > Recent Files to choose from 10 files last opened.
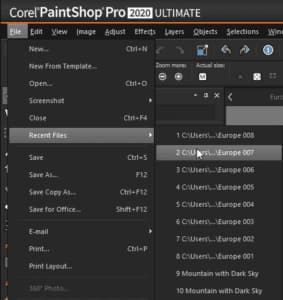
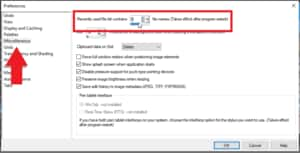
TIP: 10 is the default number of recent files that will be listed. To change this:
- Choose File > Preferences > General Program Preferences.
- From the left pane, choose Miscellaneous.
- Type or set a value in the Recently used file list control.
- You must restart PaintShop Pro before the new settings take effect.
How to import photos
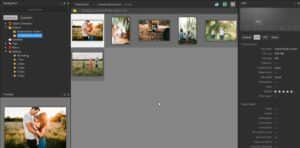
Manage Tab
After you transfer your photos to your computer (by using Windows or the software for your camera), you can import your photos into PaintShop Pro. You import photos by browsing to folders. The photos in the folders are then cataloged automatically in a database. This makes it easy to find, edit and update the information for your photos.
- In the Navigation palette, click the Collections tab, and click Browse More Folders.
- In the Browse For Folder dialog box, navigate to the folder you want.
- Click OK.
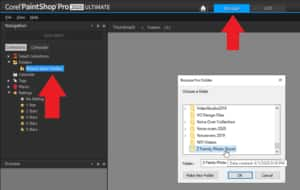
The folder is added to the folder list and all the images are cataloged in the application database.
Scanning images into PaintShop Pro
Edit tab
- After installing the software that came with your scanner, connect your scanner to your computer.
- In PaintShop Pro, choose File > Import, and click From Scanner or Camera (WIA option) or TWAIN Acquire, depending on the type of scanner.
- Use the scanner’s software to perform the scan.
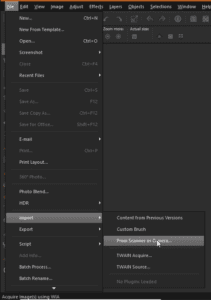
If you have set up your scanner to work with PaintShop Pro, the image is displayed in the application after it is processed. The scanner’s software may remain open, so you can either continue to acquire images or exit the software.
And it’s that simple to open, import, and scan images into PaintShop Pro!
Download your FREE 30-day trial and make every shot your best shot with PaintShop Pro, your all-in-one photo editing and design software.

Comments (2)
Reader Interactions
Comments
I already have a file that I need to import. I don’t need the scanner nor the camera. Why isn’t copy & paste working?
Hi Ruben,
If you already have the file on your computer, you can just drag and drop it into the PaintShop Pro interface or use the File > Open command to open it.
Best regards,
The Discovery Center team