
Give yourself or your video subjects super powers with the “Flash” effect! In this tutorial we’ll show you how to create the illusion of super speed with a few simple steps in Pinnacle Studio. You will also learn how to use a photo editor like PaintShop Pro to create a snapshot that will be used in this effect.
If you don’t have photo editing software, download a free 30-day trial of PaintShop Pro.
Thanks for watching! We hope you found this tutorial helpful and we would love to hear your feedback in the Comments section at the bottom of the page. You will find a written version of this tutorial below, and a printable PDF copy to download on the Download Resources tab above.
Download these free resources:
Written tutorial (PDF, 605 KB)
Demo files (Zip file, 10 MB) includes video clip, snapshot and sound effect.
Pinnacle Studio User Guide and Help Files
Studio Backlot
Pinnacle learning center
YouTube
Download a FREE 15-day trial and discover all the essential and advanced video editing features that Pinnacle Studio delivers to make your videos look their best.
What’s New in Pinnacle Studio
Speed and Motion
Advanced Video Editing Projects
Featured products
 Pinnacle Studio 26 Ultimate
 Studio Backlot Membership
 Pinnacle Studio 26
 Vision FX 2.0
Creating the Flash/Quicksilver Effect
In this tutorial, you’ll learn how to give your video stars super speed like Flash or Quicksilver. You can try this effect with videos of your family members, friends or even your pets!
Click on any of the images below to view full-size.
Preparing for Filming
When filming footage for this effect, it’s highly recommended to use a tripod so that the footage is stable and stationary which will make it easier to edit.
You’ll need to have some starting footage of your subject taking off before disappearing, and then also some footage where the subject isn’t present for when they “disappear”. Finally, you’ll have footage of the subject reappearing at a position further down in the frame.
Setting Up the Footage in Pinnacle Studio
Drag your video clip onto A/V Track 2 and split the video into a few different sections using the Split Clips icon.
- Split as the subject is taking off into a run.
- Then split again once the subject has landed in a position further down in the scene.
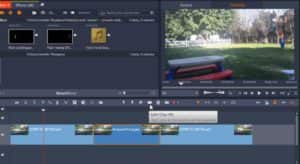
Between these two clips, place some footage of the scene without the subject to give the illusion that the subject has disappeared momentarily.
- Right-click on the clip in the middle where there is no subject and select Adjust Duration.
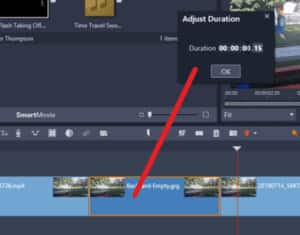
In this example we want the duration to be half a second. Since the frame rate for the project 30 frames per second we adjust the duration to 00.15 which is 15 frames.
Then click OK.
Taking Snapshots of the Subject
Drag the playhead to the point on the timeline where the subject is taking off in the frame directly before he disappears.
Use the Step One Frame Backward and Forward buttons under the preview pane to help you find the exact frame.
- Click the Snapshot button which will take a snapshot image of the frame that we can then mask.
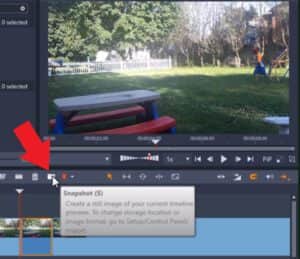
Note: To find out where this snapshot is saved on your computer, go to Setup > Control Panel. Then select Import and you’ll see where the snapshots are saved on your computer beside Snapshots Directory.
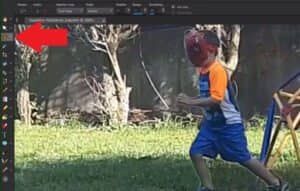
Masking the Subject in PaintShop Pro
Open up PaintShop Pro and open the snapshot you just took. Make sure your Layers palette is open by clicking on Palettes > Layers.
Choose a selection tool that will work best for your image. In this example we used the Freehand Selection tool, with the Selection Type set to Smart Edge.
You can also adjust the Smoothing level so that the edges won’t be so sharp.
Click from point to point to draw a selection marquee around the subject. Because we will be adding a blur effect later in Pinnacle Studio, the selection doesn’t need to be perfect.
Once you’ve finished masking your subject, right-click on the Layers palette and select Promote Selection to Layer.
Click on the eye icon beside the background layer on the palette. This turns off the visibility of the layer so we are just left with the masked subject.
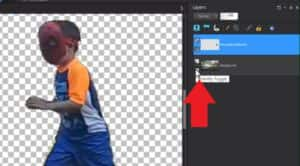
Go to File > Save As and save it as a .png file. The .png file format will preserve the transparency around the subject.
Adding the Blur Effect
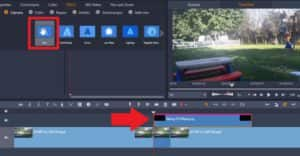
Import this mask into your Pinnacle Studio Project Bin then drag it onto A/V Track 1 on your timeline. Place it right after the subject takes off.
Double-click on the mask on A/V Track 1 to bring up the Effects Editor.
- Click on Effect > Camera > Blur.
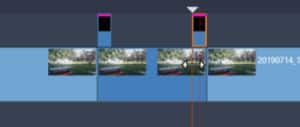
Under Blur Amount, adjust the Horizontal value to 17 and Vertical to 0. You can adjust these as much as you like.

- Right-click on the mask clip and go to Adjust Duration and change this to 2 frames.
Repeat the steps above for the frame when the subject lands at the end of the scene and place the mask just before the clip where the subject re-enters.
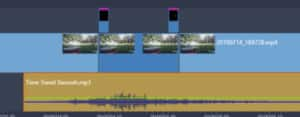
- Add a sound effect such as the Time Travel Swoosh onto A/V Track 3 right as the subject takes off to complete the effect.
Now let’s preview the video and you’ll see I’ve turned my subject into a little superhero!

Download a FREE 15-day trial and discover all the essential and advanced video editing features that Pinnacle Studio delivers to make your videos look their best.
