Want to make your next Pinnacle Studio production really stand out? In this tutorial we’ll show you how you can create custom transitions, like horizontal and vertical wipes, that whip, fly or zoom between scenes. You will learn how to use a PNG shape as a transition by using keyframes and effects to add movement and animation. You will also how to use the Split Screen template creator to design your own custom transitions that can be saved and used in future projects.
Thanks for watching! We hope you found this tutorial helpful and we would love to hear your feedback in the Comments section at the bottom of the page. You will find a written version of this tutorial below, and a printable PDF copy to download on the Download Resources tab above.
Download these free resources:
Written Tutorial and Sample Images (Zip, 2 MB)
Pinnacle Studio User Guide and Help Files
Studio Backlot
Pinnacle learning center
YouTube
Download a FREE 15-day trial and discover all the essential and advanced video editing features that Pinnacle Studio delivers to make your videos look their best.
What’s New in Pinnacle Studio
Effects, Filters and Transitions
Featured products
 Pinnacle Studio 26 Ultimate
 Studio Backlot Membership
 Pinnacle Studio 26
 Vision FX 2.0
How to Create Custom Transition Wipes
With Pinnacle Studio, you can get creative by making your own custom transitions via a number of different methods. Once you learn this technique that involves keyframing, effects and the Split Screen Template Creator, you will see that you have endless creative options to make your video projects look and feel completely original. If you want to follow along step-by-step with the directions below, make sure to download the sample PNG transition files before you get started.
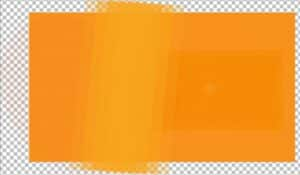
Here’s the PNG file that we used to create the first transition. You’ll notice that it has a transparent background, as indicated by the checkerboard background. You can create your own transitions like this using other shapes and images you find online, or you can create your own using a graphics program like CorelDRAW.
Set Up
Create a new Project Bin for your project. Import or drag and drop the 2 transition files you downloaded into the project bin, along with the video clips you would like to use.
Make sure that the resolution of the transition image is at least the size of your project to avoid the image appearing pixelated.
Note: you can set your project size by clicking on the Timeline Settings icon on the left of the Timeline toolbar.
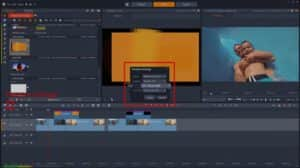
We want the transition image to wipe over the video clips, so place your video clips on A/V Track 2, and the 2 transition files on A/V Track 1.

How to Animate the Transitions
We want to have our transition image move from left to right and completely fill the Timeline preview window at the exact point where the first clip ends and the second begins. To do this:
- Position the timeline scrubber at the point where the first clip ends, and second clip begins.
- Click on the Editor tab > Properties.
- Click the Turn on/off keyframing icon beside Horizontal in the Position section. This will add the first position keyframe.
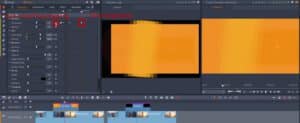
- Press Shift + Z twice to skip back 20 frames then drag the horizontal position to the left until the transition image is no longer showing in the Timeline preview window.
- Now skip ahead 40 frames by pressing Shift + X four times then drag the horizontal position to the right until the transition image disappears again.

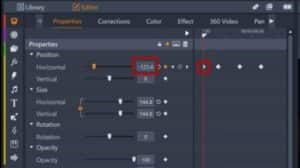
You might notice that when we added our first keyframe, Pinnacle Studio automatically created a header keyframe at the start of the clip with the same value as the first keyframe, so at the moment our wipe isn’t working correctly. We just need to copy the value of the left-hand (2nd) keyframe to the header keyframe, so our transition image stays offscreen until the playhead hits the left-hand keyframe.
In this example, the horizontal position of the left-hand keyframe is -123.4. Drag the position scrubber back to the header keyframe, represented by a left arrow. Now enter the same value, -123.4, in the horizontal position.
If you want the transition to wipe vertically rather than horizontally, follow the same steps as above but using the vertical position instead. You can also make the transition move diagonally, by adding keyframes to both the horizontal and vertical position at the same time.
Customizing Transitions with Effects
We can also use effects to further customize how the transition image is displayed, and use keyframing on the effects, rather than on the Position parameter of the transition image.
In the video, we are using the Shards GPU effect, which splits the transition image into multiple shards. You can find this effect under Effect > Artistic. Here is how the keyframes were set:
- At the zero point – the point where the first video clip ends and the second begins – there is a keyframe with the shards touching in the center and Rotation set to 0.
- Then with the keyframes either side, the Rotation is set to go from -124 on the left, to 0 in the center, to +124 on the right.
- The distance slider is pulled out on the left until all the shards are off screen, and then this value is matched on the right-hand keyframe.

So you can see how quick it can be to use effects to create something really compelling for your viewers! This is just using one effect – and with Pinnacle Studio, you have dozens of effects baked in that you could get creative with – just have a browse through the effects and have a look at what can be keyframed.
Creating Transitions with the Split Screen Template Creator
We can also create transitions with the Split Screen Template Creator. The advantage to this is that you can then save the transition and use it across multiple video projects. Let’s open the Split Screen feature and see how it works.
Click on the Split Screen icon on the Timeline toolbar to open the Split Screen Template Creator.

To create a similar wipe transition, we need three clips on screen, so we need to make two dividers. We will create a horizontal transition wipe again, so we add two vertical lines as our shapes.
- Select the Straight Line shape in the Shape Tools library, then click and drag to draw the vertical lines.
- If necessary, activate the Selection arrow in the Shape Tools library to grab and reposition your lines.
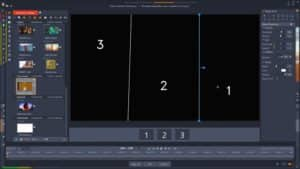
- Now drag your clips into the template, placing the plain white PNG sample file into the middle.
- In the Shape Properties section set the Rotation to -90 and the Border Opacity to 0 for both line shapes.
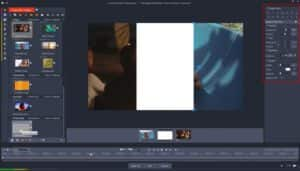
Now we need to set the keyframes for the transition points. First, move the timeline scrubber to 3 seconds in, then set your view to 50% – as we’ll be dragging our shapes off screen, and we need to see AROUND our finished split screen to see the locations of the shapes.
Select the left line shape and slide its horizontal position so it’s somewhere off the left-hand edge of the screen. Repeat this for the second line shape, but don’t drag it quite as far off screen.
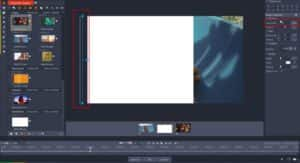
Now scrub ahead on the timeline to where we want the wipe to end – around one second is good.
Drag the horizontal position slider to the right this time, to position the shapes off the right-hand edge of the screen.
As we did with the first transition earlier in the tutorial, we need to go back to the first keyframe that we generated, and copy the position values to the header keyframe, so that the split screen just shows the first video clip until the transition begins at our first keyframe.

So now we have a simple white box wiping across the screen, revealing the second video clip. The advantage to the first method we showed in this tutorial is that we don’t have to have the wipe filling the screen at any point – our actual wipe can be much smaller. But with a couple of extra keyframes, we can make the wipe more dynamic.
- Position the timeline scrubber roughly midway between the two keyframes.
- Select the right-hand line shape.
- Move its horizontal position so it is roughly three quarters across the screen.
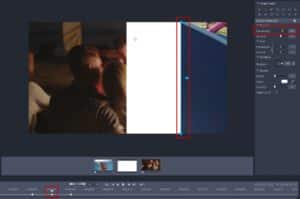
Now select the left-hand line shape and move its horizontal position so it is roughly one quarter across the screen.
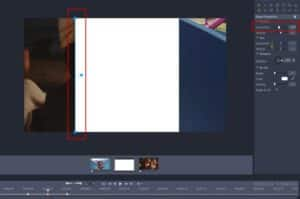
This makes the transition wipe effectively grow in size and then shrink as the transition progresses – just one of many customizations you could make to your own transitions!
And as mentioned, we can save this Split Screen Template to use again and again – simply replacing the clips in the sub-editor each time.
We hope this gives you a better understanding of the power of keyframing within Pinnacle, and how to create custom transitions that can take your projects to the next level.
Download a FREE 15-day trial and discover all the essential and advanced video editing features that Pinnacle Studio delivers to make your videos look their best.

