Learn how to create easy green screen effects with chroma key in Pinnacle Studio. In this tutorial we’ll show you how to replace the green background with a video or image of your own, how to eliminate any green screen border using Spill Suppression, and how to resize your new background footage to fit smaller green screen areas.
Thanks for watching! We hope you found this tutorial helpful. You will find a written version of this tutorial below, and a printable PDF copy to download on the Download resources tab above.
Download these free resources:
Written tutorial (PDF, 526 KB)
Download a FREE 15-day trial and discover all the essential and advanced video editing features that Pinnacle Studio delivers to make your videos look their best.
What’s new in Pinnacle Studio 25
Effects, filters and transitions
Featured products
 Pinnacle Studio 26 Ultimate
 Studio Backlot Membership
 Pinnacle Studio 26
 Vision FX
Easy green screen effects with Chroma Key
What is Chroma Key?
Chroma Key, also called chroma keying or color keying, is an editing technique for combining two video clips or images: an overlay and a background. The technique involves removing a specific color (usually green or blue) from the around the subject in the overlay to allow the background video or image to show through. A common example of the use of chroma key is a weather forecaster (overlay) in front of a weather map (background).
In Pinnacle Studio, we can use the StudioChromaKeyer tool for fast and easy green screen effects.
Replacing a full green screen background
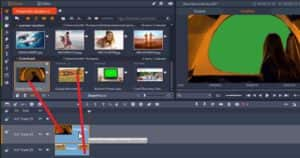
To begin, drag the background image or video you want to use from the Project Bin onto A/V Track 3. Then drag the green screen footage from your Project Bin onto A/V Track 2.

Note: I suggest leaving A/V Track 1 free in case you want to add a title later on.
To add the Chroma Key effect, double-click on the green screen footage on A/V Track 2 to bring up the Editor tab. Then click on Effect, and #4 Keyers.

Select StudioChromaKeyer.

From here, the tool will automatically make all the green background transparent, allowing you to see your background image or video.

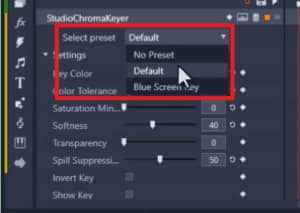
Under the StudioChromaKeyer tab, you can click on Select Preset and choose from:
- Default which is the Green Screen Key,
- Blue Screen Key if you’re using blue screen footage,
- Or you can choose No Preset if you want to customize all of the options yourself

There are also more settings you can play with including adjusting the Transparency or the Softness level.
Spill suppression is a neat tool you can use to help eliminate any green screen border along the edges of the foreground object.

Replacing a smaller sized green screen background
If you are working with a smaller sized green screen, you’ll need to make some adjustments to the foreground image, so it’ll show exactly what you want.
In this example, I have green screen footage of a person on a laptop and I want to replace the green background with my business website.

To do this, drag the green screen footage to A/V Track 2, then drag the video or image you want to replace the green screen with onto A/V Track 3.
Double-click on the green screen footage to bring up the Editor and select Effect >#4 Keyers > Studio Chroma Keyer.
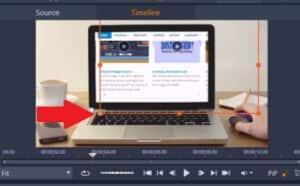
We can now see the video of the website through the laptop, but it is far too big, so we need to adjust it to match the screen size.
To do this, click on the media you want to resize on A/V Track 3. Go to the preview pane and adjust the orange boxes to resize your image to match the green screen size.

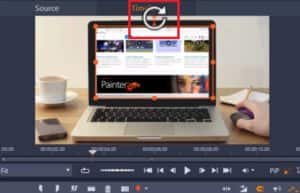
Hover over the top orange circle to rotate the image if necessary.

Now when I click Play, you can see it looks like the person is browsing on my website and I can use this to create a great promo video for my business!

Download a FREE 15-day trial and discover all the essential and advanced video editing features that Pinnacle Studio delivers to make your videos look their best.

