By Anand Dixit
CorelDRAW Master Anand Dixit shares his process to design a restaurant menu, with tips for document setup, design assets and printing considerations.
Start your FREE 15-day trial and embark on a design journey with powerful tools for vector illustration, layout, photo editing, typography, and collaboration.
Download these free resources:
Written Tutorial (PDF, 598 KB)
CorelDRAW Graphics Suite resources
Quick Start Guide (PDF, 2 MB)
Keyboard Shortcuts (PDF, 3.5 MB)
CorelDRAW and Corel PHOTO-PAINT user guides
For CorelDRAW Graphics Suite subscription and perpetual licenses (2018 to 2024), languages include English, Português do brasil, 简体中文, 繁體中文, Čeština, Deutsch, Español, Français, Italiano, 日本語, Polski, Русский
CorelDRAW Community
CorelDRAW learning center
Facebook
X (formerly Twitter)
YouTube
What’s New in CorelDRAW Graphics Suite
How to Design a Restaurant Menu in CorelDRAW
Designing a restaurant menu always poses its challenges. During the design process, designers need to consider many things like branding, content organization, reproducibility and cost-effectiveness.
Due to low print run, restaurant menus can be quite costly to produce; graphic designers typically find it’s their responsibility to be cost conscious and ensure their client is aware of budget restraints. Furthermore, the cost of post-printing processes like creasing, lamination, die cuts, job fabrication etc. also needs to be considered.
Job brief
For this menu design, we were required to create a multi-page menu that organized a wide variety of cuisines available at a 150-seat restaurant. We wanted to design a menu that was easy to navigate, so we created a menu design that differentiates each type of cuisine on a separate tab so that customers can find on their preferred cuisine in a glance.

Considering the print run is low, we thought digital printing would be the most economical way of printing. However, this limited us to using A3 Extra (12” x 18”) paper size.
Page Setup and Layout
Note: This job is different than normal jobs created in CorelDRAW. The terminology used to define the pages in design is:
1) Job Page(s): Actual page(s) in a finished job after printing.
2) File Page(s): Pages created and used in CorelDRAW file to create a design
To accommodate the required items and categories the menu needed to be 16 job pages at about A4 size. Therefore we need 8 file pages printed back to back on A3 Extra (12”h x 18”w) paper.
This menu layout has different page sizes and folding positions at different locations on each file page. Hence the normal practice of creating each job page on a separate page in a CorelDRAW file needs to be ruled out. Before you get started, it is a good idea to create a job dummy or scribble.This helps to understand the facing pages, sizes and the print pagination (print imposition).
1) Create a new CorelDRAW document (File > New or Ctrl + N) and set the number of pages to 8.
2) Change the Unit of measure to inches, and enter dimensions 17” width and 10” height, which will be digitally printed on a paper size of 12”x18”.
3) Set the Orientation to horizontal/landscape.
Using Guidelines
Before you add guidelines, go to the View menu and ensure that Guidelines and Rulers are both checked.
Guidelines can be added to the Master page as well as individual pages. Guidelines that are required on all file pages, such as page size, bleed margins or safe area, should be placed on the Guides layer of the Master page so that they appear on all file pages at same positions.
However, folding positions are different for each page in this job so the folding guidelines should be placed on the Guides layer on each page. The guidelines placed on the Guides layer of a page will appear on that particular page only.
We set up guidelines as indicated in the images below to define the margins and fold marks between left and right job page on each CorelDRAW page.
Sets of file pages to be printed back to back


To learn more about guidelines, watch our full tutorial on How to Align and Position Objects.
Now that we are done with setting up the file pages and guidelines, we can start adding design elements to create the menu.
Collecting Design Assets
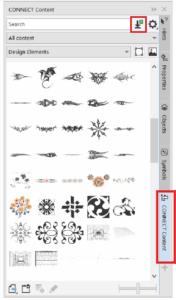
An easy way to find design assets such as backgrounds, photos, clipart and other vector images is right within CorelDRAW. Your CorelDRAW license comes with a huge library of ready-to-use royalty free vector images and photos. It can be accessed from the CONNECT Content docker (Window > Dockers > CONNECT Content).
NOTE: for CorelDRAW subscribers, you can access CONNECT content on the Local and Network Assets tab of the Assets docker.

You can search in the docker for vector images suitable for your design, and these vector images can be edited or adapted to suit the layout and color scheme of your document. Click on the Get More icon to the right of the search bar. From the Get More window, you can download a variety of free content. There is also content available for purchase.

Once downloaded, the items can be found in the CONNECT Content docker and you just have to drag them from the docker into your CorelDRAW document.
Creating and Using Symbols in CorelDRAW
Symbols are unique, user-defined objects and can be used to manage multiple instances of design elements in CorelDRAW files. Using symbols is a great way to speed up the design process and can also reduce file size when using a symbol in place of an object that appears many times.
Symbols can be created from an object or multiple objects. As an example, we created this symbol which appears on each page of the restaurant menu.

If you edit a symbol in a CorelDRAW file, it will automatically update all other instances of that symbol throughout the document.
How to Create a Symbol
1) Create an object (or a set of objects) by using tools in CorelDRAW as you would normally.
2) Select the object or set of objects, right-click and select Symbol > Create New Symbol.
3) Name the symbol in the Create New Symbol dialog box and click OK.
4) Go to Window > Dockers > Symbols to open the Symbols docker (or press Ctrl+F3).
5) To place a symbol in your document, just drag it from the Symbols docker.
TIP: Symbols can be exported to a symbol library as well as saved on local storage. Symbols that are saved to the library can be imported into any CorelDRAW file for use.
To learn more about symbols, watch our full tutorial Creating and Using Symbols.
Printing Considerations
Considering the limitation of back to back registration in process of digital printing, keep the following in mind:
- Check for Bleed and safe margins required.
- Tolerance for shifting of folding crease to some extent must be considered while designing.
- It is recommended that the first copy of digital prints must be tested to fabricate the final job. This will allow you to make necessary changes, if required, in the design before printing the complete job.
 CorelDRAW Graphics Suite
 Ultimate Vector Bundle Vol. 1
 CorelDRAW Standard 2021
 Ultimate Vector Bundle Vol. 2
 Corel Vector
Start your FREE 15-day trial and embark on a design journey with powerful tools for vector illustration, layout, photo editing, typography, and collaboration.

