
New to VideoStudio? It can often seem intimidating or overwhelming when using a new software program and not knowing where to start. Take a few moments and get to know the main components of the workspace before starting your first project. This tutorial reviews the Capture, Edit and Share workspaces as well as the different options available in each. We’ll also show you how you can customize the workspace to suit your own needs.
Thanks for watching! We hope you found this tutorial helpful and we would love to hear your feedback in the Comments section at the bottom of the page. You will find a written version of this tutorial below, and a printable PDF copy to download on the Download Resources tab above.
Download a FREE 30-day trial and turn your best moments and life experiences into unique movies with this easy and fun video editor packed with intuitive tools and creative effects.
Download these free resources:
Written Tutorial (PDF, 1 MB)
VideoStudio User Guides and Help files
For VideoStudio X9 to 2023, languages include English, Deutsch, Français, Italiano, Nederlands, 简体中文, 繁體中文, 日本語
What’s New in VideoStudio
Beginner VideoStudio Tutorials
Featured products
 VideoStudio Pro 2023
 Studio Backlot Membership
 VideoStudio Ultimate 2023
 Vision FX 2.0
Get to Know the VideoStudio Workspace
This written tutorial is a handy guide to understanding the various components of the VideoStudio interface. We will review the Capture, Edit and Share workspaces and the different options available in each. We’ll also show you how you can customize the Edit workspace to suit your own needs.
The Welcome Book
- Open VideoStudio into the very first screen and stop. This is known as the Welcome Book, the Welcome Screen or the Home tab.
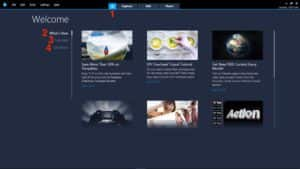
2. The What’s New tab is updated regularly with the latest tutorials, tips, blog posts, contests and more.
3. The Tutorials tab has a selection of our most popular tutorials from beginner to advanced.
4. Get More is your VideoStudio shopping mall for extras, templates, media files and effects. There’re even some freebies available (scroll to bottom of ALL tab).
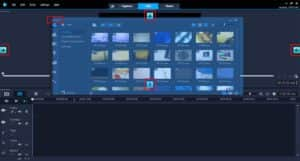
The Capture Workspace
Click on the Capture tab at the top center of your screen. Use this area to live capture content or download content off your external devices.
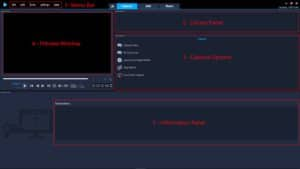
- Menu Bar — provides various commands for customizing VideoStudio, opening and saving movie projects, working with individual clips, and more. This bar is located in all three main tabs.
- Library Panel — a storage depot for captured media clips.
- Capture Options — displays different media capture and import methods.
- Click Capture Video to import video footage and photos from your camcorder.
- Use DV Quick Scan to scan your DV tape and select which scenes to save.
- Click Import from Digital Media to add already digitized media from a DVD-Video, AVCHD, Blu-ray formatted disc or from your hard drive.
- The ability to create Stop Motion animation is one of VideoStudio’s very cool and unique features.
- Depending on what version of VideoStudio you’re using this will be either Live Screen Capture or MultiCam Capture. When you click on it, it will launch the screen capture software in a separate window with settings you can adjust.
- Preview Window – is used to view and select the content you’ll be capturing in this tab. This will be covered in more detail later in this tutorial.
- Information panel — lets you view information about the files you are working with.
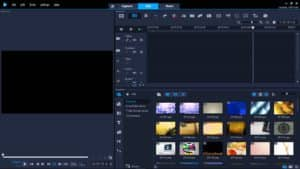
The Edit Workspace
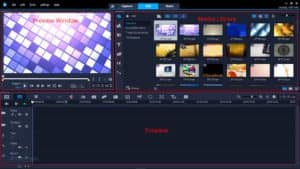
Click the Edit tab at the top center of your screen. To ensure your windows are in the same locations we’ll be discussing, make sure your workspace layout is set to the default. Under the Settings menu go to Layout Settings > Switch to > Defaults.
You can see that the Media Library is in the top right, as it was on the Capture tab, but now there are many media files in the library. Click on one of the video clips so that it displays in the Preview window. This will allow you to try out the controls and playback options we will be reviewing.
Starting with the Preview Window, playback controls from left to right are:
- Project/Clip mode lets you choose to preview the entire project or a selected clip
- Play lets you play, pause and resume the preview
- Home takes you to the start
- Previous moves you to the previous frame
- Next moves you to the next frame
- End takes you to the end
- Repeat lets you loop the playback
- Volume lets you adjust the volume of your computer’s speakers

There are also several other options available in the Preview panel:
Next is the Media Library,which holds all the content you can use in your timeline, including video clips, audio, images, titles, effects and more. To add media to the library, you can drag and drop from your desktop, or hit the Browse icon at the bottom left of the panel or go to File > Insert Media File to Library.
The media categories are listed vertically on the left side of the library. Each icon represents a different category. Let’s explore!
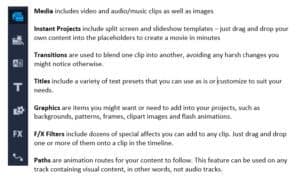
In each library category you will see dynamic icons along the top, that change depending on which category you have selected. We encourage you to explore these icons, as they provide options you might find helpful for sorting, filtering, and organizing the content in the library.

With any type of content in the library you can just drag and drop it on the Timeline to add to your video project. But you can also make adjustments using the Options panel.
To access the Options panel, simply double-click on the item in the timeline and the Options panel will open to the right beside the library. Depending on what type of content you have selected, you will have many different options to edit and customize.
You can also toggle between Library panel and Options panel view using the three icons in the lower right of the library. The left icon displays the Library panel; the middle icon displays both the Library and Options panels side by side, and the right icon displays just the Options panel.

Finally, the Timeline at the bottom portion of your screen is where you place your media into the various tracks for video, overlays, text and audio.
Notes:
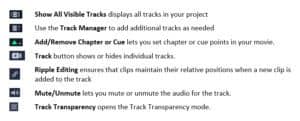
- Your movie will play from left to right
- The top track is your background, whether that be a video or an image
- Tracks below are for content that will get layered on top, such as overlays, titles, effects, etc.
This is what the timeline panel looks like:
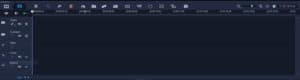
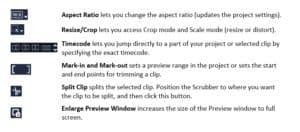
Let’s start with the tools on the left of the Timeline panel.
Use the Zoom in/Zoom out and Fit Project in Timeline icons to adjust the viewing area of your timeline content. You can use either the scroll bar or your mouse’s scroll wheel to navigate along your timeline as well.

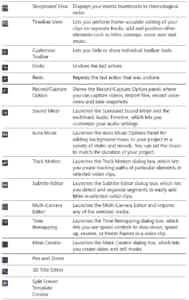
Now let’s look at the tools along the top of your Timeline.

Customizing the Edit Workspace
Each panel in the Edit workspace behaves like an independent window that can be modified according to your display preferences. This is very useful when using large displays or dual monitors.
Note: At any time, you can return to the default workspace layout by going to Settings > Layout Settings > Switch to > Default or press F7 on your keyboard.
In the far upper left corner of each panel (Preview, Library, Timeline) is a horizontal dotted line. This line can be grabbed by your mouse (the panel will turn blue) and pulled away from its current location, allowing you to re-deposit it elsewhere depending on the locations indicated by the arrows (docking guides) that pop up as you move it around. Grab a panel and hover your mouse over any of the docking guides and let go to snap the panel into place.
Once you have moved one panel into a new location, the other panels will re-arrange themselves to fit.
To save your new layout, go to Settings > Layout Settings > Switch to and choose one of three custom locations.
The Share Workspace
The third workspace in VideoStudio is the Share workspace. This workspace has all the options for exporting your project as a video file that can be played on a computer or a mobile device, burning your project to a disc complete with menus, or uploading your movie directly to a YouTube, Facebook, Flickr, or Vimeo account.
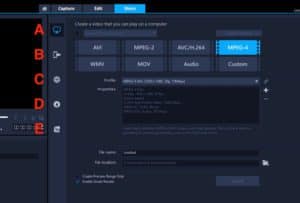
- Computer — Save to a file format that lets you play your movie on computers. You can also use this option to save the video soundtrack to an audio file.
- Device — Save to a file format that lets you play your movie on mobile devices, game consoles, or cameras.
- Web — Upload your movie directly to YouTube, Facebook, Flickr, or Vimeo. Your movie is saved in an optimal format for the site you choose
- Disc — Save and burn your movie to a disc or SD card.
- 3D Movie — Save your movie to a 3D playback format.
Download a FREE 30-day trial and turn your best moments and life experiences into unique movies with this easy and fun video editor packed with intuitive tools and creative effects.
