
It’s very easy to rotate video clips in VideoStudio. In this tutorial we’ll show you how to correct video orientation issues that occur when shooting in portrait mode. All you need to do is add your clip to the timeline, double-click to open the Options panel, and then use the Rotate Left or Right buttons to change to landscape orientation.
Want more options? Watch this tutorial for 3 creative ways to work with portrait-oriented video clips by applying masks and using backgrounds in VideoStudio Ultimate.
Thanks for watching! We hope you found this tutorial helpful and we would love to hear your feedback in the Comments section at the bottom of the page. You will find a written version of this tutorial below, and a printable PDF copy to download on the Download Resources tab above.
Download a FREE 30-day trial and turn your best moments and life experiences into unique movies with this easy and fun video editor packed with intuitive tools and creative effects.
Download these free resources:
Written tutorial (PDF, 673 KB)
Sample files (Zip folder, 35.7 MB)
VideoStudio User Guides and Help files
For VideoStudio X9 to 2023, languages include English, Deutsch, Français, Italiano, Nederlands, 简体中文, 繁體中文, 日本語
What’s New in VideoStudio
Beginner VideoStudio Tutorials
Featured products
 VideoStudio Pro 2023
 Studio Backlot Membership
 VideoStudio Ultimate 2023
 Vision FX 2.0
How to Rotate Video Clips in VideoStudio
Here’s how to rotate video clips that have been captured incorrectly. This usually happens when you’re shooting a video in portrait mode, instead of landscape. Different camera types can also produce different problems with correcting video orientation issues.
In this tutorial, you will learn:
- how to correct a video orientation issue when using a DSLR
- how to correct a video orientation issue when using a cell phone
- how to adjust the screen size and shape to make a corrected video fit properly
To get started, open VideoStudio in Edit mode. We will be working with the default interface layout shown below. You can press the F7 key to restore VideoStudio to the default layout.

Create a new content folder in your library and name it Rotating Videos. Import or drag and drop the two videos you just downloaded into your library.

- Drag the Halloween.MP4 clip into the top track (video) of the timeline
- Click Yes to the dialog box that appears
- Double-click on the clip in the timeline to open the Options panel
- Click ONCE on the Rotate Right icon (#1) here to get this result (#2)
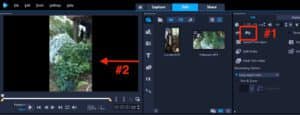
NOTE: If for any reason you don’t get this view, continue clicking the right or left rotate icon until you do.
This is the best you’ll be able to do in this situation. You can now use the Share tab to upload it to YouTube. YouTube will then add letterbox edging to fill the space on either side. It’s still not optimal as it still doesn’t and can’t fill the screen, so again, you’re better off shooting in portrait mode to begin with.

Ok, let’s try the other video where the camera orientation started out in portrait mode but was turned to landscape mid-shoot.
- Go to File > New Project to open a new project
- Drag the “Corvette.MOV” to the timeline and click Yes to the dialog box
- Go to Settings > Project Properties
- Select MPEG-4 AVC (1920 x 1080, 30p, 5Mbps)
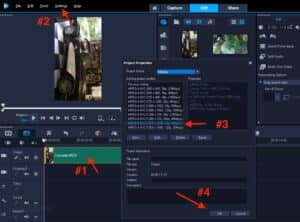
- Click OK and Yes to the dialog box
- The video should appear completely upside down
- Double-click the video in the timeline again to bring up the Options panel
- Because the video is upside down, click twice on either the Rotate Right or Rotate Left icon to correct the orientation
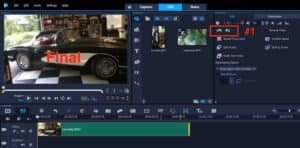
That’s all you need to do to rotate video clips in VideoStudio. You can now play the video and upload it to YouTube without any further adjustments.
Download a FREE 30-day trial and turn your best moments and life experiences into unique movies with this easy and fun video editor packed with intuitive tools and creative effects.
