
Learn how to transform a photo into a funky, pop art style image. PaintShop Professional Carole Asselin walks you through the steps of this simple process. You will learn how to change your color photo into a grayscale image, by adjusting Hue/Saturation and Brightness/Contrast, and then applying a Contour effect. The next step is to replace the different gray areas with the colors of your choice, using the Magic wand selection tool and Flood Fill tool.
Thanks for watching! We hope you found this tutorial helpful and we would love to hear your feedback in the Comments section at the bottom of the page. You will find a written version of this tutorial below, and a printable PDF copy to download on the Download Resources tab above.
Download your FREE 30-day trial and make every shot your best shot with PaintShop Pro, your all-in-one photo editing and design software.
Download these free resources:
Written Tutorial (PDF, 909 KB)
PaintShop Pro resources
Keyboard shortcuts (PDF, 173 KB)
PaintShop Pro User Guides
Partner and User websites
PaintShop Pro User Forum
Scrapbook Campus (Tips and tricks, workshops, master classes, and more)
Creation Cassel (Scripts, picture tubes, and other PaintShop Pro tools, plus weekly freebies)
PaintShop Pro Maniacs (Facebook group)
PaintShop Pro (Facebook group)
What’s New in PaintShop Pro
Artistic Tools and Projects
Featured products
 PaintShop Pro 2023 Ultimate
 AI HDR Studio 3.0
 PaintShop Pro 2023
 Vision FX 2.0
Turn your Photo into a Pop Art Image
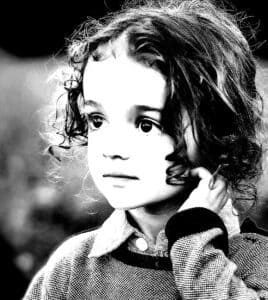
You might want to display some of your favorite photos in a unique way: as a pop art poster. It is easy to do with Paintshop Pro. Make sure you have a photo that has good contrast between the main subject and the background and you will be good to go.

Right-click on your image in the Layers palette and select Duplicate, to make sure you don’t alter your original photo. With the duplicate layer selected, turn your photo into a greyscale image using Adjust > Hue and Saturation > Colorize and set the Saturation to 0.

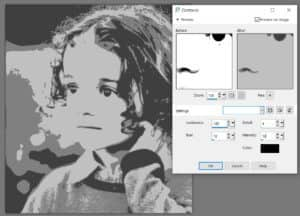
Increase the contrast with Adjust > Brightness and Contrast > Brightness and Contrast to a point that still shows the main details. For this particular image, we used a Brightness setting of 0 and a Contrast setting of 75.
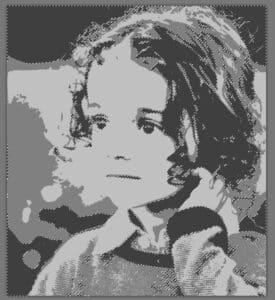
Now, you need to reduce the whole image to 3 well-defined levels of grey, which you will achieve with Effects > Artistic Effects > Contours with the following settings:
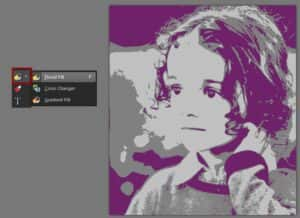
Now it is time to add some colors to make this image pop. Activate the Magic Wand; set the Match mode to RGB Value, Contiguous being unchecked and Anti-alias checked.

Then, select the area of the darkest grey.
Add a new Raster Layer. Choose a dark color in the Materials Palette. Use the Flood Fill tool to fill that selection with your chosen color.
Deselect by using Ctrl + D or Selections > Select None. Reactivate the initial layer with the grey image and use the Magic Wand to select the middle grey color with the same settings as before. Add a new Raster Layer. Choose a medium color and flood fill the selection with it.
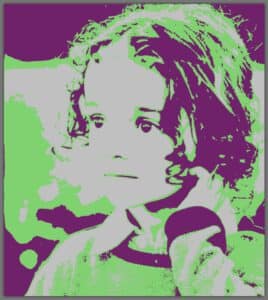
Finally, repeat the process with the lighter grey area. And you now have a uniquely customized pop art poster of your favorite photo.

Download your FREE 30-day trial and make every shot your best shot with PaintShop Pro, your all-in-one photo editing and design software.
