
In this tutorial, you’ll learn how to use the different Shape tools in PaintShop Pro to create preset shapes, rectangles, ellipses, symmetrical shapes, and more. You’ll also learn how to customize these shapes, fill a shape with an image, and save your own preset shapes to use in future projects.
Thanks for watching! You will find a written version of this tutorial below, and a printable PDF copy to download on the Download resources tab above.
Download your FREE 30-day trial and make every shot your best shot with PaintShop Pro, your all-in-one photo editing and design software.
Download these free resources:
Written tutorial (PDF, 1 MB)
PaintShop Pro resources
Keyboard shortcuts (PDF, 173 KB)
PaintShop Pro User Guides
Partner and User websites
PaintShop Pro User Forum
Scrapbook Campus (Tips and tricks, workshops, master classes, and more)
Creation Cassel (Scripts, picture tubes, and other PaintShop Pro tools, plus weekly freebies)
PaintShop Pro Maniacs (Facebook group)
PaintShop Pro (Facebook group)
What’s new in PaintShop Pro
PaintShop Pro tools
Artistic tools and projects
Featured products
 PaintShop Pro 2023 Ultimate
 AI HDR Studio 3.0
 PaintShop Pro 2023
 Vision FX 2.0
How to use the Shape tools
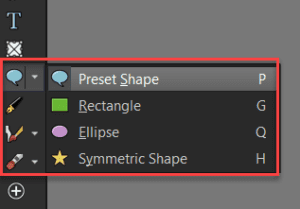
There are 4 different tools in the Shape tool group:
- the Preset Shapes tool, for creating a wide variety of objects such as callouts, arrows, flowers, hearts, and other basic shapes
- the Rectangle tool, for creating squares, rectangles and rounded rectangles
- the Ellipse tool, for creating circles and ellipses
- the Symmetric Shape tool, for creating stars and polygons
We’ll review how each of these tools are used and also show you how to edit and customize shapes, how to fill a shape with an image, and how to save your own preset shapes to use in future projects.
Click on any of the images below to view full-size.
Raster or vector shape?
When creating any type of shape, you can choose to place it on a raster layer or a vector layer by enabling or disabling the Create on Vector checkbox on the Tool Options palette. If you’re not sure which one to choose, it is best to start with a vector shape. With vector shapes you have more options for editing, and you can always convert it to a raster shape once you’re done editing.
Raster shapes:
- A raster shape is a pixel-based shape. If you try to enlarge a raster shape, the results often have a loss of image quality and look pixelated or blurry.
- You can modify raster shapes in a limited way by using the Pick tool to rotate, resize, skew or stretch the shape. And you can add effects, like a drop shadow.
- But you won’t be able to edit vector properties such as the outline or fill color, or the line segments or nodes.
- If you try to draw a raster shape on a vector layer, PaintShop Pro will automatically create a new raster layer for your shape.
Vector shapes:
- A vector shape is made up of paths, contours, line segments and nodes. Vector shapes can be enlarged without a loss of image quality.
- You can modify vector shapes in a limited way by using the Pick tool to rotate, resize, skew or stretch the shape.
- You can also edit the vector properties by using the Pen tool or by accessing the Vector Property window as we’ll demonstrate later in this tutorial.
- You can’t add any effects from the Effects menu to a vector shape, but you can easily convert it to raster by right-clicking on the layer in the Layers palette and selecting Convert to Raster Layer. Do this only when you are finished editing the vector properties.
- If you try to draw a vector shape on a raster layer, PaintShop Pro will automatically create a new vector layer for your shape.
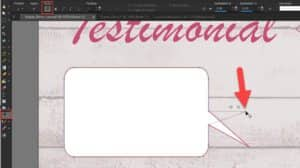
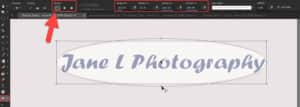
The Preset Shapes tool
To activate the Preset Shapes tool, click on the Callout icon on the Tools toolbar or press P on your keyboard.
Once you have activated the tool, the Tool Options palette along the top will present you with various settings.

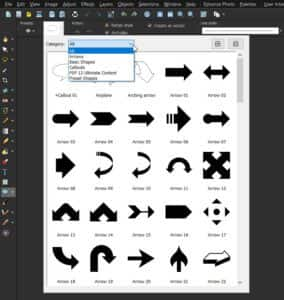
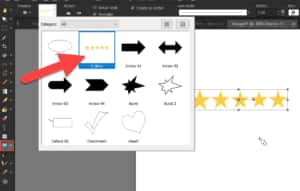
1-Select a shape
You can open the Shape list dropdown window to select a preset shape, and within this window you can use the Category dropdown to display only certain types of shapes.
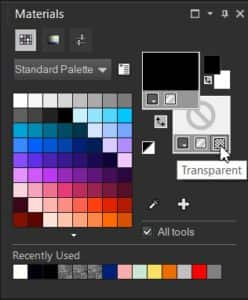
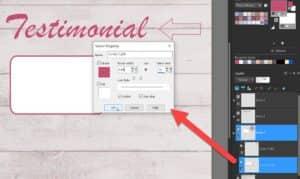
2-Fill and outline colors
To change the color of the preset shape, first uncheck the Retain style check box on the Tool Options palette and then select colors from the Materials palette.
- The Background color (bottom swatch) sets the fill color, and the Foreground color (top swatch) sets the outline color.
- If you don’t want your preset shape to have a fill, click the Transparent button under the Background and Fill swatch before dragging out your shape.
3-Shape outlines
On the Tool Options palette, choose a line style from the Line Style drop-list. Choose a stroke width by setting a value in the Width control.
Once you have adjusted these settings to your liking, just click and drag to create your shape. Here are some additional tips:
- As you are dragging to create your shape, try moving your mouse up, down, left, or right while still holding down the mouse button – this will flip the shape horizontally or vertically.
- To create a shape with the same aspect ratio as the one in the Shapes list, simply hold down Shift while you drag out your shape.
- To draw a shape from its center, right-click and drag.
- If you hold down Shift while you right-click and drag, it will draw the shape from the center and allow you to rotate while dragging.
Editing a vector shape
To edit the outline and fill colors, line style or outline stroke width of a vector shape, right-click on the shape layer within the vector group in the Layers palette and select Properties. This will open the Vector Property window, where you can make changes to these attributes.
To edit the lines and node of the shape, make sure the shape is selected then activate the Pen tool. On the Tool Options palette, click the Edit Mode icon. With the Pen tool you can reposition any of the nodes to change the shape of the object, change the node type, etc.
To learn more about editing with the Pen tool, watch the full tutorial How to use the Pen tool.
Remember, if you want to apply an effect like a drop shadow to a shape, you either need to create the shape on a raster layer or convert the vector shape layer to a raster layer.
The Rectangle tool
To activate the Rectangle tool, click on the Rectangle tool icon on the Tools toolbar or press G on your keyboard. On the Tool Options palette you can choose either the Draw Rectangle or Draw Square mode.
You can set the fill and outline colors, and line style and width before you draw your rectangle, the same way as we did for the Preset Shape tool. But you can also change these properties after you have drawn your rectangle, as long as you haven’t clicked the Apply checkmark.
- If you enable the Show Nodes option on the Tool Options palette, you can manually drag these corner nodes inward to create rounded corners. You can also use the Horizontal and Vertical Radius fields to round the corners.
- To change the way the line segments join, you can choose Miter join, Round join, or Bevel join from the Join drop-list.
Now just click and drag to draw out your shape. To draw a rectangle or square from its center, hold down CTRL while dragging to create your shape. Once you are happy with your shape, click the Apply checkmark.
You can also use the Pick tool to individually, resize, reposition, or rotate any of the shapes you have drawn.

The Ellipse tool
To activate the Ellipse tool, click on the Ellipse tool icon on the Tools toolbar or press Q on your keyboard. On the Tool Options palette you can choose either the Draw Ellipse or Draw Circle mode. As with the Rectangle tool, you can set colors and line styles before or after you draw your shape, and you just need to click and drag to draw out your circle or ellipse.
- If you want to adjust the shape of the ellipse you have drawn, click on the Edit Mode icon on the Tool Options palette and then you will be able to use the nodes on the bounding box to drag in or out, up or down, or diagonally.
- You can also change the shape and position of the ellipse using the Radius X/Y and Center X/Y fields on the Tool Options palette, but those are for more precise editing.
Once you are happy with your shape, click the Apply checkmark.
The Symmetric Shape tool
To activate the Symmetric Shape tool, click the Symmetric Shape icon on the Tools toolbar or press H on your keyboard. On the Tool Options palette you can choose either Draw Polygon or Draw Stellated mode.
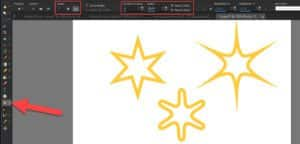
- For either mode, you can set the Number of sides. For example, create a triangle by drawing a 3-sided polygon, or create a starburst by drawing a 20-sided star.
- Enable Show Nodes for both stars and polygons, if you want to further modify the shape in Edit mode as we demonstrated with the previous shape tools.
- Mark the Rounded Outer or Rounded Inner check box to apply rounded outer or inner corners to the star. For polygons, you can only apply Rounded Outer to corners.
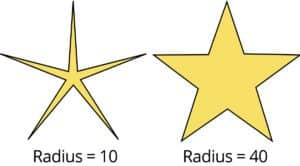
- Set a Radius value for the star shape – a small value will produce a star with narrow sides and a higher value will produce wider sides.
Once you have adjusted the settings to your liking, click and drag to draw your shape. To draw the shape from its center, hold down CTRL while you drag out the shape.
How to save a custom shape
You can also save any of your created shapes as presets. This is helpful if you want to reuse certain color combinations for fill and outline, or certain line styles and widths, or both. And if you used Edit mode to transform a shape into something new, you can save it as a preset to use again.
- First, draw your shape on a vector It could be a single shape, or multiple shapes (like a cluster of stars.
- If you have more than one object, select them all in the Layers palette, right-click on one of them and choose Group to group them together.
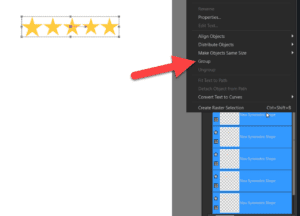
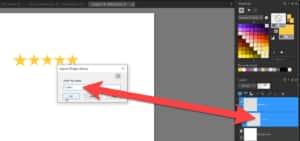
- Rename the shape layer (single shape) or group layer (multiple shapes) to what you want the shape to be called in the list of preset shapes, for example “5 stars”.
- Go to File > Export > Shape
- Enter a file name for your shape preset. It is important that the file name matches the layer name.
Now when you activate the Preset Shape tool you will see your saved preset in the Shape list to use in future projects.
Note that the settings and properties for your new saved presets work the same as other preset shapes. If you want to preserve the color and line properties of your preset, make sure that Retain Style is checked on the Tool Options palette. If you leave that option unchecked, you can edit your new preset in the same ways that we demonstrated earlier.
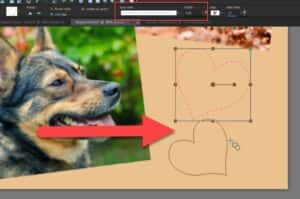
Filling shapes with images
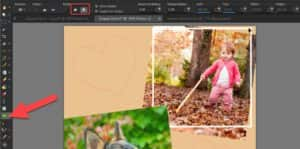
You can also use shapes to create cut-outs that are filled with your photos.
- To create a shape cut-out, open a copy of the image that you want to use as a fill.
- Choose any of the Shape tools from the Tools toolbar.
- On the image, click and drag to create the shape.
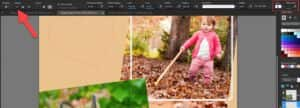
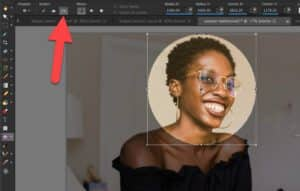
- On the Tool Options palette, click the Cutter Preview button.
A semi-transparent mode is activated that lets you preview the cut-out. You can now adjust the position, size, or rotation of the proposed cut-out using the control handles for the object.
Once you have the cutter preview positioned as you want it, click the Shape Cutter button on the Tool Options palette.
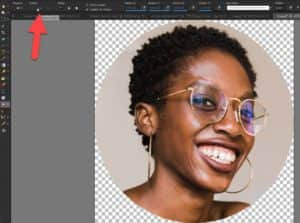
The cut-out is now filled with the underlying photo and is created as a new file with a transparent background.
A layer and mask are also created on the current image.
NOTE: If you want to save the new file with transparent background, make sure to save it as a PNG file to preserve the transparency.

Have fun experimenting with the different shape tools to create collages and graphic design projects in PaintShop Pro!
Download your FREE 30-day trial and make every shot your best shot with PaintShop Pro, your all-in-one photo editing and design software.

Comments (2)
Reader Interactions
Comments
I can’t find the “retain styles” check box in the Tools Palette (or anywhere) to uncheck so that I can make my ellipse shape transparent. Help! I have PaintShop Pro 2021 on a Windows 11 computer.
Hi Donna,
The Retain Style checkbox is only available when you have the Preset Shape tool active. If you are using the Rectangle or Ellipse shape tool, you can make it transparent by clicking the Transparent (checkerboard) icon for the Background and Fill swatch in the Materials palette.
Hope this helps!
The Discovery Center team